Thursday, December 15, 2016

December Release In Review

Good morning, friends, and welcome to my Release In Review post for this month's Papertrey Ink countdown! I have a handful of additional projects to share with you, so let's get to them.

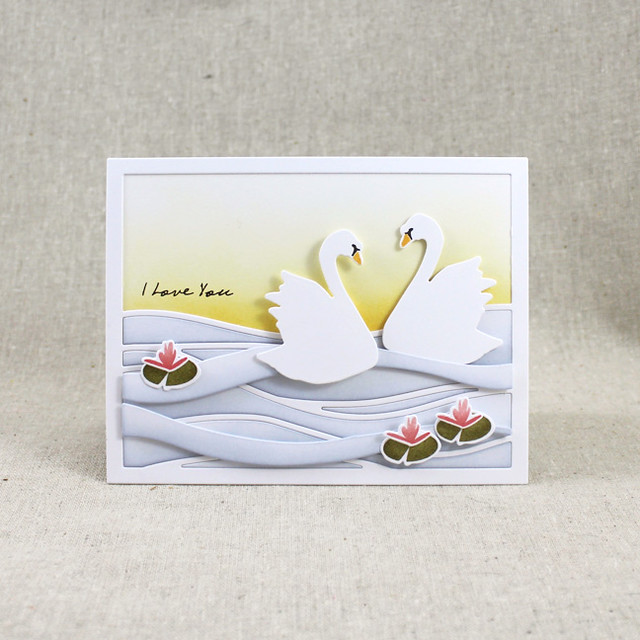
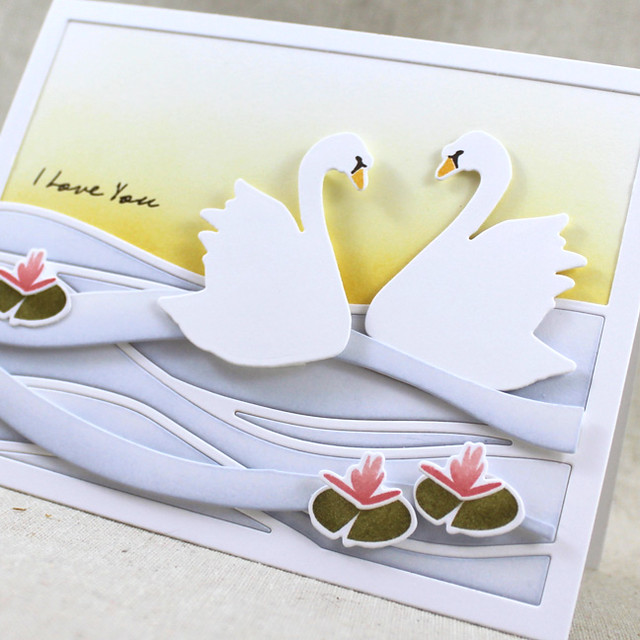
First up, I have a card featuring Maile's new Swan'sational set.

I Love You Swans Card

This set is so elegant. I used the Cover Plate: Waves die to create a little scene, trimming out a few of the waves to create more sky space. I sponged each wave with Spring Rain ink and used the extra waves to create additional texture. I sponged the background with Harvest Gold and Summer Sunrise to give a soft glow.

I Love You Swans Close Up

I die cut the swans, stamping only their details, and tucked them into the waves. Then I added the waterlilies for an extra pop of color.

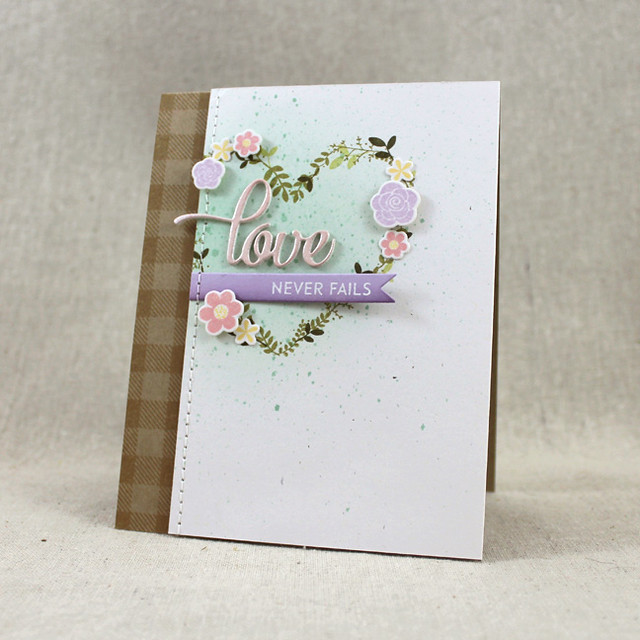
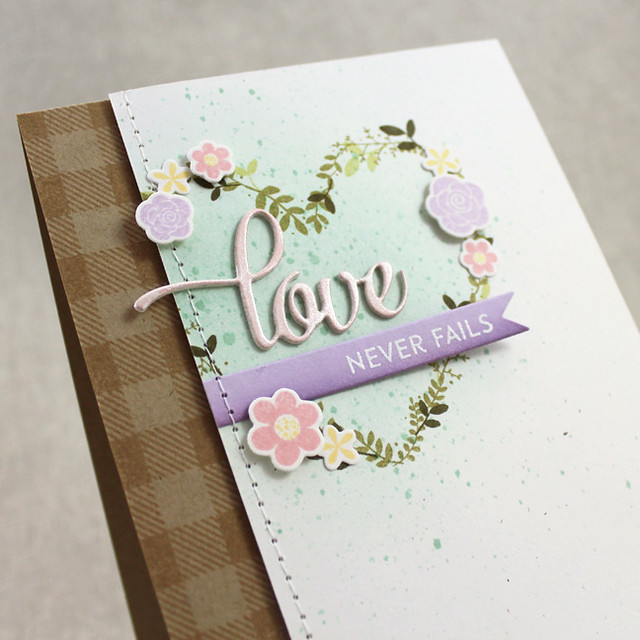
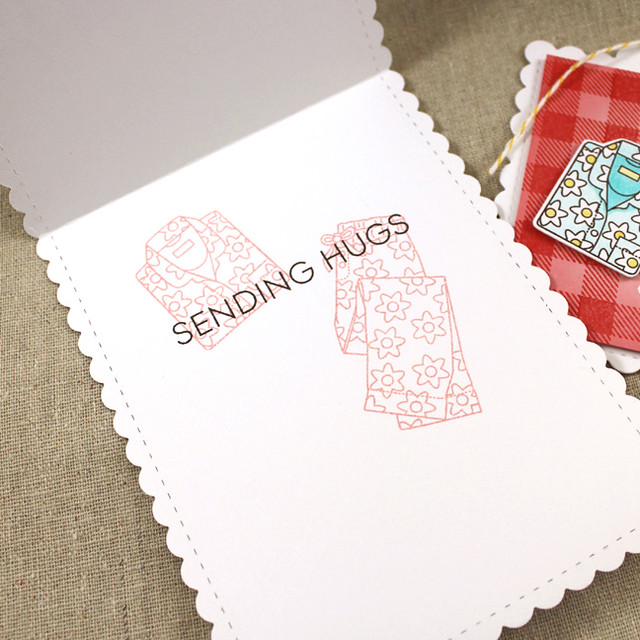
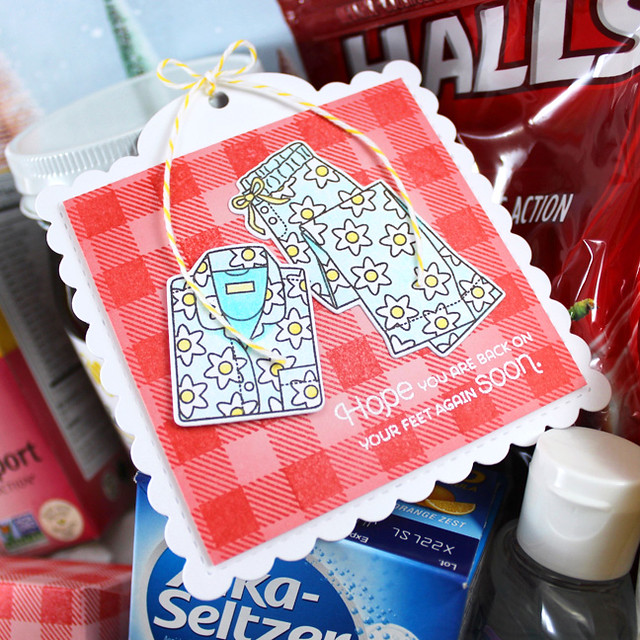
Next up, I've paired Heather's new To Have & To Hold set with Betsy's Inspired: Love.

Love Never Fails Card

I sponged a Rustic White panel with Aqua Mist before I stamped the heart-shaped wreath in Prairie Grass, Spring Moss, and Olive Twist. I heat embossed the sentiment from Inspired: Love onto a Lilac Grace banner and stitched it to the wreath panel.

Love Never Fails Close Up

Then I embellished the wreath with an assortment of flowers and adhered that panel to a Classic Kraft card base that I'd stamped with Background Basics: Super Gingham. I added a "love" die cut that I'd softly blended with Pale Peony ink and coated with Pearl pigment powder for shine. It's just the right amount of shimmer.
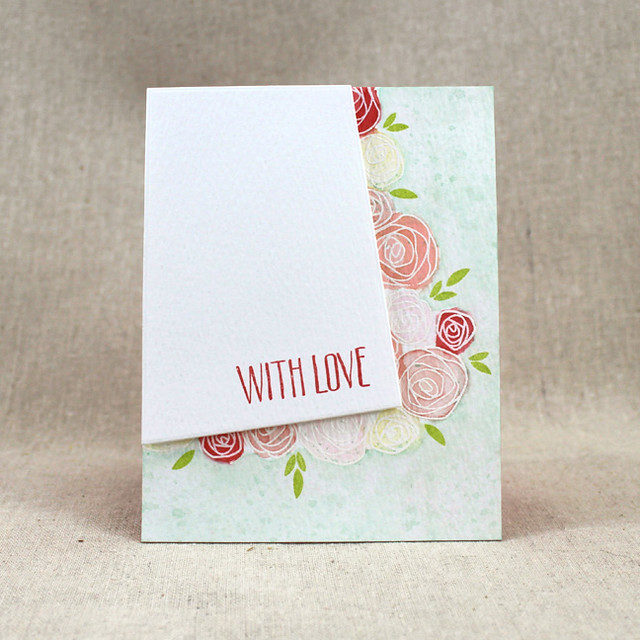
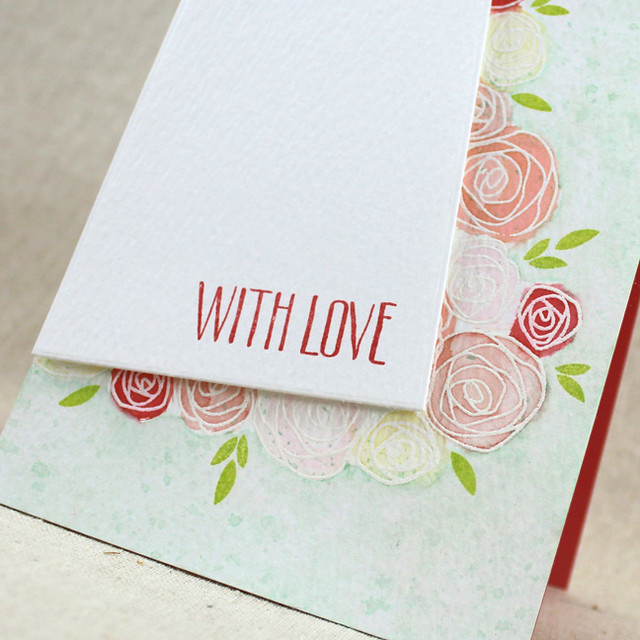
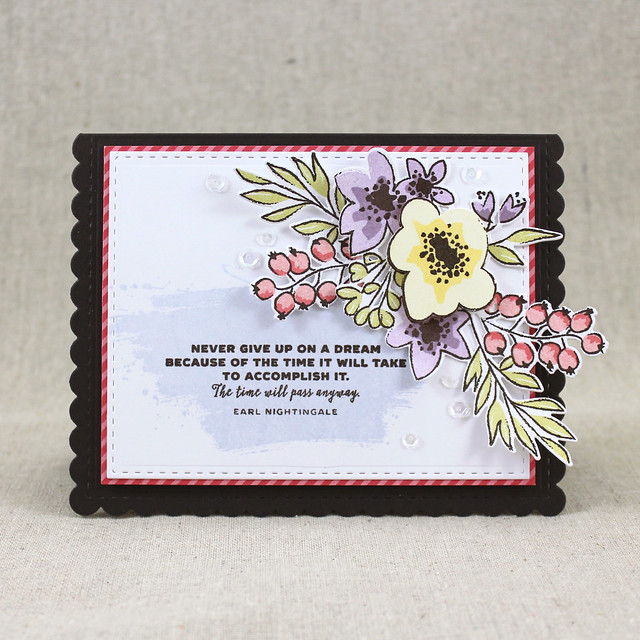
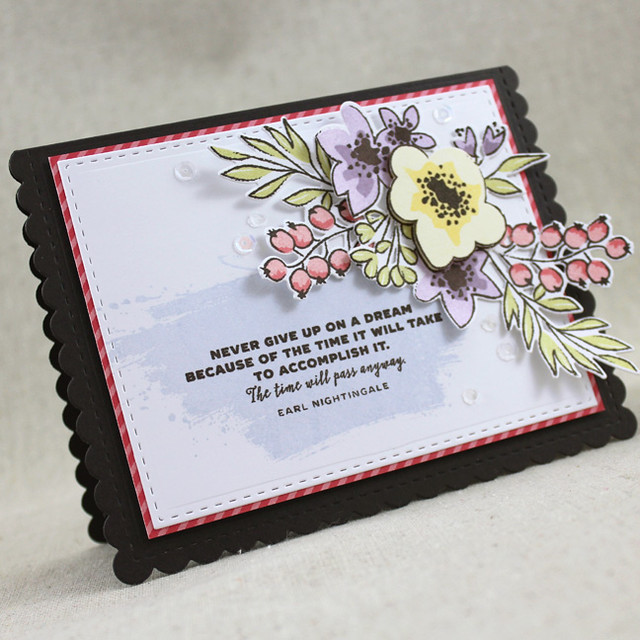
Maile's new Splits: With Love set is the star of this next card.

With Love Card

I heat embossed the floral blooms on a panel of watercolor paper and then added color with Harvest Gold, Pale Peony, Melon Berry, Berry Sorbet, and Aqua Mist inks. Once the background was dry, I stamped the leaves with Green Parakeet ink.

With Love Close Up

Then I die cut the smallest of the Tipped Tops shapes from additional watercolor paper and stamped the sentiment from the Splits set in Berry Sorbet ink. I love how all those colors are playing together!

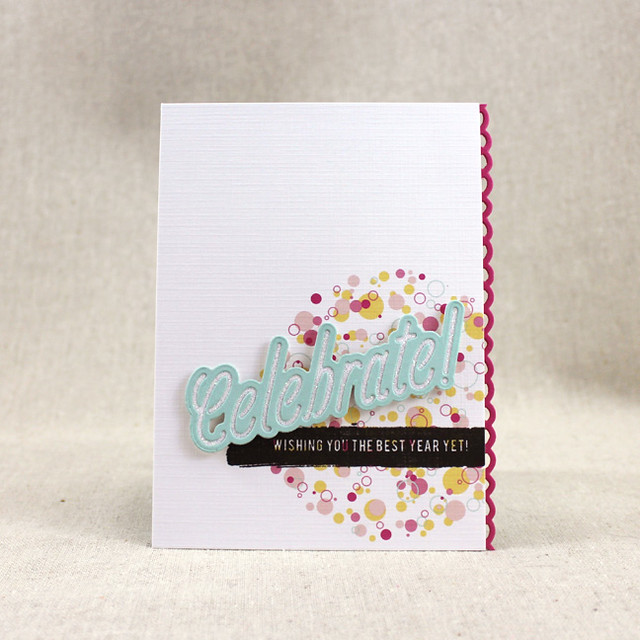
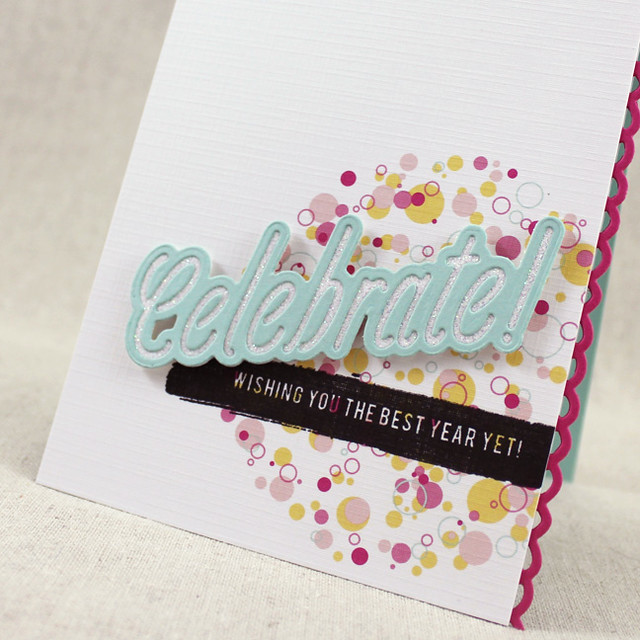
And last but not least this month I have Nichole's new Stroke Speak set paired with one of Betsy's Thick & Thin dies.

Best Year Yet Card

I stamped the brushstroke sentiment in black ink onto a piece of Confetti Toss patterned paper. Then I trimmed the panel down about 1/4" to make room for the scalloped border. Next, I die cut the "thick" Celebrate word die twice (once from white cardstock that I'd run through a Xyron machine and once from Aqua Mist).

Best Year Yet Close Up

The Aqua Mist layer went back through the die cut machine with the "thin" Celebrate die and then I layered the two pieces. I sprinkled on glitter and it stuck to the exposed adhesive in the "thin" part of the word. I adhered the "Celebrate" to the patterned paper panel with foam tape and then adhered the panel to an Aqua Mist card base.

Thank you all so much for joining me this week. Make sure check in with Nichole, Amy, Ashley, Betsy, Dawn, Heather, Kay, Laurie S., Laurie W., Melissa to see what other projects they have to share today. See you again soon!

Recipes:
I Love You Card
Stamps: Swan’sational - Papertrey Ink
Cardstock: white
Ink: Harvest Gold, Summer Sunrise, Spring Rain, Smokey Shadow, Pale Peony, Berry Sorbet, Prairie Grass, Olive Twist - Papertrey Ink
Other: Swan’sational Die, Cover Plate: Waves - Papertrey Ink; Foam Tape - Scotch

Love Never Fails Card
Stamps: To Have & To Hold, Inspired: Love, Background Basics: Super Gingham - Papertrey Ink
Cardstock: Classic Kraft, Rustic White, Lilac Grace - Papertrey Ink
Ink: Prairie Grass, Spring Moss, Olive Twist, Pale Peony, Lilac Grace, Winter Wisteria, Harvest Gold, Aqua Mist - Papertrey Ink; VersaMark - Tsukineko
Other: To Have & To Hold Die, Inspired: Love Die, Tag Sale #10 - Papertrey Ink; Foam Tape - Scotch; Sewing Machine; Pearl Pigment Powder - Perfect Pearls

With Love Card
Stamps: Splits: With Love - Papertrey Ink
Cardstock: Berry Sorbet - Papertrey Ink; Watercolor Paper - Ranger
Ink: Pale Peony, Berry Sorbet, Harvest Gold, Melon Berry, Aqua Mist, Green Parakeet - Papertrey Ink; VersaMark - Tsukineko
Other: Tipped Tops Die - Papertrey Ink; White Embossing Powder - Filigree; Foam Tape - Scotch

Best Year Yet Card
Stamps: Stroke Speak - Papertrey Ink
Cardstock: Aqua Mist, Raspberry Fizz, Confetti Toss Patterned Paper - Papertrey Ink; white
Ink: True Black - Papertrey Ink
Other: Thick & Thin: Celebrate Die, Loop De Loop Border Die - Papertrey Ink; Sugar Cube Glitter - Martha Stewart Crafts; Xyron

Wednesday, December 14, 2016

Mom & Me Valentine Inspiration

Good morning and welcome back to Day 5 of the Papertrey Ink December countdown. Today we're focusing on Valentine's Day! Coming up with cute, clever, and unique Valentines can be a challenge year after year. So Nichole and Betsy have designed some fantastic new products that will make it so much easier! Not only are these new stamps and dies adorable, but they're also so simple to use your kids can lend a hand.

Let's start with Betsy's Dress Up Dolls: Puppy Love set.

Puppy Love Valentines

I wanted to keep these little Valentines super simple so you could crank out a whole classroom's worth in an afternoon. I started by stamping the Bubble Talk speech bubble and sentiment and puppy from Betsy's new set onto a Tag Sale Quilted shape. Then, I used the Write Stuff Holders Die to add the pencil holder.

Puppy Love Valentine Close Up

Next, I colored the puppy very simply using colored pencils. I like to keep steps like coloring to a minimum whenever I'm mass producing and this is the sort of coloring that a kiddo may be able to handle after getting a little instruction.

Puppy Love Valentine Back

I adhered a second Tag Sale Quilted shape, this one in Pure Poppy, to the back of the first tag. This allows you to hide any scoring your cutting plate might have left behind and it also adds a little contrast behind the pencil holder. I tied a bow through the hole in the tag using baker's twine and added a "To:/From:" label sticker to the back. I dressed up the pencils with flags made from patterned paper and washi tape.

Be Mine Pencil Flag

The paper flags were die cut using the banner in the new Jumping For Joy Card Dies and stamped with a sentiment from Dress Up Dolls: Puppy Love before being adhered to the pencils. You could have your kids help with the die cutting and with attaching the flags to the pencils. They could also be filling out the "To:/From:" labels while you're doing some of the more skillful elements. The nice thing about the White Adhesive sheets is that it makes labels like these a snap!

Next up I have a gift bag made with the new Jumping For Joy collection. This collection includes a stamp set and dies that coordinate to create paper jumping jack toys. I remember these from childhood and I was so tickled to be able to put one together so easily.

No Lion Treat Bag

I began by creating my jumping jack. I chose to work with the little lion today. I began by die cutting all of the pieces from Harvest Gold and Summer Sunrise cardstocks. I added a bit of texture to the lion's mane by stamping one of the sunburst images from Shine in Canyon Clay. This is a step that honestly could be done by a child. I wasn't worried about making sure I was centered or anything and I stamped over areas a couple of times just to add a random effect. I also sponged a bit of extra ink around the edges to deepen things up a bit.

No Lion Treat Bag Close Up

Next, I stamped the lion's face using Summer Sunrise and Canyon Clay inks. I also added google eyes for an extra playful touch. Then, I stamped the lion's belly using Summer Sunrise and Canyon Clay inks. I did some sponging, but it would look equally cute with just one color or the other. Once all of the details were stamped, it was time to assemble my jumping jack.

Lion Jumping Jack Toy

You need brads and string, but it really is fairly simple. Just attach the limbs with the brads and then tie each pair together with string, twine, or thread. Then use a separate, longer string to tie the arms to the legs and have enough left over for a pull cord. I added a little toggle at the end of my string with some die cut circles stamped with a greeting from Jumping For Joy. It all sounds much more complicated than it really is. Mine came together in about 5 minutes.

Lion Jumping Jack & Treat Bag

You've got to have a clever way to present your jumping jack, right? Enter the Jumping For Joy Card Dies! I die cut the main rectangle from Aqua Mist patterned paper and adhered it to a white paper lunch bag. Then I die cut the banner from white cardstock and stamped the sentiment in Canyon Clay. I adhered the banner to the slot on the Card Die using foam tape and then tucked my jumping jack through the openings.

No Lion Bag & Peaches

I filled my treat bag with freeze dried peaches that I packaged in a clear cellophane bag tied with baker's twine. Other great healthy snacks might be trail mix, granola bites, freeze dried veggies, or fruit leather. And kids are great at helping portion out treats into bags - especially if they got to help choose the snack to be shared!

Thank you so much for joining me today. I hope to see you back here again tomorrow for this month's wrap up. In the meantime, make sure to pop in on Nichole, Amy, Ashley, Betsy, Dawn, Heather, Kay, Laurie S., Laurie W., Melissa, Erin, and Maile to see more inspiration. See you tomorrow!

Recipes:
Puppy Love Valentines
Stamps: Dress Up Dolls: Puppy Love, Keep It Simple: To & From, Bubble Talk - Papertrey Ink
Cardstock: Pure Poppy, Pale Peony + White Patterned Paper, White Adhesive Sheets - Papertrey Ink; white
Ink: Pale Peony, Pure Poppy, Smokey Shadow - Papertrey Ink
Other: Tag Sale: Quilted, Jumping For Joy Card Dies, Write Stuff Holders Die, Noted: Scalloped Square Die Collection, Red Chevron Washi Tape - Papertrey Ink; Teal, Cherry Baker's Twine - Divine Twine

No Lion Jumping Jack & Treat Bag
Stamps: Jumping For Joy, Shine - Papertrey Ink
Cardstock: Harvest Gold, Summer Sunrise, Aqua Mist Patterned Paper - Papertrey Ink
Ink: Summer Sunrise, Canyon Clay, Fresh Snow - Papertrey Ink
Other: Jumping For Joy Card Dies, Jumping For Joy Dies - Papertrey Ink; White Embossing Powder - Filigree; Gold Brads - Making Memories; White Crochet Thread; White Paper Lunch Bag; Google Eyes

Tuesday, December 13, 2016

Feel Better Inspiration

Good morning and welcome back to Day 4 of the Papertrey Ink December countdown. Today we're sharing projects for our under-the-weather friends and family. It's never fun to be sick, but a care package can make even the ickiest days a little bit brighter. Erin has designed a whole collection of products that will make it a breeze to deliver a ray of sunshine to your laid-up loved ones.

I've put together a gift basket full of my favorite sick day staples along with some adorable coordinating accessories I created to make it even more special.

Get Well Gift Basket

I filled my basket with a magazine, tea, a jar of local honey, cough drops, Alka-Seltzer + Cold, hand sanitizer, tissues, and lip balm. I don't know about you, but these are all things I reach for the moment I begin to feel a cold coming on.

Mini Gingham Tissue Box

Erin designed a tiny Tissue Box Cover Die to help you dress up mini packages of tissues. The result is so stinkin' cute! I created my box by stamping the Background Basics: Super Gingham pattern in Berry Sorbet on Pale Peony cardstock. I die cut two shapes and assembled the box, tucking the tissues inside before sealing it up.

Take It Easy Card

Then I created a card using Erin's Take It Easy set and her Cozy Bed Dies. I used Background Basics: Super Gingham in Berry Sorbet on Pale Peony for the comforter. Background Basics: Woodgrain came in handy to add texture to the headboard. The sheet and pillow case were sponged with Lemon Tart and the card base was sponged with Aqua Mist before I adhered the bedding layers and stamped the sentiment. I love how you can change the headline on the little newspaper. Such a fun detail!

Take It Easy Card Interior

On the inside of the card I stamped the pajamas in Pale Peony and the sentiment from Keep It Simple: Sending Hugs in Smokey Shadow.

Back On Your Feet Tag

I also made a tag with Take It Easy to tie to coordinate with my gift basket. I used Tag Sale: Quilted as the base and added a layer of Pale Peony cardstock that got the gingham treatment. I heat embossed the sentiment before I stamped the pajamas in Smokey Shadow and colored them with colored pencils. I adhered them to the tag with flat and foam adhesives for a bit of texture and then tied on a bit of yellow baker's twine. I love how easy it was to make everything coordinate!

Thank you so much for joining me today! Make sure to pop in on Nichole, Amy, Ashley, Betsy, Dawn, Heather, Kay, Laurie S., Laurie W., Melissa, Erin, and Maile to see more inspiration. Have a wonderful day and I'll see you back here again tomorrow.

Recipes:
Mini Gingham Tissue Box
Stamps: Background Basics: Super Gingham - Papertrey Ink
Cardstock: Pale Peony - Papertrey Ink
Ink: Berry Sorbet - Papertrey Ink
Other: Tissue Box Cover Die - Papertrey Ink; Scor Tape

Take It Easy Card
Stamps: Take It Easy, Background Basics: Super Gingham, Keep It Simple: Sending Hugs - Papertrey Ink
Cardstock: Pale Peony, Berry Sorbet, Classic Kraft - Papertrey Ink; white
Ink: Berry Sorbet, Aqua Mist, Classic Kraft, Lemon Tart, Smokey Shadow, Pale Peony - Papertrey Ink
Other: Cozy Bed Dies, Take It Easy Die, Noted: Scalloped A2 Vertical Die - Papertrey Ink; Colored Pencils - PrismaColor; Foam Tape - Scotch

Back On Your Feet Tag
Stamps: Take It Easy, Background Basics: Super Gingham - Papertrey Ink
Cardstock: Pale Peony - Papertrey Ink; white
Ink: Berry Sorbet, Smokey Shadow - Papertrey Ink; VersaMark - Tsukineko
Other: Take It Easy Die, Tag Sale Quilted - Papertrey Ink; White Embossing Powder - Filigree; Foam Tape - Scotch; Colored Pencils - PrismaColor; Lemon Baker's Twine - Divine Twine

Monday, December 12, 2016

Celebrating Love: Now & Then

Good morning and welcome back to Day 3 of the Papertrey Ink countdown. Today is all about love! Love is one of the most joyful reasons we have to make cards. And thanks to the products we're introducing today, celebrating weddings and anniversaries just got even easier! You're sure to fall head over heels for the beautiful details included in these fantastic collections. Let's take a closer look, shall we?

I've used Betsy's new Paper Clippings: Love Story set to create a romantic wedding card.

True Love Story Card

I used Autumn Rose and Scarlet Jewel inks to stamp the cover of the book. The pages I stamped with Fine Linen and the edges of the pages are stamped with Classic Kraft. I then stamped over the edges of the pages with VersaMark and used Pearl Perfect Pearls to make it look like the pages were gilded. I stamped the writing with Smokey Shadow before die cutting the book with the Details die.

True Love Story Close Up

Next I sponged Lovely Lady ink onto a white card base and stamped the sentiment with Scarlet Jewel. I added the hearts in Autumn Rose and adhered a Cover Plate: Delightful frame that I'd cut from White Shimmer stock.

True Love Story Card Angle

Then I cut the narrow banner from Tag Sale #10 (creatively cut to make it a bit longer) from Autumn Rose cardstock. I heat embossed a sentiment from Keep It Simple: Wedding using white powder and adhered it into place.

I also have a Making Strides card to share with you today.

Progress Is Progress Card

I began by stamping a small collage of triangles from Sketched Shapes using an array of ink colors. I wanted it to look like a handful of stylized arrows pointing the recipient in a "forward" direction.

Progress Is Progress Close Up

Then, I stamped the sentiment in True Black and adhered the panel to a white card base with foam tape. It's a simple card, but its message is clear. It also happens to be easily adaptable to anyone depending on ink colors.

Thank you so much for joining me today! Make sure to check in with Nichole, Amy, Ashley, Betsy, Dawn, Heather, Kay, Laurie S.Laurie W., Melissa, Erin, and Maile to see more inspiration. Have a wonderful day and I'll see you tomorrow!

Recipes:
Love Story Card
Stamps: Paper Clippings: Love Story, Keep It Simple: Wedding - Papertrey Ink
Cardstock: White Shimmer, Autumn Rose - Papertrey Ink; white
Ink: Lovely Lady, Scarlet Jewel, Autumn Rose, Fine Linen, Classic Kraft, Smokey Shadow - Papertrey Ink; VersaMark - Tsukineko
Other: Paper Clippings: Love Story Details Die, Cover Plate: Delightful Die, Tag Sale #10 Die, Coaster - Papertrey Ink; White Embossing Powder - Filigree; Foam Tape - Scotch; Pearl Pigment Powder - Perfect Pearls

Progress Is Progress Card
Stamps: Making Strides, Sketched Shapes - Papertrey Ink
Cardstock: white
Ink: Vintage Jadeite, Hawaiian Shores, Lilac Grace, Summer Sunrise, Raspberry Fizz, True Black - Papertrey Ink
Other: Foam Tape - Scotch

Sunday, December 11, 2016

Making Strides - Day 2

Good morning and welcome back for Day 2 of this month's Papertrey Ink countdown. Thank you all so much for your kind words yesterday. You have no idea how much it meant to me. I truly appreciate that so many of you took the time to share your enthusiasm with me and I hope that you'll love this set and use it to encourage others. Nichole and Laurie will be featuring Making Strides today, so I hope you'll take a moment and check in with them. In the meantime, I have a few projects to share with you today!

My first project today pairs Making Strides with Nichole's fantastic new She Moves set.

Run With Your Heart Card

I created the rolling hill using the Sentiment Splits Curve Horizontal that I'd stamped with Background Basics: Woodgrain before heat embossing my sentiment with white powder. I used a strip of chevron washi tape to embellish that panel and set it aside.

Run With Your Heart Close Up

Next, I sponged a white card base with Aqua Mist ink and stamped clouds, also with Aqua Mist ink. Then, I sponged the heart and rays using the stencil from the Sunshine & Rainbows kit using Harvest Gold and Summer Sunrise inks. I adhered the hill to the card front and added a running figure from She Moves.

Next up, I have another card pairing Making Strides and She Moves. These sets work so wonderfully together!

Take Another Step Card

I began by stamping the She Moves figure, scribble, and stars onto a white card base. I added a Monthly Moments: Instant Photo 2 shape die cut from Harvest Gold patterned paper.

Take Another Step Close Up

I sponged Aqua Mist ink onto white cardstock and die cut it with the Happy Notes die before stamping my sentiment in Tropical Teal. I adhered the sentiment strip to the photo frame shape and then embellished with glittered sketched stars shapes.

Last up today, I tried something a little different. This time I created an encouragement card using Making Strides for a more general purpose.

Never Give Up Card

I began by die cutting a stitched panel using the Noted: Scalloped A2 Die Collection. I stamped the brushstroke image from She Moves as a background for my sentiment. I matted that panel with Berry Sorbet patterned paper.

Never Give Up Close Up

Then, I used Fresh Bouquet to add a floral spray, layering a couple of different die cuts to get a fuller look. I adhered all of that to a Smokey Shadow scalloped card base and then added a sprinkling of sequins to add a bit of sparkle.

That's all for me today, folks! Thank you so much for joining me today. Make sure to pop in on Nichole, Betsy, Dawn, Heather, Laurie, Melissa, and Maile for more projects. Have a great day and I'll see you tomorrow!

Recipes:
Run With Your Heart Card
Stamps: Making Strides, She Moves, Background Basics: Woodgrain, So Striking - Papertrey Ink
Cardstock: Green Parakeet, Stormy Sea - Papertrey Ink; white
Ink: Green Parakeet, Smokey Shadow, Aqua Mist, Harvest Gold, Summer Sunrise - Papertrey Ink; VersaMark - Tsukineko
Other: She Moves Die, Sunshine & Rainbows Kit (Heart & Rays stencil), Sentiment Splits Curve Horizontal, Chevron Washi Tape, Coaster - Papertrey Ink; White Embossing Powder - Filigree; Foam Tape - Scotch

Take Another Step Card
Stamps: Making Strides, She Moves - Papertrey Ink
Cardstock: Harvest Gold Patterned Paper - Papertrey Ink; white
Ink: Aqua Mist, Tropical Teal, Harvest Gold, Summer Sunrise - Papertrey Ink
Other: Happy Notes Die, Monthly Moments Instant Photo 2 Die, Sketched Stars Die - Papertrey Ink; Foam Tape - Scotch; Crystal Glitter - Martha Stewart Crafts

Don't Give Up Card
Stamps: Making Strides, She Moves, Fresh Bouquet - Papertrey Ink
Cardstock: Berry Sorbet Patterned Paper, Smokey Shadow - Papertrey Ink; white
Ink: Spring Rain, Smokey Shadow, Pale Peony, Berry Sorbet, Lemon Tart, Harvest Gold, Lilac Grace, Winter Wisteria, Spring Moss - Papertrey Ink
Other: Fresh Bouquet Die, Noted: Scalloped A2 Die Collection, Sunshine & Rainbows Kit (sequins) - Papertrey Ink; Foam Tape - Scotch

Saturday, December 10, 2016

Introducing Making Strides

Good morning, all, and welcome to Papertrey Ink's December countdown. I have a very personal set to share with all of you this month called Making Strides. I hope you don't mind if I share a little bit about how this set came to be.

Lizzie Jones - Before & During
The photo on the Left is from September 2013 after I had lost about 15lbs. It's the most recent photo I have in which I'm not hiding behind something. I was the same weight and in the same shape at the beginning of this year.
The photo on the Right is from yesterday.

I've struggled with my weight and fitness for my entire adult life. About a year and a half ago I decided I wanted to give a healthy lifestyle yet another shot. I looked online for motivation and I came upon pages and pages of inspirational quotes and phrases. It took me a little while to really commit, but I buckled down starting at the beginning of this year. Now I go to the gym 5-6 days a week. I've revisited many of those quotes to help me stay engaged even on those days that I really, really want to sleep in and make bad food choices. Sometimes you just need a kick in the pants, you know?

I thought other people might be in need of that same kind of motivation. I designed this set so we can all encourage each other and congratulate one another as we push ourselves toward our goals. And the great thing is, many of the sentiments are ideal for facing any sort of challenge, not just the physical ones. The set is also gender neutral, so it will work for anyone you want to encourage! Ok, enough yapping...let's get on to some projects!

Triathlon Cards

We have a few friends who run triathlons, and their accomplishments inspired me to create these cards. I paired Making Strides with the Moments Inked: Active Symbols set to put these together.

Women's Triathlon Close Up

I began by stamping the swimmer, bicycle, and running shoe icons in rows on white cardstock panels. I adhered those panels onto white card bases. Then, I sponged ink (Deep Indigo and Berry Sorbet) onto colored strips of cardstock (Spring Rain and Pale Peony) to add depth.

Men's Triathlon Card

I set those aside to dry thoroughly before heat embossing the Making Strides sentiment with white powder. I mounted the sentiment strips to the card fronts with coaster stock. It's a little flatter than foam tape and I like that subtle difference.

Thank you so much for joining me today! Make sure to pop in and visit Nichole, Betsy, Heather, and Kay for more introductions. See you tomorrow!

Recipe:
Stamps: Making Strides, Moments Inked: Active Symbols - Papertrey Ink
Cardstock: Spring Rain, Pale Peony - Papertrey Ink; white
Ink: Harvest Gold, Summer Sunrise, Berry Sorbet, Tropical Teal, Vintage Jadeite, Spring Rain, Deep Indigo - Papertrey Ink; VersaMark - Tsukineko
Other: Coasters - Papertrey Ink; White Embossing Powder - Filigree