Thursday, September 15, 2016

Release In Review

Good morning and welcome back for this month's Release In Review post for Papertrey Ink's new release countdown. I have a few more projects to share, so let's get to them!

I'd like to start today with a card I made with Holiday Greens, Holiday Greens Borders, and Keep It Simple: Happy Holidays.

Happy Holidays Geenery Card

I started by stamping a Rustic Cream card base with the cypress image in Spring Moss and Simply Chartreuse inks. Then, I added a couple of pine boughs in Ripe Avocado and Olive Twist. From there, I stamped and die cut a variety of Holiday Greens foliage.

Happy Holidays Geenery Close Up

Next, I die cut a Sentiment Splits: Horizontal Angle shape from Pure Poppy cardstock and sponged it with Americana ink. I heat embossed the Keep It Simple: Happy Holidays sentiment and adhered that layer to the card front. Then, I arranged the Holiday Greens images and adhered them to the card front with flat and foam adhesives. A Rustic Jute twine bow was the perfect finishing touch on this rustic number.

Next up is Maile's Splits: Merry & Bright set. I wanted to keep this card fairly cool and wintery.

Merry & Bright Splits Card

I started by partially die cutting the Splits: Merry & Bright frame from white cardstock. I stamped the image from the set using Spring Rain ink and then heat embossed the sentiment in the opening. Next, I sponged Winter Wisteria ink onto a white card base.

Merry & Bright Splits Close Up

I mounted the Splits panel into place with foam tape and added a strip of silver foil paper below the bottom edge. Then, I used clear rhinestones to embellish the Splits frame.

And lastly this month, I have a tag made using Dawn's Ombré Sentiments: Christmas.

Jingle Bells Tag

I began by die cutting the Tag Sale #9 shape out of Green Parakeet and white cardstocks. The white layer was stamped with the stripe border from Candy Cane Christmas using Pure Poppy ink. I also included the "to:" and "from:" from Keep It Simple: To & From in Smokey Shadow ink.

Jingle Bells Tag 2

Next, I heat embossed the sentiment from Ombré Sentiments: Christmas onto my Green Parakeet Tag. I then stamped the polka dots in Green Parakeet and sponged around the edges a bit with New Leaf. I tied the two tags together with Pure Poppy Twill and embellished with a single jingle bell and a bit of white crochet thread. I can't wait to use this tag one someone's package this year. The bell really makes it!

Thank you so much for joining me today! The other ladies are sharing the rest of their release projects too, so make sure to pop in on Nichole, Amy, Ashley, Betsy, Danielle, Dawn, Heather, KayLaurie, and Melissa for more beautiful projects. Have a great day and I'll see you again soon!

Recipes:
Happy Holidays Card
Stamps: Holiday Greens, Holiday Greens Borders, Keep It Simple: Happy Holidays - Papertrey Ink
Cardstock: Rustic Cream, Pure Poppy - Papertrey Ink
Ink: Pure Poppy, Spring Moss, Simply Chartreuse, Ripe Avocado, Olive Twist, Cocoa Bean, Dark Chocolate, Americana - Papertrey Ink; VersaMark - Tsukineko
Other: Holiday Greens, Split Sentiments: Horizontal Angle Die, Rustic Jute Button Twine - Papertrey Ink; Foam Tape - Scotch

Merry & Bright Card
Stamps: Splits: Merry & Bright - Papertrey Ink
Cardstock: Luxe Silver Adhesive Sheets - Papertrey Ink; white
Ink: Spring Rain, Winter Wisteria - Papertrey Ink; VersaMark - Tsukineko
Other: Splits: Merry & Bright Die - Papertrey Ink; Rhinestones - Mark Richards, Kaisercraft, Darice; Foam Tape - Scotch; Silver Embossing Powder - Filigree

Jingle All The Way Tag
Stamps: Ombre Sentiments: Holiday, Cane Cane Christmas, Polka Dot Basics III, Keep It Simple: To & From - Papertrey Ink
Cardstock: Green Parakeet - Papertrey Ink; white
Ink: Pure Poppy, Green Parakeet, New Leaf, Smokey Shadow - Papertrey Ink; VersaMark - Tsukineko
Other: Tag Sale #9, Pure Poppy Twill - Papertrey Ink; White Embossing Powder - Filigree; White Crochet Thread; Jingle Bell - Darice

Wednesday, September 14, 2016

Trimming The Tree

Good morning and welcome back to Day 5 of the Papertrey Ink new release countdown! Today we're showcasing a few fabulous ornament-themed stamps and dies. These ornaments are gorgeous on cards, packaging, and even decorating your home! I have a little something for everyone today, so let's get to it!

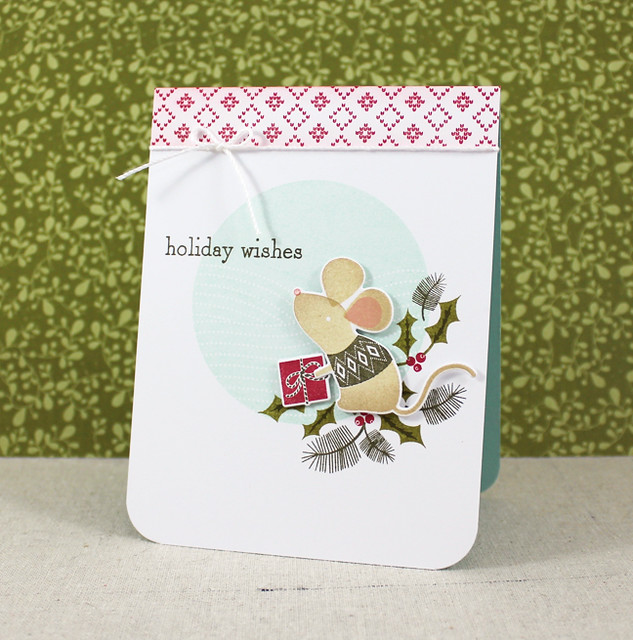
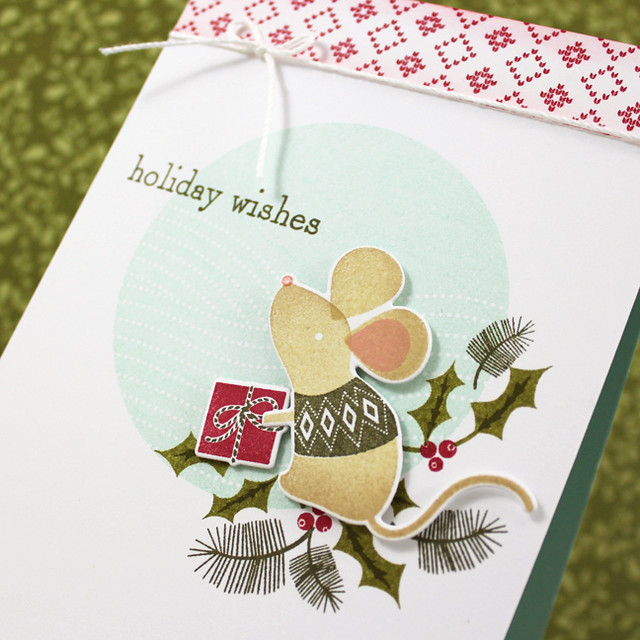
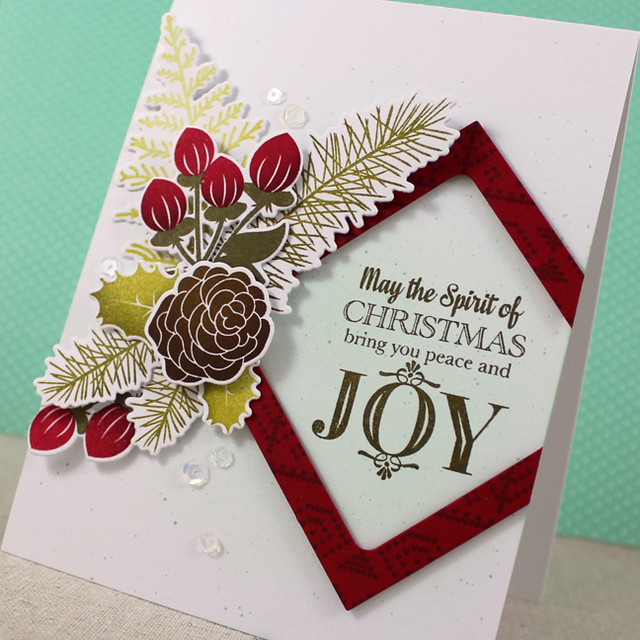
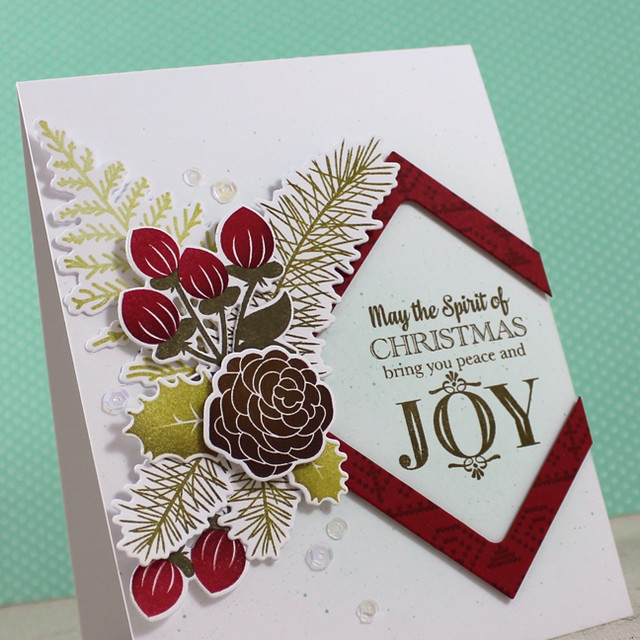
My first project today is a card featuring Dawn's Vintage Ornaments II and Holiday Greens Borders and Erin's Fancy Pants: Holiday sets.

Joy To The World Card

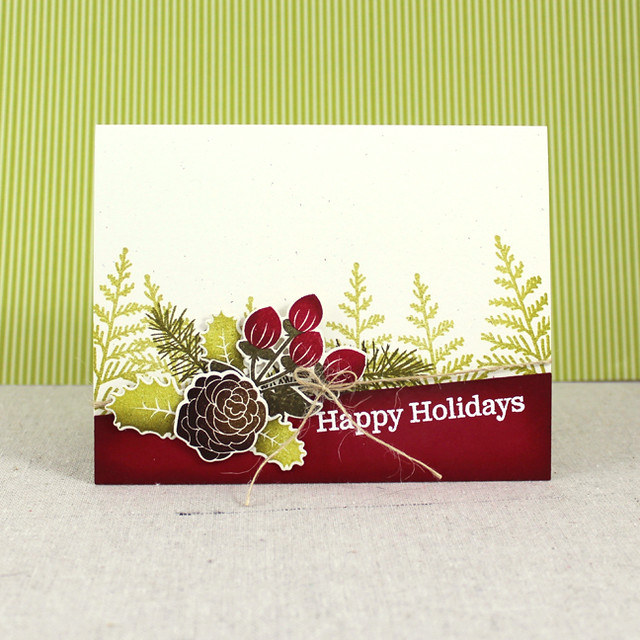
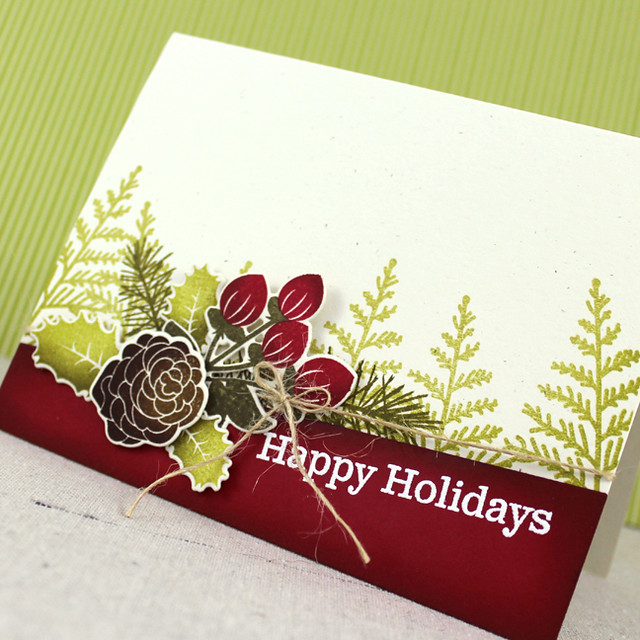
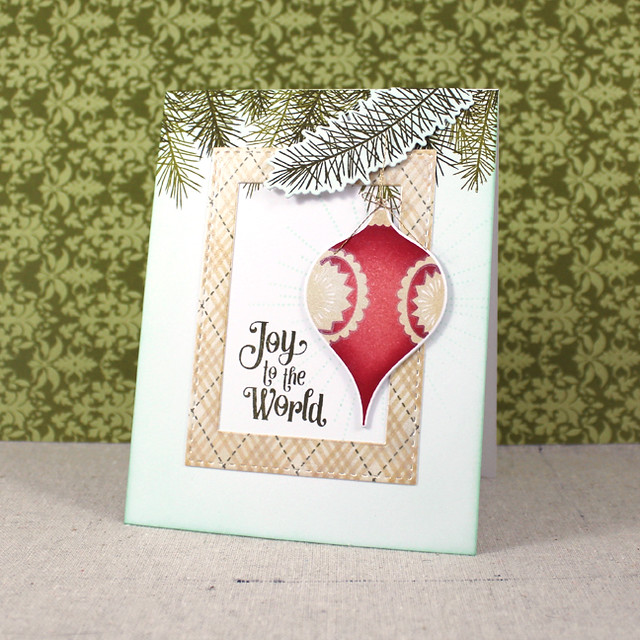
I began by sponging a white card base with Aqua Mist ink. I then stamped the Holiday Greens Borders along the top edge in Ripe Avocado and Olive Twist inks. Next, I stamped and die cut the ornament. I used Berry Sorbet, Pure Poppy, and Fine Linen inks on the ornament. Then, I stamped VersaMark over the Fine Linen Bits and used Perfect Pearl pigment powder to make them shimmer. The result is a soft gold or champagne color that has a beautiful vintage feel.

Joy To The World Close Up

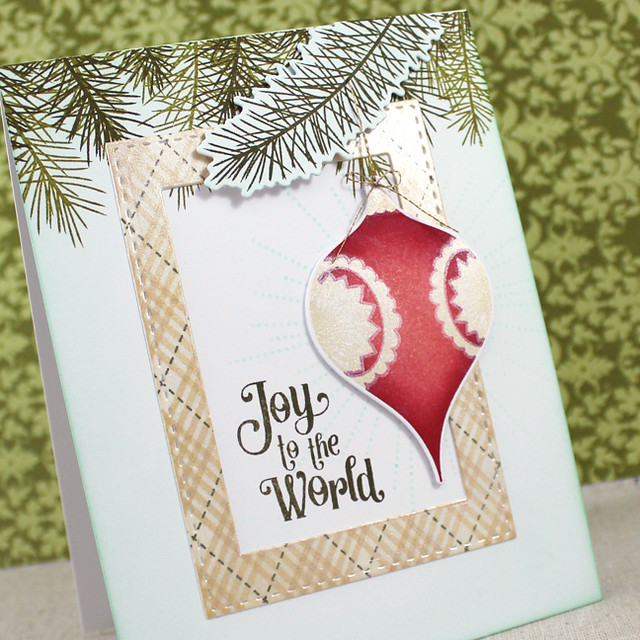
Next, I created the frame. I sponged Fine Linen ink onto white cardstock and die cut with dies from the Noted: Scalloped A2 Die Collection. Then, I stamped the plaid using Background Basics: Super Stripes and Plaid Builder in Fine Linen and Ripe Avocado inks. I stamped the Shine image and the Fancy Pants: Holiday sentiment on the card base before adhering my frame into place. Then I stamped and die cut one of the boughs from Holiday Greens and adhered it to the card front after stitching it to my ornament. That allows the ornament to swing freely and add a playful element to this sophisticated design.

Next up is a gift card holder that does double duty by decorating the Christmas tree before it is gifted.

A Gift For You Ornament Tag

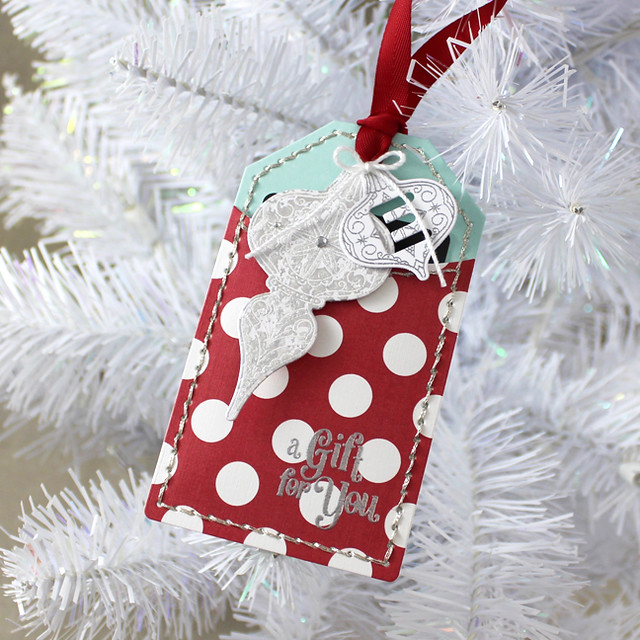
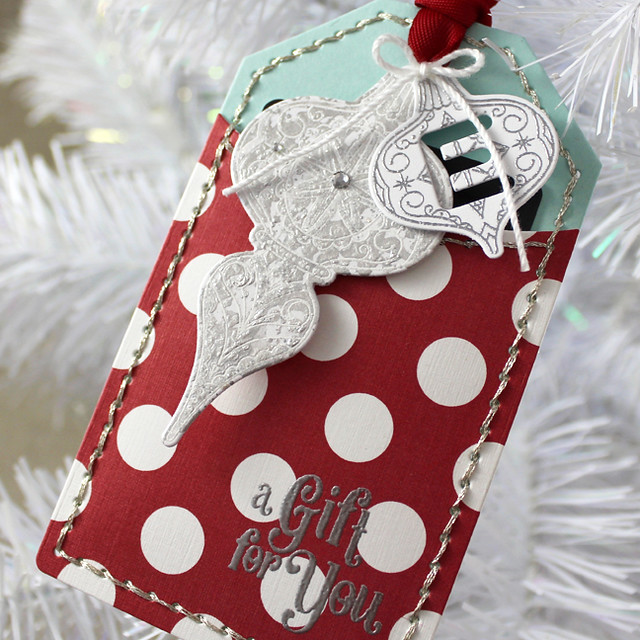
I love mercury glass ornaments. One (probably Sean) could argue that my collection has gotten a little out of control. But, while I'm generally fairly reserved when it comes to my spending, I lose my senses as soon as I see that gorgeous silvery finish. I reliably add at least a half dozen ornaments to my collection every year. So I thought it might be fun to use Betsy's new What The Doodle: Ornament to create a paper version of one of my beloved mercury glass beauties.

A Gift For You Ornament Tag Close Up

I began by heat embossing the ornament onto white cardstock using white powder. Then, I used metallic watercolor (I used Gansai Tambi silver mixed with a touch of black) to drip, splatter, and speckle the image. I used a fine tipped paintbrush to paint any of the details that I wanted to make sure got color. Once that had fully dried, I die cut the ornament and embellished with glitter and self-adhesive rhinestones. It turned out beautifully and absolutely reminds me of one of my ornaments.

A Gift For You Ornament Detail

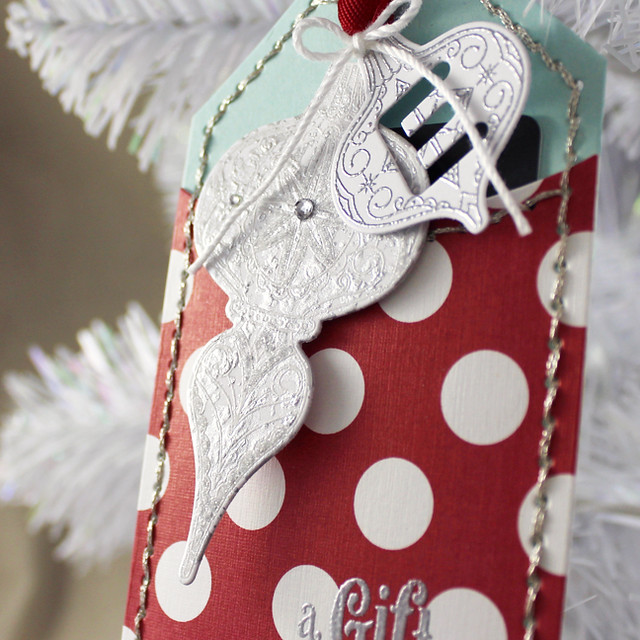
I also die cut one of the small ornaments to use as an initial tag. I then heat embossed the coordinating image using silver embossing powder. I die cut the Stitched Tag Die from Pure Poppy + White patterned paper and Aqua Mist cardstock. I heat embossed the Fancy Pants: Holiday sentiment and then stitched the pieces together with silver embroidery floss. I used Pure Poppy twill as the hanger and tied the ornaments to the tag with white crochet thread. I'm so in love with that mercury glass ornament. I will definitely be doing that again.

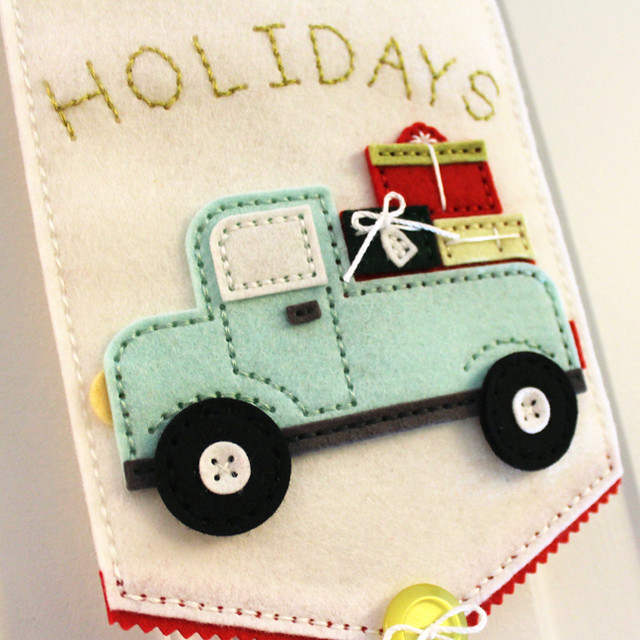
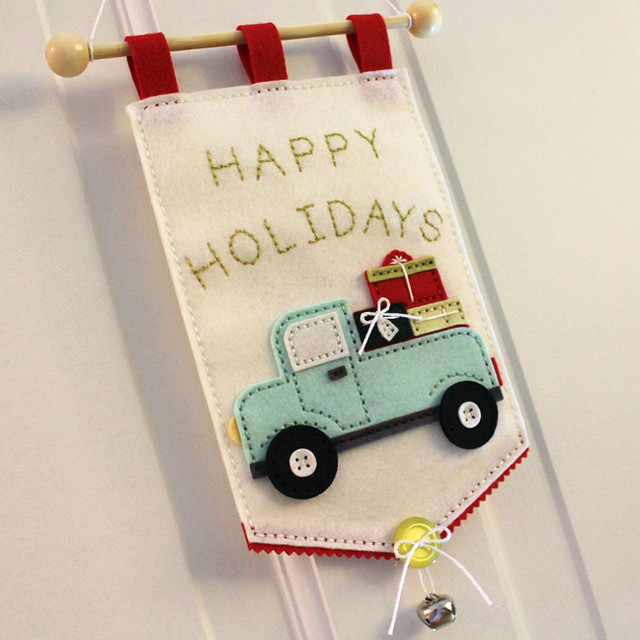
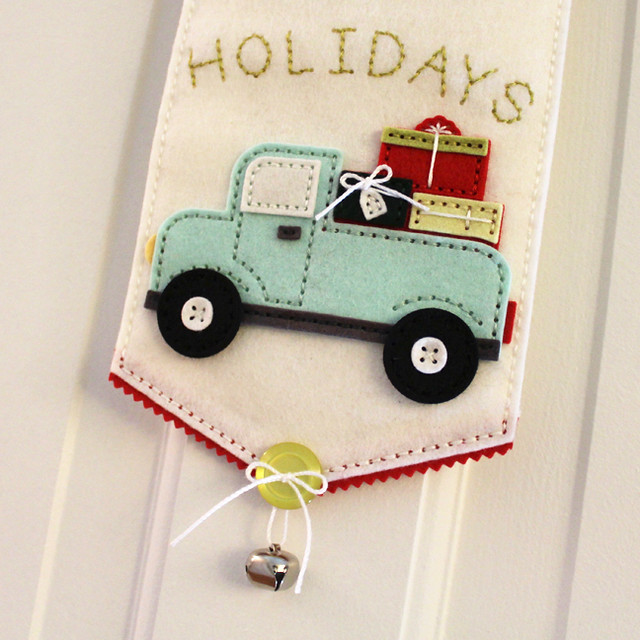
I have one last project for you today and this one may be one of my favorites from this whole year. No joke.

Happy Holidays Door Hanger

Erin has designed a series of ornament dies that are totally amazing. The one I was most drawn to is the Stitched Truck Presents Die (please note: the truck is sold separately). I thought it was so charming the moment I saw it and I wanted to create a door hanger to decorate our front door this holiday season.

Happy Holidays Door Hanger - Truck Close Up

I began by die cutting all of the pieces from Papertrey's delicious wool felt. I used Aqua Mist, Vintage Cream, Pure Poppy, Smokey Shadow, True Black, Harvest Gold, Pinefeather, Simply Chartreuse, and Spring Moss felt.

Happy Holidays Door Hanger Side

I created a base by trimming the bottom edge of a rectangle of felt onto a point. I used the Small Stitched Alphabet Die to die cut the greeting. I used the Stitching Lines Die to create stitching lines around the outside edge and the tabs along the top are the garland dies from the Quick Stitch: Beaded Holiday Kit.

Happy Holidays Door Hanger - Truck & Bell
I used a Simply Chartreuse button and a jingle bell to embellish the point of the hanger and the Pinking Shears Border Die to create a decorative edge.

Happy Holidays Door Hanger - Date & Initials

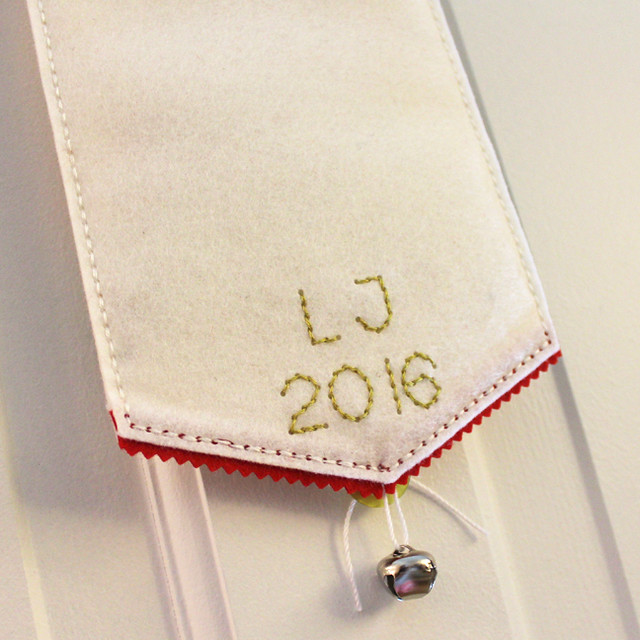
On the back, I used the Small Stitched Alphabet again to add my initials and the Stitched Years Die to add "2016."

Happy Holidays Door Hanger Side

I finished it off with a piece of dowel and some wooden beads. I really, really love how this turned out. I actually want to make another one with the Stitched Car Tree Dies. Door hangers for everyone!

Well, that's all for me today, friends. Thank you so much for joining me! Make sure to check in with Nichole, Amy, Ashley, BetsyDanielle, Dawn, Heather, Kay, Laurie, and Melissa have more tree trimming inspiration to share. Erin and Maile have more of their new products for you too, so make sure to pop over for a visit. See you soon!

Recipes:
Joy To The World Card
Stamps: Vintage Ornaments II, Holiday Greens Borders, Holiday Greens, Fancy Pants: Holiday, Shine, Background Basics: Super Stripes, Plaid Builder - Papertrey Ink
Cardstock: white
Ink: Aqua Mist, Olive Twist, Ripe Avocado, Berry Sorbet, Pure Poppy, Fine Linen - Papertrey Ink; VersaMark - Tsukineko
Other: Vintage Ornaments II Die, Holiday Greens Die, Noted: Scalloped A2 Die Collection - Papertrey Ink; Embroidery Floss - DMC; Foam Tape - Scotch

Mercury Glass Gift Card Tag
Stamps: What The Doodle: Ornament, Fancy Pants: Holiday - Papertrey Ink
Cardstock: Aqua Mist, Pure Poppy + White Patterned Paper - Papertrey Ink; white
Ink: VersaMark - Tsukineko
Other: What The Doodle: Ornament Die, Smooth Alphabet Die, Pure Poppy Twill Ribbon, Stitched Tag Die - Papertrey Ink; White Embossing Powder, Silver Embossing Powder - Filigree; Rhinestones - Mark Richards, Darice; Embroidery Floss - DMC; Fine Crystal Glitter - Martha Stewart Crafts; Watercolor Paint - Gansai Tambi; White Crochet Thread

Happy Holidays Door Hanger
Dies: Stitched Truck Die, Stitched Truck Presents Die; Stitching Lines Die, Small Stitched Alphabet Die, Garland Die (Quick Stitch: Beaded Holiday Kit), Stitched Years Die, Pinking Shears Die - Papertrey Ink
Felt: Aqua Mist, Vintage Cream, Pure Poppy, Smokey Shadow, True Black, Harvest Gold, Pinefeather, Simply Chartreuse, Spring Moss - Papertrey Ink
Other: Simply Chartreuse Button - Papertrey Ink; Wooden Beads, Jingle Bell - Darice; Dowel; Hot Glue Gun; White Crochet Thread

Tuesday, September 13, 2016

Classic Holiday Inspirations

Good morning and welcome back for Day 4 of the Papertrey Ink September countdown. The sets we're introducing today remind me of classic holiday stories and the tiny vintage town that my grandma would set up on her mantle every Christmas.

Source

I used to love looking at (but never, ever, ever touching) those delicate little ceramic houses, trees, and people. I could stare at them for hours.

Source

Such nice, warm memories that keep me smiling all through the busy holiday season. You won't be able to keep from smiling either once you see these beautiful new stamps. Let's get on to a few projects!

My first card today features Nichole's Christmas Critters and the companion sentiment set.

Holiday Mouse Card

I just love these little mice! I began by stamping the snowdrift circle onto a panel of white cardstock using Aqua Mist ink. I added a little nest of holly (from the Christmas Critters set) and pine boughs (from Christmas Faith) using Ripe Avocado, Olive Twist, and Pure Poppy inks. I added the sentiment, also in Olive Twist, and adhered that panel to an Aqua Mist card base along with a decorative strip that I'd stamped with Fair Isle Borders.

Holiday Mouse Close Up

Next, I stamped my mouse. I used Fine Linen and Classic Kraft inks sponged together on his little body and ears. His sweater is Olive Twist and his nose and inner ear are Pale Peony. I mounted him and his gift box to the card front with dimensional adhesives before adding a crochet thread bow and rounded corners. A little Glossy Accents is the perfect embellishment on his sweet little nose.

Next up is a card made with Betsy's new Winter Village. This set is so charming!

Snowy Season's Greetings Card

I began by sponging a white card base with a bit of Spring Rain ink. I stamped the sentiment, bare tree, and added a snowdrift that I'd cut using the Split Sentiments: Curve Horizontal Die and textured with the Woodgrain Impression Plate. Before die cutting, I actually ran that white cardstock through a Xyron machine to give it a fully sticky surface so I could add a sugary coating of glitter. Once the excess glitter was brushed away, I attached a frame to the card front that I'd cut with the largest oval in the Noted: Scalloped A2 Die Collection.

Snowy Season's Greetings Close Up

Next, I stamped and die cut the house from the set. I used Melon Berry and Americana inks for the walls and Stormy Sea and Smokey Shadow for the roof. I mounted that into place before adding a glittered snow drift die cut to the roof. Then I stamped the evergreens using Ocean Tides and Pinefeather inks. I die cut those and adhered them into place with flat and foam adhesives. I felt the house could use another tiny detail, so I very carefully stamped the wisp of smoke above the chimney with Spring Rain ink. I was going for a serene scene on this card and I really love how it turned out!

My last card today is a super fun, bold Christmas card pairing Gifts Of The Season with Holiday Swoosh.

Merry & Bright Presents Card

I started by stamping the stack of gifts in Hibiscus Burst and Vintage Jadeite inks. I die cut the image and mounted it to a white card base layered with a Cover Plate: Front & Center die cut. Next, I stamped and die cut the Holiday Swoosh sentiment and positioned it over the presents, using a bit of foam tape to keep the center supported.

Merry & Bright Presents Close Up

I tucked the ends under the Cover Plate shape and trimmed off the excess. I finished up by embellishing with a handful of Sunshine & Rainbows sequins. Isn't it cheerful?!

That's all for me today. Thank you so much for joining me! I'll be back tomorrow with a few more projects. In the meantime,  NicholeAmy, Ashley, Betsy, Danielle, Dawn, Heather, Kay, Laurie, and Melissa have more Classic Christmas inspiration to share. Erin and Maile have more of their new sets for you too, so make sure to pop over for a visit. See you soon!

Recipes:
Holiday Mouse Card
Stamps: Christmas Critters, Christmas Critters Sentiments, Christmas Faith, Fair Isle Borders - Papertrey Ink
Cardstock: Aqua Mist - Papertrey Ink; white
Ink: Aqua Mist, Pure Poppy, Ripe Avocado, Olive Twist, Pale Peony, Fine Linen, Classic Kraft - Papertrey Ink
Other: Christmas Critters Die - Papertrey Ink; Foam Tape - Scotch; White Crochet Thread; Glossy Accents - Ranger; Corner Chomper

Season's Greetings Card
Stamps: Winter Village - Papertrey Ink
Cardstock: white
Ink: Spring Rain, Melon Berry, Americana, Stormy Sea, Smokey Shadow - Papertrey Ink
Other: Winter Village Die, Woodgrain Impression Plate, Noted: Scalloped A2 Die - Papertrey Ink; Fine Crystal Glitter - Martha Stewart Crafts; Foam Tape - Scotch; Xyron

Merry & Bright Gifts Card
Stamps: Gifts Of The Season, Holiday Swoosh - Papertrey Ink
Cardstock: white
Ink: Hibiscus Burst, Vintage Jadeite, True Black - Papertrey Ink
Other: Gifts Of The Season Die, Holiday Swoosh Die, Cover Plate: Front & Center Die, Sunshine & Rainbows Sequins - Papertrey Ink; Foam Tape - Scotch

Monday, September 12, 2016

Christmas Faith

Good morning and welcome back to Day 3 of the Papertrey Ink September countdown! Today is our first group post for this month and it's all about faith at the holidays. The holiday season has such spiritual significance for so many people. And the faith-based sets we're introducing today are as meaningful as they are beautifully designed. Let's get to it, shall we?

My first card today pairs Heather's Christmas Faith with Nichole's Shine. The sentiment in Heather's set got me thinking about the song and I just went from there.

Oh Holy Night Card

I started with the background. I began by sponging a piece of white cardstock with Spring Rain ink and then I dry brushed over it with some Enchanted Evening ink. The end result looks a bit like linen and I love it. When that piece was fully dry, I stamped the Shine burst image twice onto the blue layer with the Delicata gold ink and then used Perfect Gold Perfect Pearls to give it an extra shimmer boost. Then, I stamped my sentiment in Enchanted Evening and adhered that layer to a white card base.

Oh Holy Night Close Up

Next, I sponged a tiny bit of Spring Rain ink onto the dove image (just enough to give the bottom edge shape) and stamped it onto white cardstock. I die cut that with the coordinating die and set it aside. Then, I created the frame. I die cut a Mat Stack 4 shape and used the Fillable Frames #7 die to create an opening before adding texture with the Sheet Music Impression Plate. I also stamped the star image onto a scrap of white cardstock with Delicata ink and trimmed it out by hand. I mounted the frame to the card front with foam tape and then added the dove carrying the star. I embellished the star with glitter as a finishing touch.

Next up, I have a card pairing Dawn's new Holiday Greens and A Thrill Of Hope sets.

Spirit Of Christmas Card

I began by just stamping a bunch of the elements from Holiday Greens so that I'd have a good selection to choose from once I got going. I used Spring Moss, Simply Chartreuse, Ripe Avocado, and Olive Twist for the foliage, Cocoa Bean and Dark Chocolate for the pinecone, and Pure Poppy and Scarlet Jewel for the berries. Next, I sponged a white card base with Aqua Mist ink and added a few splatters with the coordinating reinker.

Spirit Of Christmas Close Up 2

I stamped the sentiment with Olive Twist ink and embellished with a frame that I'd cut from Pure Poppy and stamped with Fair Isle Borders in Scarlet Jewel.

Spirit Of Christmas Close Up

Then I went about building my evergreen arrangement. I used both flat and foam adhesives and curled the branches a bit with my fingers to give depth. I finished by embellishing with a handful of sequins. I think this might be my favorite of the day. That Holiday Greens set is a real gem!

Lastly today, I have a card created with Betsy's latest Inspired set, Inspired: Jesus.

Jesus Is The Reason Card

I began by creating a little scene with the Petite Places: Nativity set. I sponged Spring Rain and Enchanted Evening inks onto a stitched rectangle from the Noted: Scalloped Square die collection before stamping Mary, Joseph, and baby Jesus in Cocoa Bean ink. Then, I heat embossed the star and added a sand dune stamped with a sentiment from Inspired: Jesus. I mounted that to a white card base with foam tape before adding the die cut stable.

Jesus Is The Reason Close Up

I sponged Fine Linen and Classic Kraft inks onto a scrap of white cardstock before die cutting with the Inspired: Jesus die. I layered that die cut with a couple of additional cuts to give it weight before adding it to the scene rectangle. To finish it off, I added a tiny rhinestone to the center of the star. It's such a simple card, but it sends a powerful message.

Thank you all so much for joining me today! Make sure to pop in on Nichole, Amy, Ashley, Betsy, Danielle, Dawn, Heather, Kay, Laurie, and Melissa for more Christmas Faith inspiration. Erin and Maile have more to share of their new sets as well, so you won't want to miss them either. Have a great day and I'll see you tomorrow!

Recipes:
Oh, Holy Night Card
Stamps: Christmas Faith, Shine - Papertrey Ink
Cardstock: white
Ink: Spring Rain, Enchanted Evening - Papertrey Ink; Delicata Gold - Tsukineko
Other: Christmas Faith Die, Sheet Music Impression Plate, Mat Stack #4 Die, Fillable Frames #7 Die - Papertrey Ink; Perfect Gold Pigment Powder - Perfect Pearls; Foam Tape - Scotch; Yellow Barite Fine Glitter - Martha Stewart Crafts

Spirit Of Christmas Card
Stamps: A Thrill Of Hope, Holiday Greens, Fair Isle Borders - Papertrey Ink
Cardstock: Pure Poppy - Papertrey Ink; white
Ink: Aqua Mist, Spring Moss, Simply Chartreuse, Ripe Avocado, Olive Twist, Cocoa Bean, Dark Chocolate, Pure Poppy, Scarlet Jewel - Papertrey Ink
Other: Holiday Greens Die, Monthly Moments: Slide Frame Die, Sunshine & Rainbows sequins - Papertrey Ink; Foam Tape - Scotch

Jesus Is The Reason Card
Stamps: Inspired: Jesus, Petite Places: Nativity - Papertrey Ink
Cardstock: white
Ink: Spring Rain, Enchanted Evening, Fine Linen, Classic Kraft, Cocoa Bean - Papertrey Ink; VersaMark - Tsukineko
Other: Inspired: Jesus Die, Petite Places: Nativity Die, Noted: Scalloped Square Die Collection, Woodgrain Impression Plate - Papertrey Ink; Foam Tape - Scotch; Rhinestone - Mark Richards; Copic

Sunday, September 11, 2016

Gifts Of The Season - Day 2

Good morning and welcome back to Day 2 of the Papertrey Ink new release countdown! I'm so glad to hear you're all as excited as I am about Gifts Of The Season and I can't wait to see how you all use it! I have a few additional projects to share with you featuring this set, so let's get going!

Family Is The True Gift Card Trio

I wanted to try something a little different today. Instead of three totally unique projects, I thought it might be fun to show you how you can use Gifts Of The Season to create incrementally more involved cards (like simple, intermediate, and more complex projects).

Let's start with the simple version.

Family Is The True Gift Card Simple

I started by stamping the gift stack onto a white card base using Scarlet Jewel and Spring Moss inks. I added a strip of Pinefeather patterned paper to ground the gifts and embellished with Pinefeather bows. The sentiment, also from the set, was stamped in Pinefeather as well. These would be super easy to mass produce and they're totally flat so mailing would be a breeze.

Next up is the intermediate design.

Family Is The True Gift Card Intermediate

On this one, the stack of presents is stamped onto a white cardstock panel and embellished with die cut bows that are popped up with foam tape. The panel is also embellished, this time with white crochet thread. The gift stack panel is mounted to a Pinefeather card front with foam tape and the sentiment is stamped in Scarlet Jewel onto a Sweet Blush banner. A few more steps, but still fairly quick.

Last but not least, the complex card.

Family Is The True Gift Card Complex

On this card I added Ocean Tides and Scarlet Jewel packages to the stack by trimming them out of another stamped stack and adhering them into place. It's a simple step, but it adds some nice color variation. I also matted the right edge with a strip of Autumn Rose patterned paper before wrapping the gift panel with crochet thread. I embellished a few of the boxes with fine crystal glitter before adding my bows and added texture to the Pinefeather card front with the Striped Sweater Impression Plate. The sentiment is still on a Sweet Blush banner, but this time I sponged it with a bit of Autumn Rose ink to give it some depth. This is a card I might save for someone that would appreciate the effort - like my sister or my momma-in-law.

Thank you so much for joining me today! I hope you've enjoyed my stepped-up approach to today's post. Make sure to pop in on Nichole, Amy, Betsy, Danielle, Dawn, Heather, Melissa, Erin, and Maile for more of this month's release. See you tomorrow!

Recipe:
Family Is The Gift Trio
Stamps: Gifts Of The Season - Papertrey Ink
Cardstock: Pinefeather, Sweet Blush, Autumn Rose Patterned Paper, Pinefeather Patterned Paper - Papertrey Ink; white
Ink: Scarlet Jewel, Spring Moss, Pinefeather, Ocean Tides, Autumn Rose - Papertrey Ink
Other: Gifts Of The Season Die, First Place Die Collection, Striped Sweater Impression Plate - Papertrey Ink; Fine Crystal Glitter - Martha Stewart Crafts; Foam Tape - Scotch; Scor Tape; White Crochet Thread

Saturday, September 10, 2016

Introducing Gifts Of The Season

Good morning and welcome to this month's Papertrey Ink new release countdown! It may be September, but it's beginning to look a lot like Christmas around here. This month, I'm debuting a new set called Gifts Of The Season. It's a $15 set that features a large stack of presents broken down into two pieces that you can stamp quickly and easily. I've been having a blast playing with this set for the past several days and I hope you love it as much as I do! Let's get on to a few projects!

My first card today pairs Gifts Of The Season with Betsy's new Dress Up Dolls: Elves set. I thought it would be fun to have a little elf carrying the stack of gifts.

Nice List Card

I began by sponging a white card base with Aqua Mist ink. Then I stamped on snowflakes with the Confetti Toss set. I glittered those and added a snowbank that I'd die cut from the In The Meadow dies and textured with the Woodgrain Impression Plate. I stamped the sentiment, included in the Elf Sentiments mini, and set that aside for a moment.

Nice List Close Up

Next, I stamped and die cut my stack of presents using Pure Poppy and Green Parakeet inks. I found it easiest to use the nested bow (inside the chevron package) and the string (inside the large polka dot package) as a guide when stamping. I die cut that and embellished with a handful of Hawaiian Shores bows. Then, I stamped the elf legs and dress and die cut those before coloring with Copic markers. I also die cut one of the Dress Up Dolls: Basics figures and colored the hands. Now, the hands on the Dress Up Dolls characters are actually facing the same direction, so I had to position them so that you wouldn't see the thumbs, but it worked out just fine. I adhered the elf legs to the card front with flat adhesive and then the packages followed with foam adhesive. Cute!

Next up, I wanted to create a card using the same layout and concept, but with a birthday theme rather than a holiday theme. I specifically didn't use any patterns on these packages that would scream "Christmas" so this set could be useful in the off season too!

Wish Big Card 1

I began this card in the same way, by sponging Aqua Mist ink onto a white card base. Then, I embellished the top half of the card with streamers from Hooray and confetti from Confetti Toss.

Wish Big Close Up

I wanted to make this card a little more boy-like so I stuck with a Hawaiian Shores, Summer Sunrise, Terra Cotta Tile, and Canyon Clay color combo.

Wish Big Card 2

I stamped and die cut the stack of presents the exact same way as the first card. I used Dress Up Dolls: Basics for the denim and little shoes. I stamped the sentiment from Stylish Sentiments: Birthday in Terra Cotta Tile ink on the card base before adhering the little boy and stack of gifts into place. I'm going to love using this set for birthdays!

And lastly today I have a set of gift tags to share.These came together in just a few minutes, but they are so, so cute! It would have gone even more quickly if I had just left them flat, but these are folded so you can add a message inside.

Christmas Packages Tags

I began by stamping the package three times, rotating between Pure Poppy, New Leaf, and Aqua Mist inks for the packages. I die cut those and added the bows in the third color (the Aqua Mist bows are the only ones I die cut - just to make sure they'd be visible) and the sentiment in black.

Christmas Packages Tag Close Up

Next, I folded a piece of cardstock and die cut the packages again, making sure the fold was inside the die so that there would be a hinge at the top. I used a piece of typing paper between my plate and my cardstock to minimize scarring the back of my tag while die cutting and it worked wonders.

Christmas Packages Tags Open

I stamped each tag with a "To:/From" message from Keep It Simple: To & From before adhering the stamped tags onto the front of the folded ones. Then, I simply threaded a loop of crochet thread through the bow at the top of the packages.

Ok, that's all for me today, folks! I hope you've enjoyed this first look at Gifts Of The Season. Nichole and Betsy are going to be showcasing this set today, too, so make sure to pop over to their blogs to see it in action. Dawn, Heather, Kay, Erin, and Maile all have projects to share with you too. Have a great day and I'll see you tomorrow!

Recipes:
Nice List Card
Stamps: Gifts Of The Season, Dress Up Dolls: Elves, Dress Up Dolls: Basics, Confetti Toss - Papertrey Ink
Cardstock: white
Ink: Pure Poppy, Green Parakeet, Aqua Mist, Hawaiian Shores - Papertrey Ink; Tuxedo Black - Memento
Other: Gifts Of The Season Die, In The Meadow Die, Dress Up Dolls: Elves Die, Dress Up Dolls: Basics Die, Woodgrain Impression Plate - Papertrey Ink; Fine Crystal Glitter, Chunky Crystal Glitter - Martha Stewart Crafts; White Embossing Powder - Filigree; Foam Tape - Scotch

Wish Big Card
Stamps: Gifts Of The Season, Stylish Sentiments: Birthday, Dress Up Dolls: Basics, Confetti Toss, Hooray - Papertrey Ink
Cardstock: white
Ink: Hawaiian Shores, Summer Sunrise, Terra Cotta Tile, Canyon Clay, Aqua Mist - Papertrey Ink; Tuxedo Black - Memento
Other: Gifts Of The Season Die, Dress Up Dolls: Basics Die - Papertrey Ink; Foam Tape - Scotch


Christmas Presents Tags
Stamps: Gifts Of The Season, Keep It Simple: To & From - Papertrey Ink
Cardstock: white
Ink: Pure Poppy, New Leaf, Aqua Mist, True Black - Papertrey Ink
Other: Gifts Of The Season Die - Papertrey Ink; White Crochet Thread

Monday, September 5, 2016

Moments Inked: Incorporating Offbeat Holidays


Good morning, planner people! Happy Labor Day! It's my turn to show you how I've been using my Papertrey Ink Moments Inked planner lately so I thought I'd share a fun feature I've been adding to my planner pages for the past few months.

Offbeat Holidays Overview

As some of you may already know, I'm the editor of Papertrey Ink's monthly newsletter. This year we introduced a silly section of the newsletter called Offbeat Holidays. In this section, I highlight a handful of goofy, weird, or otherwise quirky holidays in the coming month.

Page 1 - 9.4-9.10 Weekly Spread

I love these holidays because they're often unexpected and grin-worthy occasions and they remind me that there's something to celebrate nearly every day. So a few months ago I decided to start adding these dates (the ones in the newsletter as well as a whole bunch of extra ones that I find particularly entertaining) to the pages of my planner.

September Dashboard & Holidays List

I sat down and created sticky note lists for each of the remaining months in the calendar using the Moments Inked: Posted II and a heading from Moments Inked: Remembered. I filled out those notes with holidays I found on online lists (I like this one, this one, and this one) and then stuck the notes to the tabbed monthly dividers appropriate for each note. I then transfer the notes to their month's dashboard as I get them made.

Offbeat Holiday Stickers

I also wanted to add celebratory stickers to the individual days to remind myself of each of the holidays. I didn't want things to get too complicated, so I used the Moments Inked: Boxed die to cut rectangles of self-adhesive paper and used small, relevant images to decorate each one.

Page 2 - 9.4-9.10 Weekly Spread

I found images in a variety of sets, but the Moments Inked: Everyday Symbols, Active Symbols, and Tiny Treats: Birthday were particularly helpful (at least this month). Then, I just wrote in the name of each holiday using a black pen before I stuck them down in the "notes" section of the appropriate day.

Placing Holiday Sticker

My days can get kind of full, so putting the stickers in that bottom area ensures that they're not going to interfere with the more important details of my week.

9.4-9.10 Weekly Spread

Here's what this week looks like. It makes me smile to see those oddball holidays tucked in next to my regular comings and goings.

Well, that's all for me this time, friends. Have a safe and happy holiday and I'll see you again soon!

Recipes:
Holiday Stickers
Stamps: Moments Inked: Everyday Symbols, Moments Inked: Active Symbols, Tiny Treats: Birthday, City Scene, Pajama Time, Sew Simple Borders, Zappy Birthday, Super Hero, Cup Of Cheer, Grand Ampersand, Life's Music, Wet Paint Alphabet - Papertrey Ink
Dies: Moments Inked: Boxed Die - Papertrey Ink

Holidays Sticky Note
Stamps: Moments Inked: Posted II, Moments Inked: Remembered - Papertrey Ink
Other: 3" x 6" White Post-It Note Pads - Papertrey Ink

September Dashboard
Cardstock: Hawaiian Shores, Simply Chartreuse, Hibiscus Burst Patterned Paper - Papertrey Ink
Dies: Monthly Moments: Year Round 2 Die, Moments Inked: Binder Page Die - Papertrey Ink