Monday, February 15, 2016

Release In Review

Well, everyone, here we are. We've made it to the end of this year's Papertrey Ink anniversary countdown. You should see my studio. The word "avalanche" doesn't even begin to describe it. But all that mess has most certainly been worth the fun, friends, and I have a handful of final projects to share with you.

Let's start with a walk through the Spring Woods (designed by Nichole).

New Beginnings Card

I loved the first set that Nichole designed, so this one is going to be a fast favorite as well. I began by die cutting and stamping the chickadee using Bright Buttercup and True Black inks. Then, I die cut, stamped, and colored (with Copics) the Simply Spring Borders eggs. I added speckles to the eggs with a stippling brush and some Tropical Teal ink.

New Beginnings Close Up

I die cut a circle from Classic Kraft cardstock and trimmed it down using the Pinking Shears Border Die to create a nest shape. I stamped it with Background Basics: Woodgrain for a little visual texture and adhered it to a Spring Woods Patterned Paper panel that I'd trimmed with the Small Scalloped Border Die. I adhered that to a white card base that I'd embellished with New Leaf Bitty Dot paper and tied a crochet thread bow around the front. Next, I stamped the sentiment, from Tulip Time, using True Black ink and attached my bird and my eggs to the card front.

Next up we have Heather's Be and Nichole's Keep It Simple: St. Patrick's Day.

St. Patrick's Day Card

I began by sponging Mint Julep ink through one of the Modern Background Stencils onto a Rustic White card base. I removed the stencil and sponged a bit more ink for a tone-on-tone look. Next, I chose one of the small dots and a stem from Be and used it to create three four leaf clovers in that sponged area.

St. Patrick's Day Close Up

This particular dot has an ever-so-slightly-teardrop shape, so it worked perfectly. The last step was to heat emboss the sentiment using gold detail powder. Nice and simple.

It's Splits: Just A Note's turn in the spotlight. I love the sketchy feel of this set. It's a great little mini and I'm sure it's going to get plenty of attention around here.

Splits Just A Note Card

I began by heat embossing the large frame onto watercolor paper using white powder. I watercolored that image using my Zig pens and set it aside to dry. In the meantime, I heat embossed the sentiment onto a strip of True Black cardstock using white powder.

Splits Just A Note Close Up

Once the watercolored panel had dried I trimmed a bit off the edges and adhered it to a white card base I used a clear Wink Of Stella pen to add a bit of shimmer to the flowery images before adhering the sentiment strip with foam tape. A few clear rhinestones were the perfect finishing touch.

Both of my final two cards use Dawn's new Peonies On Parade. I love peonies and I was so excited when peony bushes popped up at our new(ish) house last Spring. Thanks to Dawn's new set, I can enjoy peonies anytime!

Peony Thanks Card

I began this first card by heat embossing the blooms onto watercolor paper using white powder. I colored the flowers in pale pastels to mimic the flowers in my garden and followed with more saturated greens for the leaves. The background is a pale blue, just dark enough to give the embossed lines a bit of definition. Once it was dry, I attached that panel to a Stormy Sea card base.

Peony Thanks Close Up

Next, I die cut the Layered Banner shapes from Hooray Patterned Paper (the pastel pink) and additional watercolor paper. I stamped the top layer with a sentiment from Layered Banner Banter using Stormy Sea ink an then adhered the pieces together. Those were then mounted to the card front with foam tape. I wanted to keep this design simple enough to let the watercolor shine. I think it worked out pretty well.

My final card for this release is a quickie made with the Peonies On Parade Coloring Sheets. These sheets are wonderful for creating cards in minutes!

Wedding Wishes Card

I began by coloring the leaves on the sheet with a nice deep green Copic combo. I wanted my peonies to appear white, so I colored them very simply. I sponged a bit of Harvest Gold ink onto the flower centers and then added small touches of warm gray in a few strategic areas. I then outlined the entire image with a pale blue marker to make it pop a bit.

Wedding Wishes Close Up

I embellished the flower centers with a clear Wink Of Stella pen before trimming the panel down a smidge and mounting it to a Lemon Tart card base with foam tape. Next, I heat embossed a sentiment from Spring Woods onto vellum using white powder. I adhered it to the front of the card by hiding tiny strips of adhesive behind the embossing. Super quick and easy.

Well, that's it for me this time around. I hope you've enjoyed the festivities the past several days! Make sure to check in with Nichole, Amy, Ashley, Betsy, Danielle, Dawn, Heather, KayLaurie, and Melissa as they wrap up this countdown too. See you again soon!

Recipes:
New Beginnings Card
Stamps: Spring Woods, Tulip Time, Simply Spring Borders, Background Basics: Woodgrain - Papertrey Ink
Cardstock: Classic Kraft, Spring Woods Patterned Paper, New Leaf Bitty Dot Patterned Paper - Papertrey Ink; white
Ink: True Black, Bright Buttercup, Tropical Teal, Classic Kraft - Papertrey Ink; Tuxedo Black - Memento

Other: Spring Woods Die, Simply Spring Borders Die, Two Toned Die, Pinking Shears Border Die, Small Scalloped Border Die - Papertrey Ink; Foam Tape - Scotch; Copic Markers

Happy St. Patrick’s Day Card
Stamps: Be, Keep It Simple: St. Patrick’s Day - Papertrey Ink
Cardstock: Rustic White - Papertrey Ink
Ink: Mint Julep, Pinefeather - Papertrey Ink; VersaMark - Tsukineko
Other: Modern Backgrounds Stencil Collection - Papertrey Ink; Gold Embossing Powder - Filigree

Just A Note
Stamps: Splits: Just A Note - Papertrey Ink
Cardstock: True Black - Papertrey Ink; Watercolor Paper - Ranger; white
Ink: VersaMark - Tsukineko
Other: White Detail Powder - Filigree; Rhinestones - Kaisercraft; Foam Tape - Scotch; Clean Color Brush Pens - Zig

Thanks Card
Stamps: Peonies on Parade, Layered Banner Banter - Papertrey Ink
Cardstock: Stormy Sea, Hooray Patterned Paper Collection - Papertrey Ink; Watercolor Paper - Ranger
Ink: Stormy Sea - Papertrey Ink; VersaMark - Tsukineko
Other: Layered Banner Die - Papertrey Ink; White Embossing Powder - Filigree; Clean Color Brush Markers - Zig; Foam Tape - Scotch

Wedding Wishes Card
Stamps: Spring Woods - Papertrey Ink
Cardstock: Peonies On Parade Coloring Sheets, Lemon Tart, Vellum - Papertrey Ink
Ink: VersaMark - Tsukineko
Other: White Embossing Powder - Filigree, Foam Tape - Scotch; Wink Of Stella Pen - Zig; Copic Markers

Sunday, February 14, 2016

2016 Anniversary Set: Painted Petals

Good morning! It's Day 10 of the Papertrey Ink 9th anniversary countdown and today the team is introducing you to this year's anniversary set.

Painted Petals Cards

I think the thing I love most about this year's anniversary set, Painted Petals, is how versatile it is. This set lends itself well to all sorts of styles. It can be bright and bold on one project, earthy and rustic on the next, and then shabby and delicate on yet another card. This is one must-have floral, for sure! Let's get on to some projects!

Happiness In Joy Card

I began this first card by stamping the flower onto a piece of Rustic White cardstock using Harvest Gold and Bright Buttercup inks. I added the flower center with Canyon Clay, the individual seeds with Terra Cotta Tile, and the stem with Simply Chartreuse. The tiny leaf details were then added with Ripe Avocado. There are so many opportunities to layer color and add interest with this set.

Happiness & Joy Close Up

Next, I stamped the sentiment with Terra Cotta Tile and added a strip of striped Terra Cotta Tile patterned paper to the bottom edge of the panel. I wrapped that piece with Rustic Jute Button Twine and mounted it to a Classic Kraft card base that I'd textured with the Rustic Burlap Impression Plate. Clean and simple goes rustic.

Next up is a much brighter project using this set.

Note Of Thanks Card

I began by sponging a bit of Aqua Mist along the top edge of a white card front. Then I started stamping an assortment of flowers along the bottom edge with a rainbow of color. I left some open spaces to allow for additional flowers that I added with foam tape. I stamped the sentiment with Smokey Shadow, layering part of the text onto the Canyon Clay flower.

Note Of Thanks Close Up

I really had so much fun with these flowers. I played around with color combinations on a piece of scrap paper and discovered some combos that I'd never really considered before. The Berry Sorbet, Pure Poppy, and Scarlet Jewel might be my unexpected favorite.

Well, that's all for me today. Thank you so much for visiting me today. Make sure to check in with NicholeAmy, Ashley, Betsy, Danielle, DawnHeather, Kay, Laurie, and Melissa for more of this year's anniversary set. Have a great day and I'll see you back here tomorrow for this month's wrap-up. Have a great day!

Recipes:
Happiness & Joy Card
Stamps: 2016 Anniversary Set: Painted Petals - Papertrey Ink
Cardstock: Classic Kraft, Rustic White, Terra Cotta Tile Striped Paper - Papertrey Ink
Ink: Harvest Gold, Bright Buttercup, Canyon Clay, Terra Cotta Tile, Simply Chartreuse, Ripe Avocado - Papertrey Ink
Other: Rustic Jute Button Twine, Rustic Burlap Impression Plate - Papertrey Ink; Foam Tape - Scotch

Note Of Thanks Card
Stamps: 2016 Anniversary Set: Painted Petals - Papertrey Ink
Cardstock: white
Ink: Winter Wisteria, Plum Pudding, Harvest Gold, Bright Buttercup, Berry Sorbet, Pure Poppy, Scarlet Jewel, Simply Chartreuse, Ripe Avocado, Summer Sunrise, Canyon Clay, Terra Cotta Tile, Aqua Mist, Tropical Teal, Smokey Shadow - Papertrey Ink
Other: Painted Petals Die - Papertrey Ink; Foam Tape - Scotch

Saturday, February 13, 2016

New Moments Inked

Good morning, everyone, and welcome back for Day 9 of the Papertrey Ink 9th anniversary release! Today we have a Moments Inked group post that is sure to make you planner users very happy.


I've really been enjoying getting into a better rhythm with my planner this year and the new products coming out this month are sure to make it even easier to use! I'm particularly fond of the extended Posted II and Everyday Symbols sets. They're perfect for a simple planner girl like me! Let's take a closer look.

First up, let's check out the Moments Inked: Everyday Symbols set.

2.7-2.13 Weekly Spread Close Up

This set includes just about any everyday image you can think of wanting to include in your planner. I'm using these images in place of text on my weekly spreads to break things up a little.

2.7-2.13 Weekly Spread

There are images for chores, errands, and appointments as well as a wide selection of words to pair with the symbols (should you want to specify rooms, times, etc).

2.14-2.20 Weekly Spread

I've found these images really useful as mini visual reminders. For example, I could write on my daily to-do list that I need to remember to water the plants in the living room, but a watering can and "living room" delivers the same message with a pop of color.

2.17-2.20 Weekly Spread

I'm also really loving the new Posted II set.

February Dashboard And To Do List

The extended size makes it super easy to stamp onto the 3"x6" post its that were introduced this year. I like using the original set if I want to fit two days on one note, but this new set is perfect for those days when you have a ton of stuff to accomplish and want it all in one streamlined list.

Grocery List Notepad

This set is also a great fit for the notepads that you can tuck into your binders, too. This way, I can write my grocery list (or whatever else), tear it off, and go without having to take my whole binder if I don't want to. I think I might stamp a whole pad and attach it to our fridge with a magnet to make it even easier for Sean to add items to the list.

Another great new product this month is a binder version of the Tabbed List die that came out last year for the spiral planner.

Workout Favorites Tabbed List

We recently joined our local YMCA and they offer a ton of great classes. I'm slowly working my way though the schedule and I thought it might be nice to have a handy place to write down my favorite classes and instructors to keep everything straight. Now I have an easy reference of the "sure thing" classes (the ones I know I'll enjoy) right at my fingertips.

This last product is sure to please those of you that were disappointed when the daily pages were removed from this year's design. The pages are back, but with a few improvements.

2.12 Daily Page

The pages are a little more flexible this year, with a choose-your-own-date bar, open list section, and perforated corner for easy tracking. I love that the list section on this page can be whatever I need it to be on any given day. Yesterday, laundry was a priority and this section was perfect for keeping track of what needed to happen.

Daily Page Close Up

And of course, your favorite features are making their triumphant return. The water intake, important tasks, and gratitude areas are all back and as great as ever. If you choose to use the daily pages, you'll likely need to remove and store several dormant months to have the required space in your binder.

So there you have it! I know you're going to love using these great new products and I can't wait to see how you incorporate them into your own planners. Make sure to visit with Nichole for more about today's contest and introductions and then pop over to see Amy, Ashley, Audrey, Laurie S, Laurie W, Lexi, and Rebecca and check out how they're using these fresh Moments Inked additions. Have a great day and I'll see you back here again tomorrow!

Supplies In Today's Post:
Stamps: Moments Inked: Everyday Symbols, Moments Inked: Posted II, Moments Inked: Blog Banners, Moments Inked: Family Banners, Moments Inked: Planner Banners, Outlined - Papertrey Ink
Cardstock: Adhesive Sheets, Fresh Snow Linen, Simply Chartreuse Stripe, Raspberry Fizz, Scarlet Jewel - Papertrey Ink
Ink: Chartreuse Stripe, Raspberry Fizz, Scarlet Jewel, Canyon Clay, Aqua Mist, Stormy Sea, Winter Wisteria, Hibiscus Burst, True Black - Papertrey Ink
Other: Moments Inked: Binder Tabbed List Die, Moments Inked: Binder Page Die, Moments Inked: Planner Banners Die, Monthly Moments: Year Round 1 Die - Papertrey Ink

Friday, February 12, 2016

Make It Market Mini Kit: Color Pop Florals

Good morning, everyone! It's Day 8 of the Papertrey Ink anniversary countdown and the whole team is joining together to feature Betsy's new Make It Market Mini Kit: Color Pop Florals. You're going to flip, people. Betsy's whole concept behind this new kit is nothing short of brilliant. She has thought of everything to help you create cheerful, colorful cards in no time at all. The stencils, the dies, the papers - it's all so amazing!

Color Pop Floral Cards

I have two super fun cards to share with you today that I created with this kit. One is all stamping and sponging, the other is mostly die cutting. Let's get to it!

Let's start with the card that's mostly stamping.

Be Original Card

I couldn't wait to give the stencils in this kit a spin. The kit includes a set of three nesting stencils that work together to create an all-over pattern. I began by sponging the larger flower stencil with Harvest Gold ink. Next, I sponged the leaves, this time with Simply Chartreuse. The smallest flowers came last. I sponged those with Lemon Tart. The background was lovely enough on its own, but then you have the opportunity to add detail using the stamp set included in the kit. The tiny flowers got details in Harvest Gold and Bright Buttercup, the largest flowers got centers in Bright Buttercup, and the leaves got details in Simply Chartreuse and Ripe Avocado inks.

Be Original Close Up

I went with a monochromatic color scheme so I could add a flower in a different pop of color. I sponged that flower onto a scrap of cardstock using Hibiscus Burst ink and added a flower center with Raspberry Fizz. I used the coordinating dies to cut out the flower and then added glitter to the flower center with the help of a glue pad. I also die cut a small leaf shape from Simply Chartreuse and added details with Simply Chartreuse and Ripe Avocado inks. I stamped the sentiment from Be onto my card front and then added the flower and leaves. Isn't that fun?

Next up is a card I put together with the pre-printed elements that come with the kit.

Celebrate Today Card

Betsy has designed some amazing, ready-to-die-cut elements that make creating colorful cards a snap. I began by die cutting an assortment of flowers from the printed sheets.

Celebrate Today Top View

Then I chose one of the patterned card fronts from the kit and sponged the leaves using the stencil to mask off the surrounding areas. Using Simply Chartreuse ink, I added details to the leaves.

Celebrate Today Close Up

I attached the flowers to the card front using a mix of flat and foam adhesives. Then, I sponged a piece of Lovely Lady cardstock with Hibiscus Burst ink and die cut it with the sentiment die in the set. I layered a few of those cuts together and then adhered them to the card front. A quick swipe of a clear Wink Of Stella pen added shimmer to the sentiment as a final bit of flair. Easy!

Thank you so much for joining me today! Make sure to pop over to Nichole's blog to see today's contest and then check in with Amy, AshleyBetsy, Danielle, Dawn, Heather, Kay, Laurie, and Melissa for more of this incredible kit. Have a great day and I'll see you again soon!

Recipes:
Be Original Card
Stamps: Color Pop Florals, Be - Papertrey Ink
Cardstock: Simply Chartreuse - Papertrey Ink; white
Ink: Harvest Gold, Lemon Tart, Bright Buttercup, Simply Chartreuse, Ripe Avocado, Hibiscus Burst, Raspberry Fizz, True Black - Papertrey Ink
Other: Color Pop Florals Stencil Collection, Color Pop Florals Die - Papertrey Ink; Glue Pad - Tsukineko; Crystal Glitter - Martha Stewart Crafts; Foam Tape - Scotch

Celebrate Today Card
Stamps: Color Pop Florals - Papertrey Ink
Cardstock: Color Pop Florals Paper Collection, Lovely Lady - Papertrey Ink
Ink: Hibiscus Burst, Simply Chartreuse - Papertrey Ink
Other: Color Pop Florals Stencil Collection, Color Pop Florals Die - Papertrey Ink; Foam Tape - Scotch; Clear Wink Of Stella Pen - Zig; Xyron

Thursday, February 11, 2016

New Products For Spring & Egg Hunt


Good morning, everyone! Welcome back for Day 7 of the Papertrey Ink 9th anniversary countdown! Spring is in the air for today's group post! Or at least it feels like it thanks to the charming new products we're showcasing today. Today is also the annual egg hunt, so your job is to find the hidden Easter eggs in the photo at the top of this post. Add up all of the hidden eggs from each Design Team member's photo and then enter the contest over on Nichole's blog. Good luck!

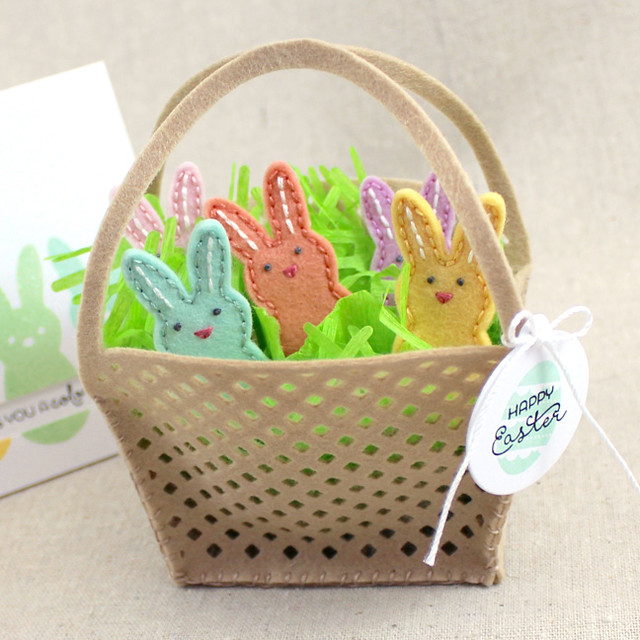
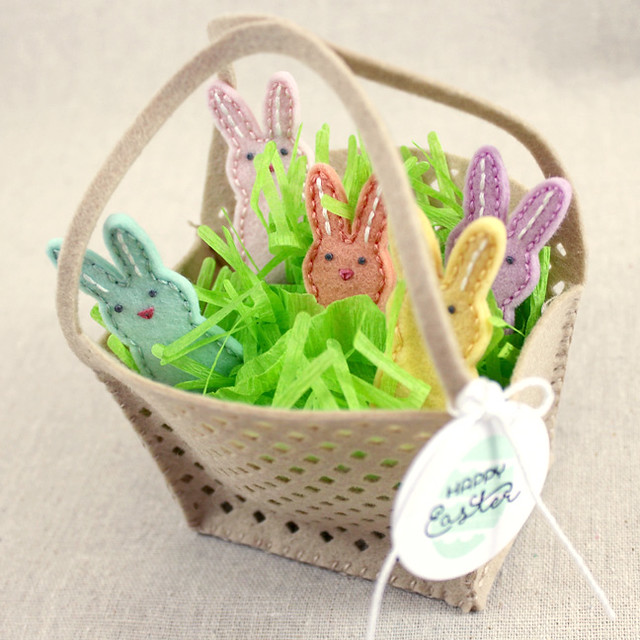
I had a blast busing out my needle and thread to create a little Easter gift for the kiddos in my life. At first blush it just looks like a felt basket full of bunnies, but (as if that wouldn't be cute enough) there's more to it than meets the eye.

Let's start by taking a look at the basket.

Felt Bunny Basket

I began by die cutting two of the Cover Plate: Basket shapes from Classic Kraft felt, trimming the frame off afterward. I also die cut three of the third smallest rectangles from the Stitched Rectangles Die. I trimmed five holes off of two of the rectangles and then stitched all three end-to-end (the full size rectangle in the center). Then, I blanket stitched the rectangle strip to the basket pieces, keeping my stitches fairly even by using the rectangles' holes as my guide. When the basket was done, I filled it with crepe paper that I die cut with the new Easter Grass Die. I also added a bit of scrunched crepe paper to add volume.

Bunny Basket Top View

Next, I die cut the bunnies, two of each color, from Harvest Gold, Melon Berry, Sweet Blush, Lavender Moon, and Aqua Mist felt using the new Bunny Basket die. I trimmed off their tails (you'll see why in a second) before stitching on face and ear details. I stitched around the edges of the bunnies making them into.....

Bunny Finger Puppet Front

Finger puppets! These will fit much better on my niece and nephew's fingers. I have giant hands for a lady (it's true, they're as big as my dad's and he's 6' 4"). They have sweet little kiddo fingers.

Bunny Finger Puppet Back

I stitched a little white pom pom to the rear of each bunny (which is why I trimmed off their tails). Aren't they just the gosh darn sweetest?!?!

Happy Easter Mini Tag

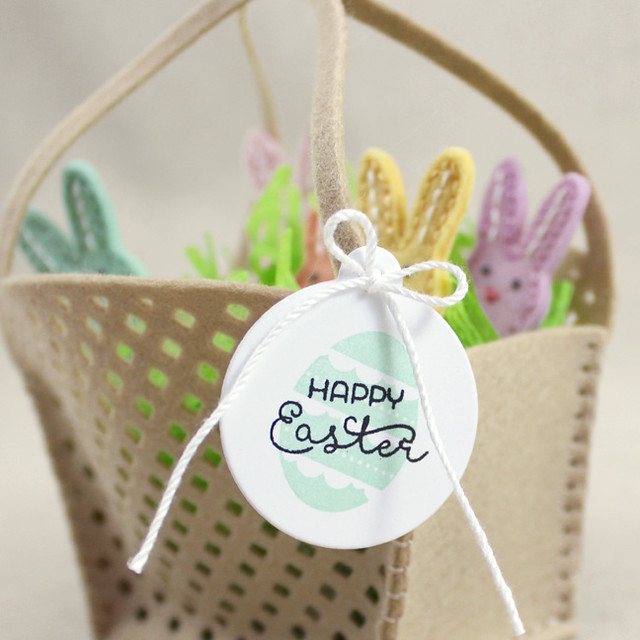
I tucked the bunnies into the crepe paper and added a tag that I'd stamped with an egg from Bunny Basket and a sentiment from Simply Spring Borders.

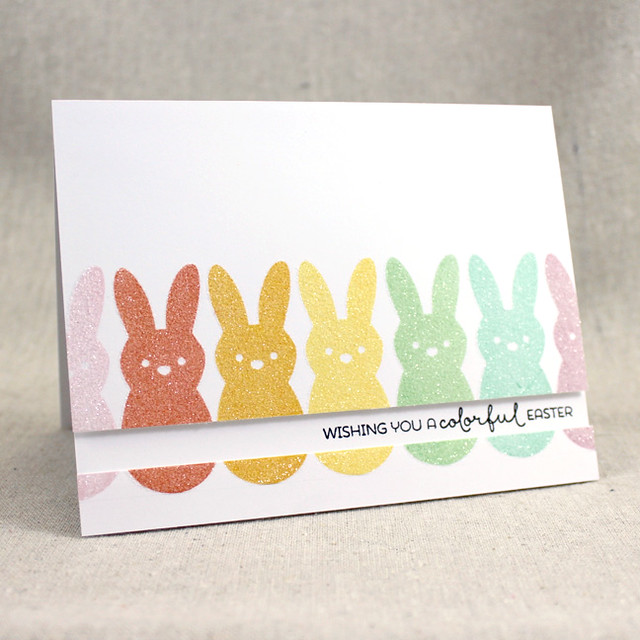
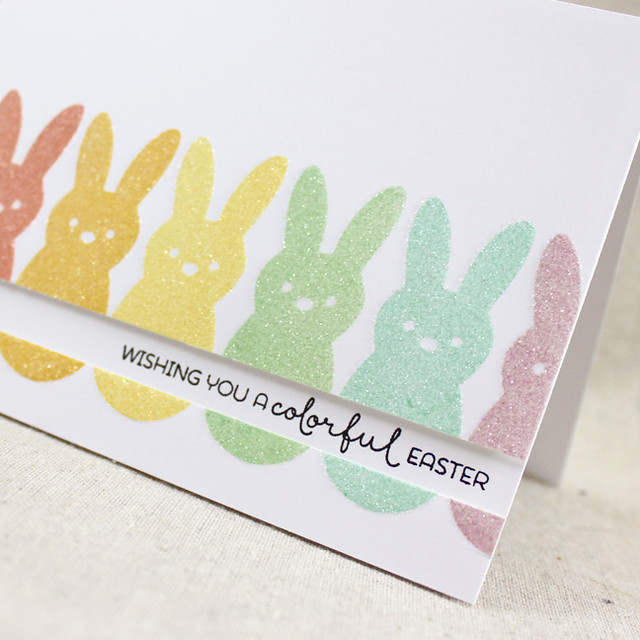
The coordinating card is fairly simple, but I love how much it embraces rainbow peeps.

Colorful Easter Card

I began by stamping a row of the Bunny Basket critters in a row using Sweet Blush, Melon Berry, Summer Sunrise, Harvest Gold, Mint Julep, Aqua Mist, and Lavender Moon inks. Then, I trimmed a stripe out of the center of that row of bunnies. I lined up the strips on two post it notes to keep them together and make the next step easier.

Colorful Easter Close Up

I stamped over each bunny with a freshly inked glue pad, giving the adhesive a second or two to get tacky before sprinkling on the glitter. I find giving it a second before adding the glitter makes it stick better. They totally look like they're covered in sugar! I stamped my sentiment (also from Simply Spring Borders) onto a white card base and mounted my bunny panels once the adhesive had dried a bit. Cute!

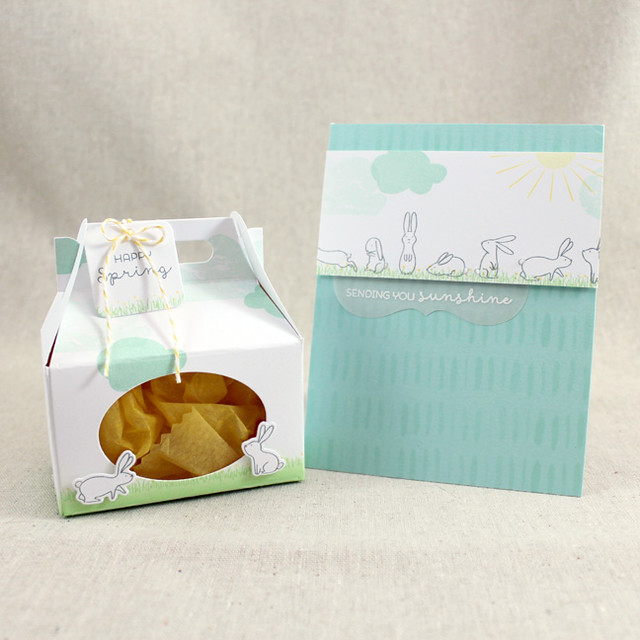
I have one more ensemble to share with you today (no hidden eggs in this one though). I wanted to show you a little more of Simply Spring Borders, so here we go!

Spring Bunny Ensemble

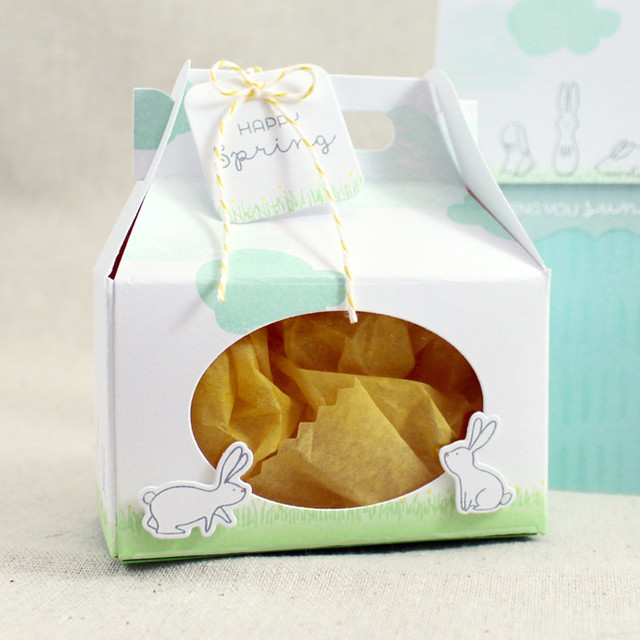
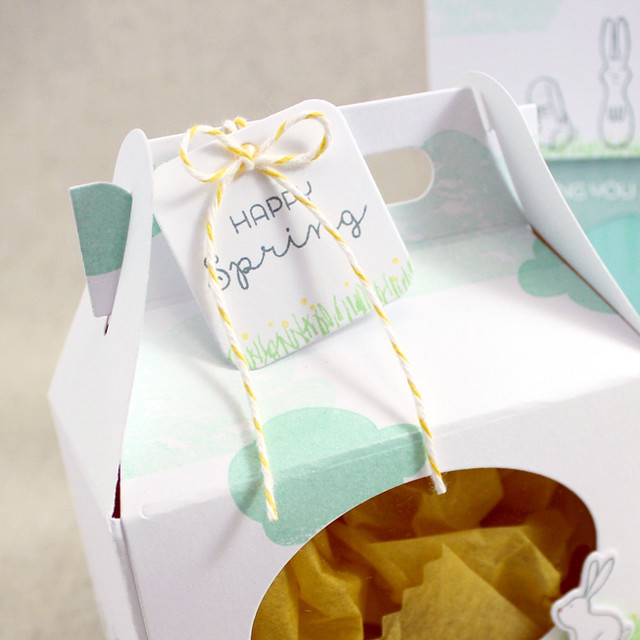
Let's start by taking a closer look at the gable box.

Bunny Gable Box

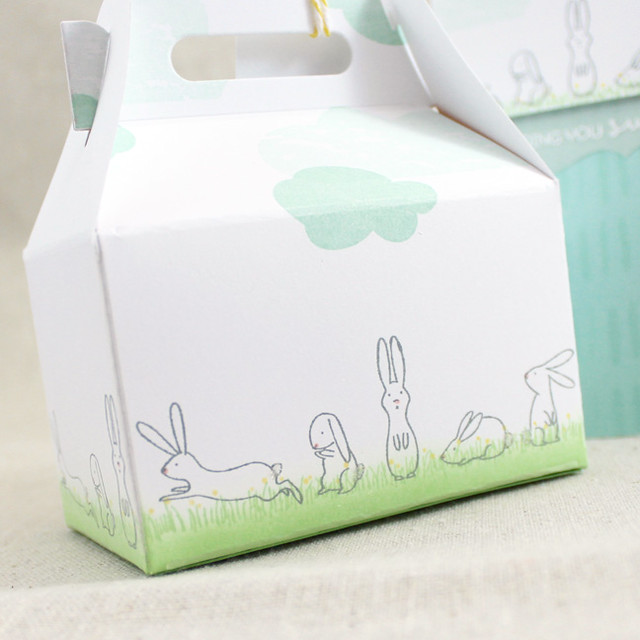
I die cut my box from white cardstock using the Gable Box Die. I sponged a bit of Vintage Jadeite ink along the bottom edge before stamping rows of grass and flower blossoms all the way around the box. I added bunnies to three sides of the box using Stormy Sea ink. I went around and touched each of their little noses with a pink Copic just to give them a bit of extra color.

Bunny Gable Box Back

Then, I added Aqua Mist clouds to the front and back of the box using the images from So Striking. I stamped off the larger ones to make them a tiny bit softer. The smaller ones I stamped at full strength. Once all of my stamping was done, I die cut an oval window from the front panel of the box and added a Clear Cardstock panel inside. I assembled my box using my favorite treat box adhesive, Scor Tape.

Bunny Gable Box Tag

Next, I die cut and stamped two bunnies to embellish the front of the box. I added them with foam tape and then tied on another small tag, this one stamped with images from Simply Spring Borders. I also gave each bunny a fluffy tail with white flocking just for good measure.

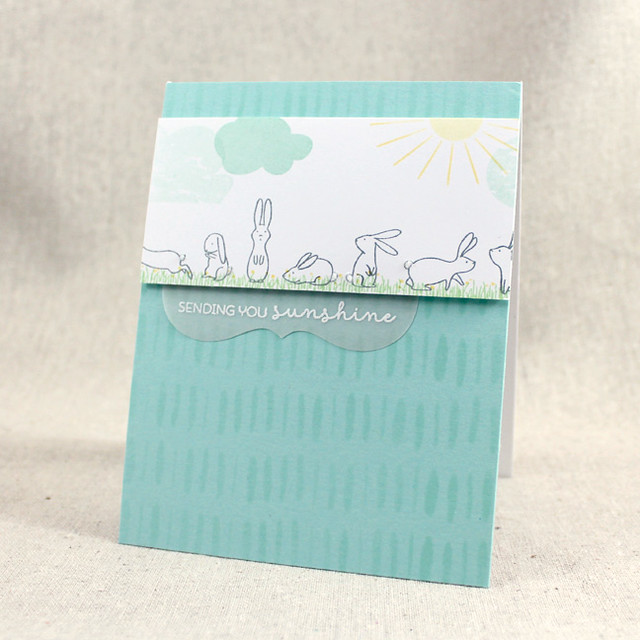
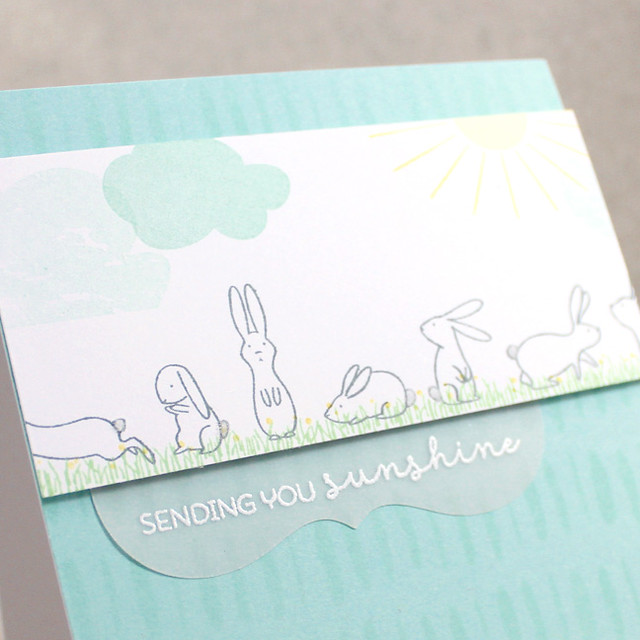
Next up is the coordinating card in the ensemble.

Sending You Sunshine Card

I began by adding a little dimension to an Aqua Mist card front by lightly sponging it with the matching ink through one of the new Modern Basics Stencils. It really doesn't take much to get a subtle background. Next, I trimmed a white strip of cardstock and stamped it with the same images that I had used on the gable box, with the addition of the sun from Blue Skies.

Sending You Sunshine Close Up

Next, I die cut a vellum sentiment banner using the Fabulous Frames Die Collection. I heat embossed the sentiment from Simply Spring Borders using white detail powder and adhered it to the card front. I then added the bunny strip with foam tape. As a final embellishment, I once again gave the bunnies fluffy tails with a bit of white flocking.

Thank you so much for joining me today. Make sure to pop over to Nichole's blog for all of the details about today's contest and then check in with Amy, Ashley, Betsy, Danielle, Dawn, Heather, Kay, Laurie, and Melissa for more of today's group post. See you again soon!

Recipes:
Felt Bunny Basket
Stamps: Bunny Basket, Simply Spring Borders - Papertrey Ink
Cardstock: white
Ink: Aqua Mist, True Black - Papertrey Ink
Other: Classic Kraft, Harvest Gold, Melon Berry, Sweet Blush, Lavender Moon, and Aqua Mist Felt, Bunny Basket Die, Cover Plate: Basket Die, Easter Grass Die, Stitching Rectangles Die, Tremendous Tags Die - Papertrey Ink; Embroidery Floss - DMC; White Crochet Thread; Crepe Paper; White Pom Poms

Colorful Easter Card
Stamps: Bunny Basket, Simply Spring Borders - Papertrey Ink
Cardstock: white
Ink: Sweet Blush, Melon Berry, Summer Sunrise, Harvest Gold, Mint Julep, Aqua Mist, Lavender Moon, True Black - Papertrey Ink
Other: Glue Pad - Tsukineko; Crystal Glitter - Martha Stewart Crafts; Foam Tape - Scotch

Bunny Gable Box
Stamps: Simply Spring Borders, So Striking - Papertrey Ink
Cardstock: Clear Cardstock - Papertrey Ink; white
Ink: Vintage Jadeite, Aqua Mist, Stormy Sea, Harvest Gold - Papertrey Ink
Other: Gable Box Die, Simply Spring Borders Die, Tremendous Tags Die, Limitless Layers: 2 1/4" Oval Die Collection - Papertrey Ink; Foam Tape - Scotch; White Flocking - Stampendous; Copic; Lemon Baker's Twine - Divine Twine

Sending Sunshine Card
Stamps: Simply Spring Borders, So Striking, Blue Skies - Papertrey Ink
Cardstock: Aqua Mist, Vellum - Papertrey Ink; white
Ink: Vintage Jadeite, Aqua Mist, Stormy Sea, Harvest Gold - Papertrey Ink; VersaMark - Tsukineko
Other: Fabulous Frames Die, Modern Basics Stencil Collection - Papertrey Ink; White Detail Powder - Filigree; Foam Tape - Scotch; White Flocking - Stampendous

Wednesday, February 10, 2016

Introducing Tulip Time

Good morning, all! Welcome back to Day 6 of the Papertrey Ink 9th anniversary countdown! Nichole is introducing some wonderful Spring sets on her blog today and has invited the rest of us to help her celebrate. I'm going to be sharing a card with Betsy's new Tulip Time set this morning. These realistic tulips are going to make you giddy!

Easter Blessings Card

I began by lightly sponging Aqua Mist ink around the edges of a white card base. Next, I stamped the tulip stems with Vintage Jadeite and New Leaf inks. The tulip blooms came next in Lemon Tart, Harvest Gold, and Bright Buttercup inks. Look at that detail!

Easter Blessings Tulip Detail

Next, I heat embossed the Keep It Simple: Easter sentiment using gold detail powder.

Easter Blessings Close Up

I adhered a scalloped eyelet frame that I'd die cut from white cardstock using the new Cover Plate: Pretty Frame Die. Lastly, I added a simple white crochet thread bow for a soft finishing touch. Isn't it just so delicate and lovely?

Alrighty, friends. That's all for me today. Thank you so much for joining me today! Make sure to pop over to Nichole's blog to see what other announcements and challenges she's sharing this morning. She'll also be letting you know who else is joining Heather and Betsy in today's showcase. Thanks again for stopping by! Have a great day!

Recipes:
Stamps: Tulip Time, Keep It Simple: Easter - Papertrey Ink
Cardstock: white
Ink: Vintage Jadeite, New Leaf, Lemon Tart, Harvest Gold, Bright Buttercup, Aqua Mist - Papertrey Ink; VersaMark - Tsukineko
Other: Cover Plate: Pretty Frame Die - Papertrey Ink; Gold Detail Embossing Powder - Filigree; Crochet Thread

Tuesday, February 9, 2016

Introducing Paper Clippings

Good morning, friends, and welcome back to Day 5 of the Papertrey Ink 9th anniversary countdown! Remember: All of the new sets being featured this week will be available beginning at 10pm on February 15th. Nichole is sharing several fabulous surprises on her blog today and has invited the rest of us to help make some introductions. I'm going to be sharing two of Betsy's new sets today, Paper Clippings and Inspired: Savior. Let's get to it!

Oh Happy Day Card

I began by creating the watercolor background for my sentiment panel. I did a full color wash and flicked more concentrated color over the surface while it was still wet to give it a mottled appearance. After it was dry, I added more speckles to give it more depth.

Oh Happy Day Interior

While that was drying, I stamped a sentiment from Inspired: Savior inside a white card base using Ripe Avocado ink. I added the vine flourish from Paper Clippings along with a couple of flowers to dress things up a smidge. This is a nice detail that I rarely think to use, but I love the effect when I do.

Oh Happy Day Close Up

I stamped the sentiment in Ripe Avocado after the surface had dried the second time. Because the watercolor paper is textured I got a little "salt and pepper" effect on some of my text, but I actually really like the way that looks, so I went with it. I added the vines around the sentiment and mounted the panel to the front of my white card base.

Oh Happy Day Flower Detail

Next, I die cut a variety of flowers and stamped them with their coordinating images using Pure Poppy, Berry Sorbet (I'm on a one-woman mission to make everyone love this color as much as I do), and Harvest Gold. Before adhering the flowers to the sentiment panel, I heat embossed the tiny Lily of the Valley flowers with white powder first. Then I added the die cut flowers with a mix of flat and foam adhesives. I embellished the flower centers with tiny spots of clear glitter as a final touch.

So what do you think? I'm fairly certain Betsy is on a roll this year. Watch out world!

Thank you for joining me today! Make sure to check in with Nichole to see what other announcements and challenges she has up her sleeve today. She'll also have a list of the other designers that are joining Betsy and Danielle in today's showcase. Have a great day and I'll see you again very soon!

Recipe:
Stamps: Paper Clippings, Inspired: Savior - Papertrey Ink
Cardstock: Watercolor Paper - Ranger; white
Ink: Ripe Avocado, Pure Poppy, Berry Sorbet, Harvest Gold - Papertrey Ink; VersaMark - Tsukineko
Other: Paper Clippings Die - Papertrey Ink; White Detail Embossing Powder - Filigree; Foam Tape - Scotch; Crystal Glitter - Martha Stewart Crafts