Monday, January 18, 2016

Moments Inked: Finding Better Balance


Good morning, everyone! It's my turn to share with you how I'm using my Papertrey Ink Moments Inked Planner these days, so I thought I'd talk a little bit about balance and how I'm hoping to find better balance in 2016.

1.10_1.16 Weekly Spread


This past year was a wonderful one for Sean and me, but we completely lost sight of work/life balance. "Everyone does that" you say. "He opened a brand new restaurant last year, what do you expect?!" you ask. "You're self-employed; you can work whenever you want to" you insist. Well, maybe, but after months of working 12 to 18 hours a day, six or seven days a week we found ourselves burned out, tired, and not as connected to one another as is probably healthy. So when this year began, I was bound and determined to reclaim our balance.

The way I figure, the first step to finding balance is actually writing a schedule and sticking to it. I've never written a schedule for myself before; I just start working when I wake up and stop here and there for snacks masquerading as meals. No more! When Sean entered his schedule into our joint Google calendar I decided to write a schedule for myself based on his hours (in large part because when he's home I get distracted and want to spend time with him).

Banners And Envelope

I chose a Papertrey color for each of us (Canyon Clay for him and Aqua Mist for me) and stamped and die cut enough little banners for about six months in each of those colors. He writes his schedule four weeks at a time, so it will be easy to stay out ahead. We're both really committed to sticking to our schedules so we can spend our off time together doing things that we enjoy (and not mindlessly staring at our computers because we're too tired to do anything else).

1.17_1.23 Weekly Spread

I also wanted banners for my blog schedule and deadlines as well as for the various newsletters I handle for Papertrey. I chose to use Simply Chartreuse for all blog work. The deadlines and posts are differentiated by the secondary text stamps. The newsletters are all done in Stormy Sea and I used the small dot to specify which newsletter is which. The monthly news is stamped in Harvest Gold, the Design Team Tips in Winter Wisteria, and the Moments Inked in Hibiscus Burst. The nice thing about the Stormy Sea is that it's light enough that I can write the name of the Design Team member in charge of that week's newsletter (so I can crack the whip when they forget...just kidding, they're all really great).

January Dashboard

The easiest way for me to keep the banners handy is to have them in an envelope inside my planner. But rather than just tuck an envelope in a binder pocket I decided to create a monthly dashboard with a velcro tab attaching a glassine envelope to the back.

Back Of Banner Envelope

I paired the new Binder Page dies with the Monthly Moments: Year Round 1 Die to create my dashboard. I chose patterned papers and cardstock that coordinated with January's color scheme (Summer Sunrise, Canyon Clay, and Raspberry Fizz). It's perfect for keeping my banner sticker easily available and it's a handy landing spot for my Post-it to do lists (I love the white ones so very much).

Weekly Spread With Dashboard

I also created a simple key for the banners using the smallest Binder Page. I thought a visual reminder might be a good idea, not only for myself, but also if Sean wants to peek inside to know what's happening when.

Banner Key

I simply die cut a Fresh Snow Linen page and embellished it with some Simply Chartreuse patterned paper before sticking on one of each banner with a quick note regarding their purpose. This will be particularly important the first week of each month when I can't remember which newsletter was which color. Because that will happen, people.

So there you have it, a few ways I'm working to find a better balance in 2016. I hope you've enjoyed today's post! Have a great day and I'll see you again soon!

Recipes:
Banner Stickers
Stamps: Moments Inked: Planner Banners, Moments Inked: Blog Banners, Moments Inked: Family Banners - Papertrey Ink
Cardstock: Adhesive Sheets - Papertrey Ink
Ink: Canyon Clay, Aqua Mist, Stormy Sea, Harvest Gold, Winter Wisteria, Hibiscus Burst, Simply Chartreuse, True Black - Papertrey Ink
Other: Moments Inked: Planner Banners Die - Papertrey Ink

Dashboard & Post-Its
Stamps: Moments Inked: Posted - Papertrey Ink
Cardstock: Summer Sunrise Polka Dot Paper, Raspberry Fizz, Canyon Clay - Papertrey Ink
Ink: Summer Sunrise, Canyon Clay, Raspberry Fizz - Papertrey Ink
Other: Binder Page Die, Monthly Moments: Year Round 1 Die, White Post-It Notes - Papertrey Ink; Velcro; Glassine Envelope

Friday, January 15, 2016

Release In Review

Good morning, friends, and welcome back for Release Wrap Up day for this month's Papertrey Ink countdown. All of the new products we've been showcasing this week will be available tonight starting at 10pm EST on the Papertrey ink website. I have a couple of additional projects to share with you today, so let's get to it!

Let's start with a gift bag featuring the Enclosed: Butterfly collection.

Blessed Birthday Gift Bag

I began by die cutting two Front & Center #2 shapes (one for the front, one for the back) from Aqua Mist cardstock. I used the solid butterfly die to cut a shape from the center of the front piece. I backed the opening with a piece of Confetti Toss patterned paper before adhering both Front & Center pieces to a white lunch sack. Next, I heat embossed the sentiment bits onto the front of the bag using white embossing powder.

Blessed Birthday Gift Bag Close Up

Then, I xyroned a piece of Fresh Snow Linen cardstock and die cut it with the outline butterfly die. I die cut a solid butterfly from clear cardstock and adhered the two together. I carefully folded at the wings and adhered the butterfly to the bag using foam tape. A couple of pearl head pins were ideal for antennae. Now, isn't that a festive gift bag?

The last project I have to share with you for this countdown features Bitty Butterflies and the Cover Plate: Butterflies Die.

Brave Enough To Fly Card

I began by die cutting a scrap of cardstock with the Cover Plate: Butterflies die to make a template. I I lightly traced that template onto a white card base so I would know the approximate location for each of the butterflies. Then I used the splatter images from Drips & Dribbles to randomly stamp inside and slightly overlapping those lines.

Brave Enough To Fly Close Up

Once I was finished with the splatter stamping, I created a sentiment banner. I die cut a First Place banner from Smokey Shadow cardstock and heat embossed the sentiment from Bitty Butterflies using white detail powder. I then die cut a nice, clean version of the Cover Plate from white cardstock and adhered that and the banner to the card front. Next, I die cut a piece of Linen Vellum using the Cover Plate die. I trimmed out the butterfly and adhered it to the card front, folding its wings upward in the process. I love all that white with the pops of color!

That's all I have for you today, friends, but you can check in with Nichole, Amy, Ashley, BetsyDanielle, Dawn, Heather, Kay, Laurie, and Melissa to see more inspiration using this month's new releases. Have a great day and I'll see you all again here soon!

Blessed Birthday Gift Bag
Stamps: Enclosed: Butterfly - Papertrey Ink
Cardstock: Aqua Mist, Fresh Snow Linen, Confetti Toss Patterned Paper, Clear Cardstock - Papertrey Ink
Ink: VersaMark - Tsukineko
Other: Enclosed: Butterfly Die, Front & Center #2 Die - Papertrey Ink; Pearl Head Pins - Dritz; Foam Tape - Scotch; Xyron; White Lunch Bag

Brave Enough To Fly Card
Stamps: Drips & Dribbles, Bitty Butterflies - Papertrey Ink
Cardstock: Linen Vellum, Smokey Shadow - Papertrey Ink; white
Ink: Harvest Gold, Summer Sunrise, Simply Chartreuse, Aqua Mist, Pure Poppy - Papertrey Ink; VersaMark - Tsukineko
Other: Cover Plate: Butterfly Die, First Place Die - Papertrey Ink; Vellum Tape - Scotch

Thursday, January 14, 2016

Introducing Coin Purse II

Good morning, Friends! Are you ready for Day 5 of the Papertrey Ink January countdown. I know some of you have been curious about what today holds since all of the stamp sets have been introduced, but you should know by now that there's always something hiding up our sleeves. Ha! Well, I promise today has been worth the wait! Today we're introducing Erin Lincoln's newest stitching die, the Coin Purse II.

Of all of the things I create and share on my blog, stitching projects are some of my absolute favorites. This new coin purse die is completely adorable and I'm so excited to show you how I've transformed this sweet coin purse into a delightful mini handbag for my favorite little girl.

Josie's Purse

My niece Josie is at just the right age to start playing with itty bitty accessories and she has a birthday coming in a few months. I thought this might be the perfect opportunity to create an extra special purse that was just her size.

Josie's Purse Front

I die cut the purse parts from Sweet Blush and Vintage Cream felt and the details (the patches and closure) from Melon Berry and Simply Chartreuse felt. The monogram (because who doesn't love a monogram?) was cut from Melon Berry and the flowers and their leaves were cut from Vintage Cream and Simply Chartreuse. A Harvest Gold button and about 18" of Harvest Gold Saddle Stitched ribbon rounded out the initial supplies.

Josie's Purse Back

I knew I wanted to add a shoulder strap, so I used the ribbon slit die from the Sewing Staples: Needle Book Die collection to add two openings on the back of the purse. I stitched the ribbon into place and added the heart any my initials before embellishing the front flap.

Josie's Purse Monogram Close Up

There, I stitched on the flowers, leaves, and monogram. I used yellow french knots to tie in the color of the strap and button. I then added the corner patches and button to the front panel of the purse before stitching together my closure using Erin's figure 8 technique (watch her video for a complete explanation). All that was left to do was sew together the outer edge and my mini handbag was complete. I am totally in love with this die and I can't wait to make a matching coin purse for my sister!

Next up, I have a Go For The Goal shaker card to share with you.

Coach Thank You Shaker Card

I thought the movement of a shaker card would be a nice complement to the soccer theme. I began by die cutting and stamping the jersey and ball. Then, I xyroned a piece of True Black cardstock and die cut it with the Thanks, Coach die, sticky side (still covered) up. I removed the adhesive backing and covered the surface with fine, black glitter.

Coach Thank You Close Up

Next, I die cut the Cover Plate: Stars die from white cardstock and stamped it with the sentiment before backing it with a piece of clear cardstock. I added foam tape to make it a shaker box, which I filled with chunky pink glitter. I adhered the jersey and ball to the card front with flat adhesive and then mounted the coach die cut with foam tape. This same design could be used in almost any color combination depending on your team's colors.

And finally, I have one last Background Basics: Splats card today.

So Sweet Of You Card

I began by stamping a Mint Julep (I love this color) card base with the large dots in Fresh Snow ink. Then, I die cut the flowers and leaves from Bold Blossoms from white cardstock and the flower centers from Smokey Shadow. I stamped the centers with True Black ink and the leaves with Pinefeather.

So Sweet Of You Close Up

You all know I can't resist a prime rock 'n roll opportunity, so I did just that using Berry Sorbet and Pure Poppy on the flowers. I stamped an Outlined frame onto the card base and arranged my flowers around it, adhering with flat and foam adhesives. I stamped an extra Outlined frame onto a scrap of white cardstock and trimmed out the center. On that, I stamped the sentiment in True Black before tucking it into the frame beneath the flowers. A little black glitter embellishment was all I needed to finish it off. Don't you love those colors together?!

That's all for me today, friends! Make sure to visit NicholeAmy, AshleyBetsy, Danielle, Dawn, Heather, Kay, Laurie, Melissa, and Erin to see how they're using the new Coin Purse II die today. I'll see you back here tomorrow with my Release In Review post. Have a wonderful day!

Recipes:
Josie's Monogrammed Purse
Dies: Coin Purse II Die, Sewing Staples: Needle Book Die Collection, Sewing Staples: Floral Cluster Die Collection, Sew Stylish Alphabet 1 Die - Papertrey Ink
Felt: Sweet Blush, Melon Berry, Vintage Cream, Simply Chartreuse - Papertrey Ink
Other: Harvest Gold Saddle Stitch Ribbon, Harvest Gold Button - Papertrey Ink; Embroidery Floss - DMC

Soccer Coach Shaker Card
Stamps: Go For The Goal, Thanks, Coach - Papertrey Ink
Cardstock: True Black, Clear Cardstock - Papertrey Ink; white
Ink: True Black, Hibiscus Burst - Papertrey Ink
Other: Cover Plate: Stars Die, Go For The Goal Die, Thanks, Coach Die - Papertrey Ink; Chunky Tourmaline Glitter, Fine Onyx Glitter - Martha Stewart Crafts; Foam Tape - Scotch

So Sweet Of You Card
Stamps: Background Basics: Splats, Bold Blossoms - Papertrey Ink
Cardstock: Mint Julep, Smokey Shadow - Papertrey Ink; white
Ink: True Black, Pure Poppy, Berry Sorbet, Pinefeather - Papertrey Ink
Other: Bold Blossoms Die - Papertrey Ink; Foam Tape - Scotch; Fine Onyx Glitter - Martha Stewart Crafts - Papertrey Ink

Wednesday, January 13, 2016

Introducing Petite Places Home & Garden

Good morning, everyone, and welcome back to Day 4 of the Papertrey Ink January countdown! Today's group post is all about Petite Places: Home & Garden. Betsy has saved the best Petite Places for last! This series may be coming to a close, but the Home & Garden edition is so versatile, you definitely won't be disappointed. Let's get on to some projects, shall we?

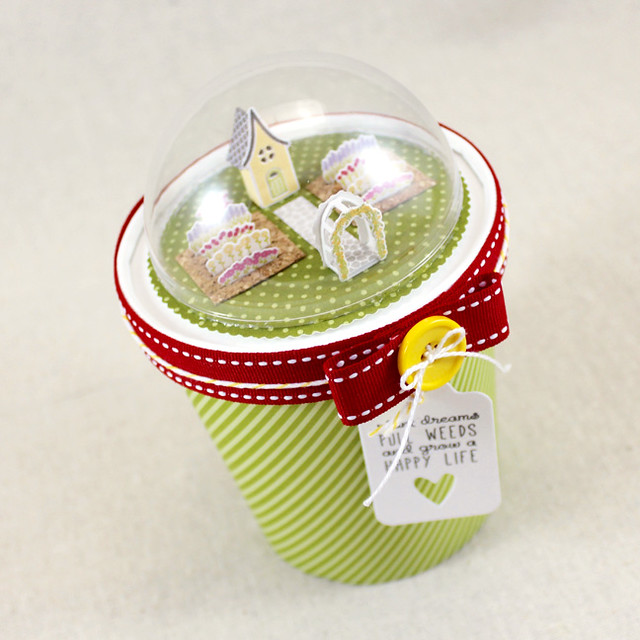
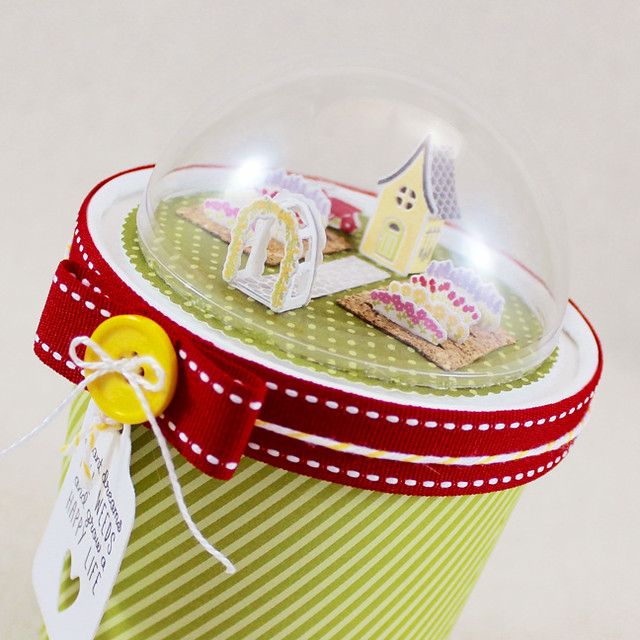
My first project today is a decorated pint container. These are the perfect size for a few seed packets and some peat seed starters or a handful of spring bulbs (Narcissus would be perfect!).

Petite Places Garden Shed Top View Left

I began by die cutting the shed components, wheelbarrow, flowers, and trellis parts from Rustic White cardstock. I stamped those with their coordinating images (there are even tools to hang on the side of the shed!) and assembled the shed and trellis.

Petite Places Garden Shed Close Up

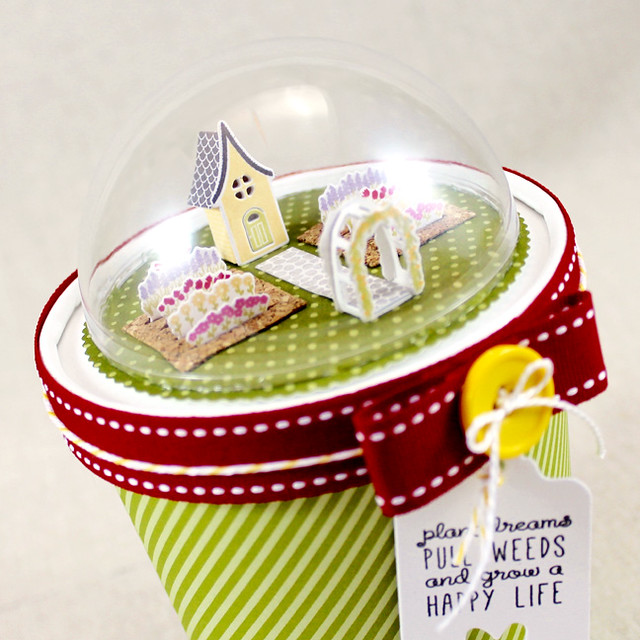
Next, I die cut the garden plots from cork sheeting and tucked the flowers into place. I wanted a pathway, so I pulled out Petite Places: Walk In The Park for the center aisle. I stamped third generation Smokey Shadow onto Soft Stone to get the right color balance.

Petite Places Garden Shed Tag

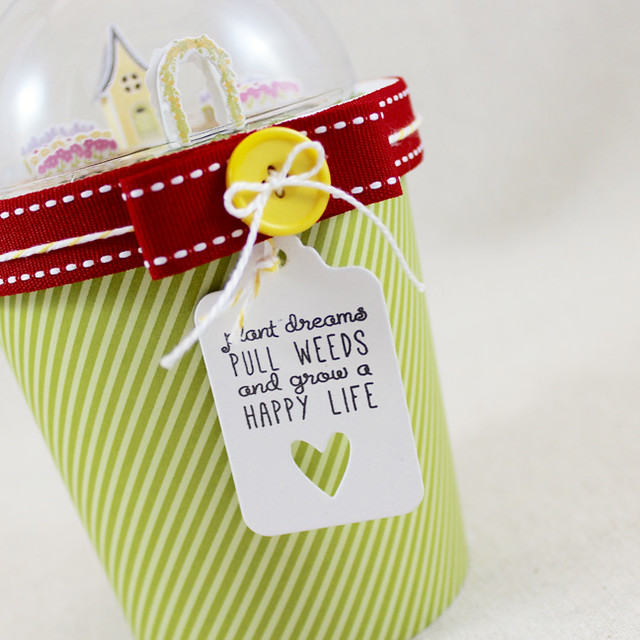
Then, I decorated a pint container using Simply Chartreuse patterned paper and Pure Poppy ribbon. I tied a little sentiment tag to the container with Baker's Twine before I adding a little button-embellished bow to hide the ribbon seam.

Petite Places Garden Shed Close Up Left

Then, I die cut a Scene It: Basic Backer shape from Ripe Avocado patterned paper and added it to the top of the container with foam tape.

Petite Places Garden Shed Pint Container

I adhered my garden scene into place and then topped the whole thing with a clear dome. Isn't it the cutest?!

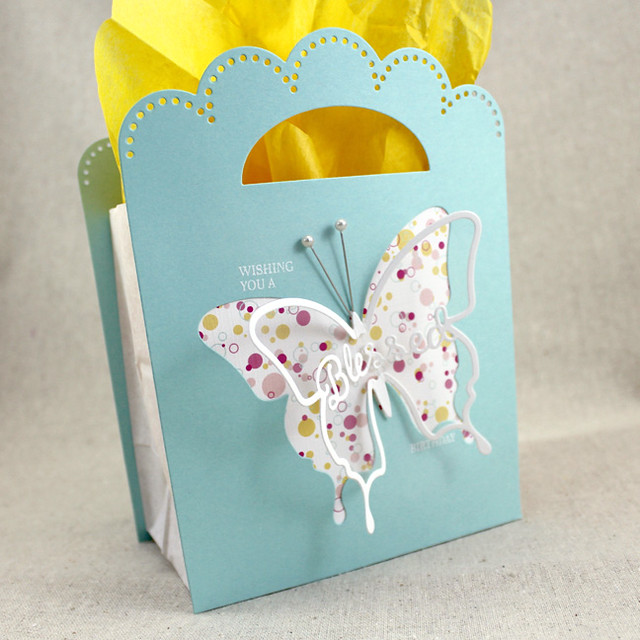
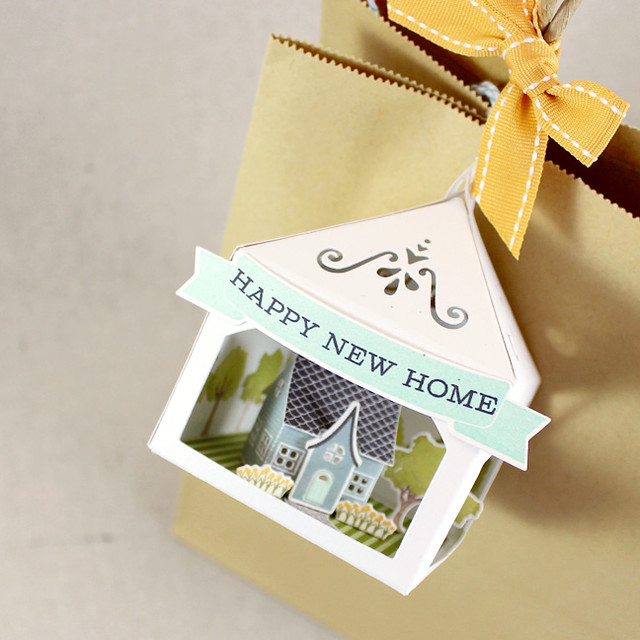
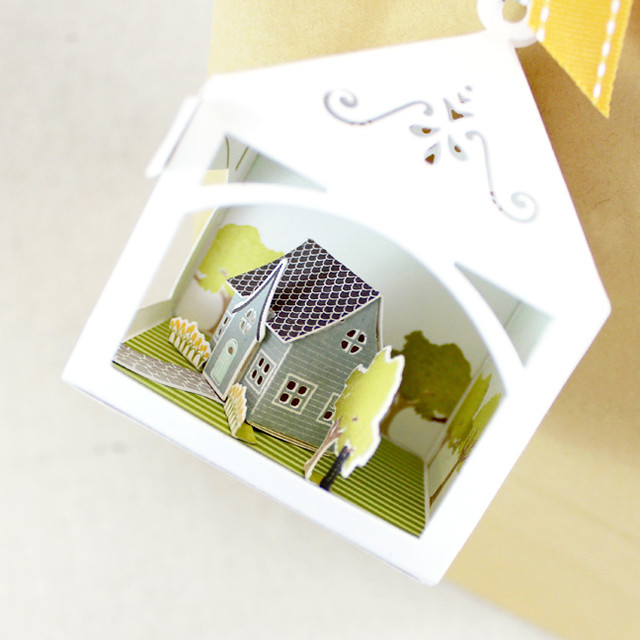
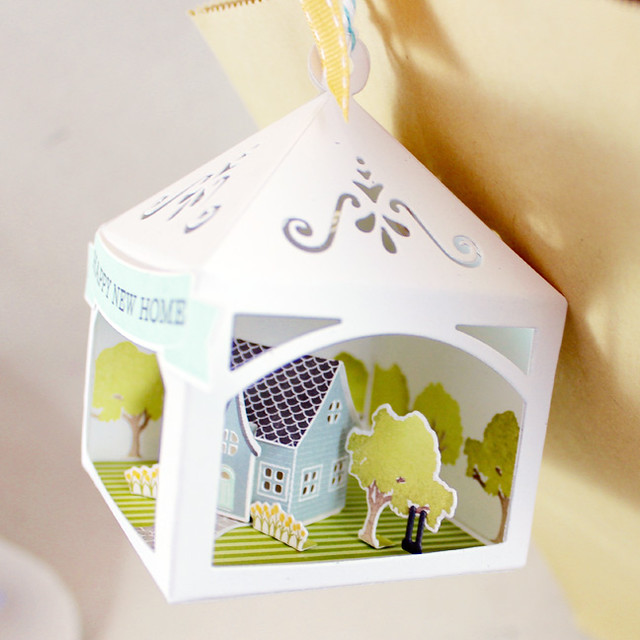
Next, I have a 3D tag that I created for a new neighbor or friend moving into their first house.

Petite Places Happy New Home 3D Tag

I began by die cutting and assembling a Petite Ornament: Square shape from Rustic White cardstock. I added stamped scene panels to two of the windows using the trees in Petite Places: Home & Garden and Petite Places: Walk In The Park.

Petite Places Happy New Home 3D Tag House Side View

I also added a bit of sponging with Aqua Mist to suggest a clear, blue sky. The backs of those panels were stamped with the plaid image from Half & Half so the outside would still have a bit of interest, too. Next, I added the "grass" patch using a square of Simply Chartreuse patterned paper.

Petite Places Happy New Home 3D Tag House Close Up

Once the ornament itself was ready to go, I went to work on the components for the inside. I die cut the house, tree, and flower beds from Rustic White cardstock and stamped all of them with their coordinating images. I added a die cut swing to the tree with Smokey Shadow cardstock and created a sidewalk by stamping the pathway from Petite Places: Walk In The Park onto Soft Stone cardstock.

Petite Places Happy New Home 3D Tag Tree Side

Then I went about creating my little scene inside the ornament. I adhered everything at an angle, so I wouldn't have a "bad" side.

Petite Places Happy New Home 3D Tag Top View

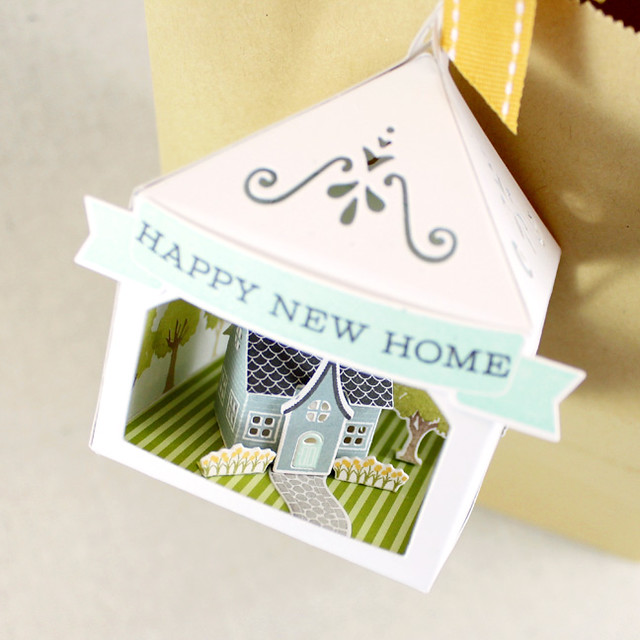
Next, I die cut a Bountiful Banners shape from Rustic White and stamped it with the coordinating image in Aqua Mist ink. I added the sentiment, from Keep It Simple: Home, in Smokey Shadow ink before adhering it to the ornament. I used a bit of Baker's Twine to tie my tag to a bag handle and then added a small Summer Sunrise bow for a pop of color. I'm so smitten with this set. Everything turns out so cute!

And lastly today, I have one more 
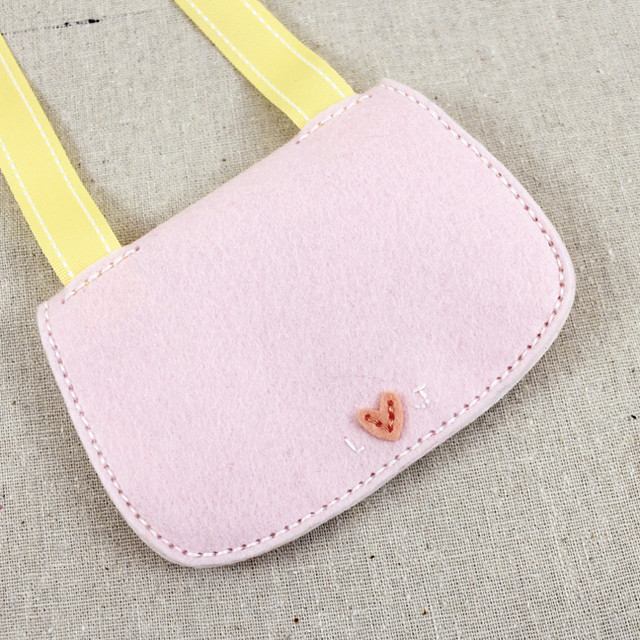
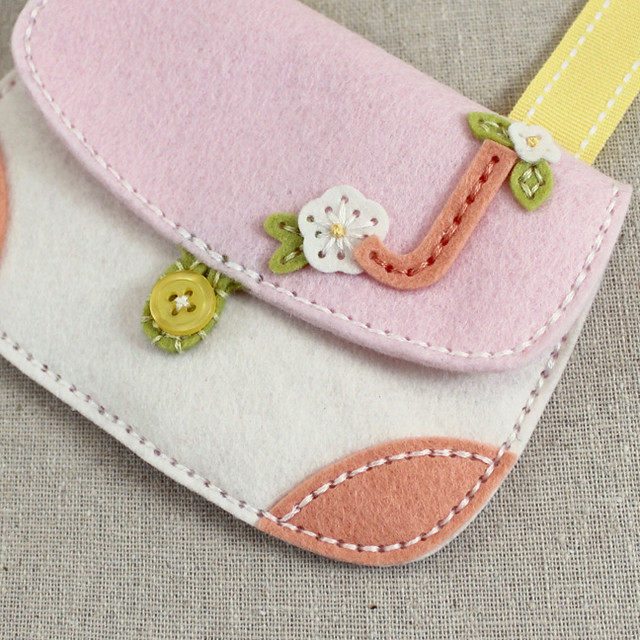
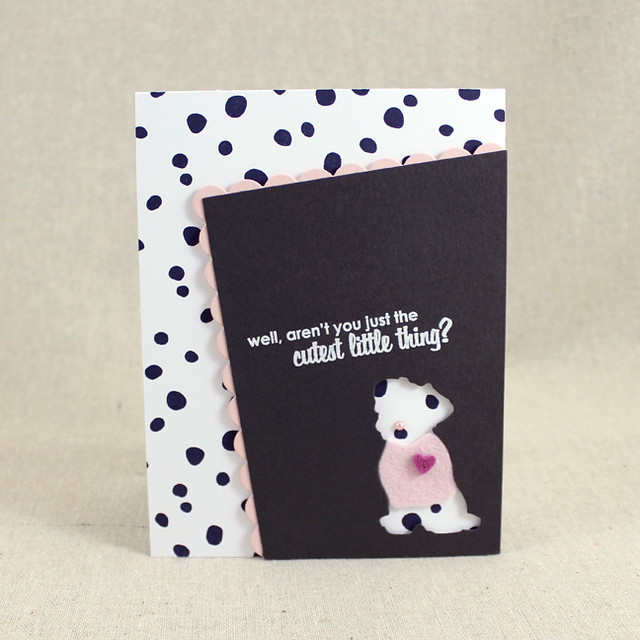
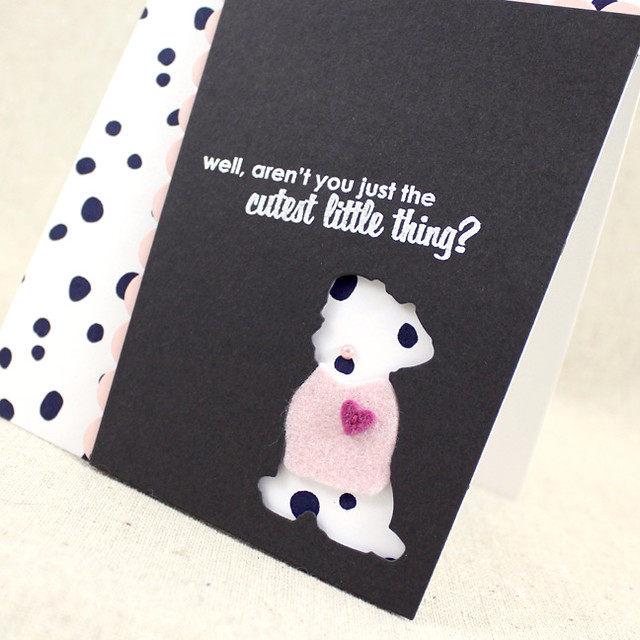
Background Basics: Splats card to share with you. All week, I've been working with these images and thinking "dalmatian." So I thought I'd go ahead and make a card for someone who may have gotten a new puppy (the spots would also work in other colors for different breeds, too).

New Puppy Card

I began by repeatedly stamping the large dot strip onto a white card base using True Black ink. Next, I die cut the medium Tipped Tops shape from Smokey Shadow cardstock. I die cut the dog image, leaving a negative, and heat embossed the sentiment using white powder. I added a scalloped border to that piece using the Embroidered Frames: Dots die and Sweet Blush cardstock.

New Puppy Close Up

I adhered that panel into place with foam tape and then added a Sweet Blush puppy sweater that I'd embellished with a tiny heart. A pink puppy nose created with a colored-to-match pearl was the perfect finishing touch.

That's all for me today, friends. I hope you've enjoyed today's post. Make sure to check in with Nichole,Amy, Ashley,Betsy, Danielle, Dawn, Heather, Kay, Laurie, and Melissa for more Petite Places inspiration. I'll see you back here tomorrow. Have a great day!

Recipes:
Garden Shed Pint Container
Stamps: Petite Places: Home & Garden, Petite Places: Walk In The Park - Papertrey Ink
Cardstock: Rustic White, Soft Stone, Simply Chartreuse Patterned Paper, Ripe Avocado Patterned Paper - Papertrey Ink
Ink: Harvest Gold, Pure Poppy, Simply Chartreuse, Smokey Shadow, Summer Sunrise, Winter Wisteria, Hibiscus Burst - Papertrey Ink; VersaMark - Tsukineko
Other: Petite Places: Home & Garden Die, Tremendous Tags Die, Scene It: Basic Backer Die, Pure Poppy Saddle Stitch Ribbon, Harvest Gold Button, Cork Sheets, Clear Dome, Pint Container, Pint Size Wrap Die - Papertrey Ink; Foam Tape - Scotch; Silver Embossing Powder - Filigree, Baker's Twine - Divine Twine

New Home 3D Tag
Stamps: Petite Places: Home & Garden, Petite Places: Walk In The Park, Bountiful Banners, Keep It Simple: Home, Half & Half - Papertrey Ink
Cardstock: Rustic White, Soft Stone, Simply Chartreuse Patterned Paper, Smokey Shadow - Papertrey Ink
Ink: Simply Chartreuse, Ripe Avocado, Limeade Ice, Classic Kraft, Dark Chocolate, Stormy Sea, Aqua Mist, Smokey Shadow, Summer Sunrise - Papertrey Ink
Other: Petite Places Home & Garden Die, Petite Ornament: Square Die, Petite Places: Walk In The Park Die, Bountiful Banners Die - Papertrey Ink; Scor Tape; Foam Tape - Scotch; Baker's Twine - Divine Twine

New Puppy Card
Stamps: Background Basics: Splats, Sweet Cheeks - Papertrey Ink
Cardstock: Smokey Shadow, Sweet Blush - Papertrey Ink; white
Ink: True Black - Papertrey Ink; VersaMark - Tsukineko
Other: Oh Come All Ye Faithful Die, Tipped Tops Die, Embroidered Frames: Dots Die, Sweet Blush Felt, Autumn Rose Felt - Papertrey Ink; White Embossing Powder - Filigree; Foam Tape - Scotch; Self-Adhesive Pearl - Mark Richards; Embroidery Floss - DMC

Tuesday, January 12, 2016

Butterfly Inspirations

Good morning, everyone, and welcome back to Day 3 of the Papertrey Ink January countdown! We're introducing several new butterfly products today that any butterfly fan is going to fall head-over-heels for in no time. Enough dawdling! Let's get to it!

Source

Source

Sean and I are lucky enough to live next to a meadow that, come Spring, seems to house every gorgeous color of butterfly in existence. I had those beautiful, fluttering creatures in mind while playing with these new stamps.

Rainbow Butterflies Card

I started by heat embossing the butterflies from Bitty Butterflies onto white cardstock using clear embossing powder. I sponged each one with ink before punching them out and arranging them in rainbow order onto a white panel.

Rainbow Butterflies Close Up

I attached each circle with foam tape and adhered the panel to a striped vellum card base with vellum tape.

Rainbow Butterflies Card Interior

Next, I stamped the sentiment and an additional butterfly onto a second white panel with True Black ink. I colored the butterfly with a handful of colored pencils before adding an Aqua Mist mat. That piece was adhered inside the card, also with foam tape. I love how all the colors on the outside come together on the butterfly on the inside.

Next up, I have another Background Basics: Splats card to share.

When It Rains Card

I began by die cutting a Wine Bottle Tag shape from white cardstock, trimming off the top loop section. On that, I stamped the small dots strip using Aqua Mist ink. I then stamped a second time without reinking to give a little depth to the dots. Next, I stamped the umbrella handle and sentiment, both from Scattered Showers, using Stormy Sea and Royal Velvet inks. I die cut the umbrella shape and stamped it with the coordinating image in Winter Wisteria before adhering it to the tag shape with foam tape. The So Striking clouds were die cut from a sheet in the coordinating patterned paper collection and adhered to the top of the tag to soften that edge. I also die cut a Loop De Loop border and adhered that to the right side of the tag.

When It Rains Close Up

I wanted to get the Aqua in there one more time, so I die cut a Get A Handle On It banner shape and stamped it with the plaid image from Half & Half. I layered those pieces on a Winter Wisteria card front that I'd textured with the Sunrise Impressions 1 Impression Plate. The card still needed a little something, so I embellished a few random "raindrops" with Sugar Cube glitter for sparkle.

And last, but certainly not least, is another Go For The Goal card.

2016 Soccer Grad Card

I began by Xyroning a piece of white cardstock and die cutting it with the Letterman Stitched Number Dies, sticky side (still covered) up. I removed the adhesive backing and sprinkled the letters with white flocking. It's an alternative to felt if you're looking for interesting texture with a little less bulk. I die cut a Pure Poppy layer using the Letterman Stitched Number Mat Dies and stitched those together with black embroidery thread.

2016 Soccer Grad Close Up

Then, I die cut a 1 3/4" circle from white cardstock and stamped it with the soccer ball image using True Black ink. Next, I used my score board to emboss lines into a white panel and stamped it with the tiny star background from Bitty Background Blocks II in Spring Rain ink. I followed up with the sentiment from Keep It Simple: Graduation in True Black ink. I attached that panel to a Pure Poppy card base and added the numbers and soccer ball with foam tape.

Thank you so much for joining me today! Make sure to check in with Nichole, Amy, Ashley,Betsy, Danielle, Dawn, Heather, Kay, Laurie, and Melissa for more beautiful butterfly projects. I'll see you again tomorrow!

Recipes:
Rainbow Butterfly Card
Stamps: Bitty Butterflies - Papertrey Ink
Cardstock: Aqua Mist, Striped Vellum - Papertrey Ink; white
Ink: Pure Poppy, Summer Sunrise, Harvest Gold, Mint Julep, New Leaf, Aqua Mist, Blueberry Sky, Winter Wisteria, Hibiscus Burst, True Black - Papertrey Ink; VersaMark - Tsukineko
Other: 1 3/8" Circle Punch - EK Success; Vellum Tape, Foam Tape - Scotch; Clear Embossing Powder - Filigree; Colored Pencils - PrismaColor

When It Rains Card
Stamps: Background Basics: Splats, Scattered Showers, Half & Half - Papertrey Ink
Cardstock: Winter Wisteria, Aqua Mist, So Striking Patterend Paper Collection - Papertrey Ink; white
Ink: Stormy Sea, Winter Wisteria, Aqua Mist, Royal Velvet - Papertrey Ink
Other: Scattered Showers Die, Get A Handle On It Die Collection, Loop De Loop Border Die, So Striking Die, Sunrise Impressions 1 Impression Plate - Papertrey Ink; Foam Tape - Scotch; Sugar Cube Glitter - Martha Stewart Crafts

2016 Soccer Grad Card
Stamps: Go For The Goal, Bitty Background Blocks II, Keep It Simple: Graduation - Papertrey Ink
Cardstock: Pure Poppy - Papertrey Ink; white
Ink: Spring Rain, True Black - Papertrey Ink
Other: Letterman Stitched Number Dies, Letterman Stitched Number Mat Dies, Limitless Layers: 1 3/4" Circle Die Collection - Papertrey Ink; White Fun Flock - Stampendous; Foam Tape - Scotch; Black Embroidery Thread - DMC; Xyron; T1 Marker - Copic

Monday, January 11, 2016

More Background Basics: Splats and Go For The Goal

Good morning, friends! Welcome back to Day 2 of the Papertrey Ink January countdown. I'm so glad to hear about your enthusiasm for this month's sets! I’ve seen a few requests for other sports that folks want to see in the future, so I’ll just take a moment to remind you of which sports I’ve already tackled (no pun…well, only a little bit of a pun intended):

Baseball (7th Inning Stretch)
Golf (On The Links)

Anyway, I have a couple of additional projects to share with you today, so let's get to it!

Let's start today with a baby card featuring Background Basics: Splats.

Baby Boy Teddy Bear Card

I started by die cutting the word "baby" out of a panel of white cardstock using the Modern Alphabet Upper die collection. There's only one letter B, so it required two passes to get the whole word. I simply used an extra "B" shape as a placeholder to make sure I got the spacing right. No sweat!

Baby Boy Teddy Bear Close Up

Then, I stamped the Keep It Simple: Baby sentiment and teddy bear using Spring Rain and Dark Chocolate inks. Next, I traced the die cut letters onto a white card base and stamped the open areas with one of the small background blocks in the new Splats set (I used a sticky note to mask off each letter to avoid overlap).

Baby Boy Teddy Bear Card Interior

On the inside I stamped the Tucked In: Baby sentiment in Dark Chocolate ink. I wanted a little extra embellishment, so I stamped the small dots strip using second generation Spring Rain ink (which makes for easier legibility, but much more difficult photography). To finish up, I erased any errant pencil lines and attached the top panel to the card base using foam tape. A tiny crochet thread bow is the perfect to add a sweet touch to the teddy.

Next up is Go For The Goal. The idea behind this card was "blood, sweat, tears, and mud." As I recall from my sister's (much more successful) soccer career all four generally made an appearance at one time or another.

Happiness In Winning Card

I started by stamping a collage of images from Go For The Goal, Background Basics: Splats (the large dot strip), and Drips & Dribbles using Fine Linen, Classic Kraft, and Dark Chocolate inks. I sponged those same inks around the perimeter of the card to soften the edges a bit and then added a few "blood" spots by inking with Pure Poppy and Scarlet Jewel inks (the two colors together looks more realistic than one or the other alone). I added texture to the card front with the Linen & Canvas Impression Plate and set it aside.

Happiness In Winning Close Up

Next, I stamped the Outlined frame onto Rustic White cardstock using the same Pure Poppy/Scarlet Jewel combo. The sentiment was then stamped using True Black ink. I trimmed out the frame and adhered it to the card base using foam tape.

Well, that's all for me today. Thank you so much for joining me. Make sure to check in with Nichole, Betsy, Danielle, Dawn, and Melissa for even more inspiration. Have a great day and I'll see you tomorrow!

Recipes:
Baby Boy Teddy Bear Card
Stamps: Background Basics: Splats, Polka Dot Parade #4, Keep It Simple: Baby, Tucked In: Baby - Papertrey Ink
Cardstock: white
Ink: Spring Rain, Blueberry Sky, Aqua Mist, Mint Julep, Dark Chocolate - Papertrey Ink
Other: Modern Alphabet Upper Die Collection - Papertrey Ink; Foam Tape - Scotch; White Crochet Thread

Happiness In Winning Card
Stamps: Background Basics: Splats, Go For The Goal, Drips & Dribbles
Cardstock: Classic Kraft, Rustic White - Papertrey Ink
Ink: Fine Linen, Classic Kraft, Dark Chocolate, Pure Poppy, Scarlet Jewel, True Black - Papertrey Ink
Other: Linen & Canvas Impression Plate - Papertrey Ink; Foam Tape - Scotch

Sunday, January 10, 2016

Introducing Go For The Goal and Background Basics: Splats

Good morning, friends, and welcome to the kick off to Papertrey Ink's January countdown. Today I have the pleasure of introducing you to my two sets debuting this month, Go For The Goal and Background Basics: Splats (all new products will be available on January 10th at 10pm EST). Nichole, Heather, and Dawn will also be introducing these new sets today, so make sure to pop in and visit them, too! Let's get on to a few projects, shall we?

I'm going to go ahead and start with the Background Basics: Splats set. This set was inspired by one of my very favorite scarves (I have a little bit of a thing for scarves) and I can't wait to explore all of the possibilities this set has to offer.

Sending Hugs Card

On this first card, I started by stamping a single row of dots onto a white panel. I inked it with Lemon Tart, Harvest Gold, Summer Sunrise, Canyon Clay, and Terra Cotta Tile to get the gradient of color. Next, I die cut the panel with the Sentiment Splits: Curve Vertical die and attached the pieces to a Terra Cotta Tile card base using foam tape.

Sending Hugs Close Up

Next, I die cut the script "Hugs" from Tropical Teal cardstock and attached it to the card front with additional foam tape. I die cut a Sketched Shapes banner from white cardstock and stamped it with the companion sentiment from Big Hugs before attaching it to the card base, also with foam tape.

Next up I've used the Background Basics: Splats to create a rainbow behind a Text Block shape.

Let's Party Rainbow Card

I began by stamping rows of dots onto a white card base using Pure Poppy, Summer Sunrise, Lemon Tart, Simply Chartreuse, and Aqua Mist inks. Next, I die cut a Text Block: Party Time shape from Tropical Teal cardstock and coated the front with glitter.

Let's Party Rainbow Close Up

I layered that with three white Text Block shapes to give it some depth and then adhered the whole piece to the rainbow card base. I added a white crochet thread bow for an extra pop of softness. Easy as can be!

Now let's get to Go For The Goal! I played soccer (poorly) as a child. Truth be told, I was better at picking dandelions. Be you a scoring phenom or simply a fan, this set is for you!

Go For The Goal Card

I started my first card by masking off a circle on a white card base and sponging with Spring Rain ink. Next, I die cut a Simply Chartreuse circle and stamped it with Background Basics: Woodgrain to make it look grassy. I trimmed the circle in half(ish) with the Pinking Shears Border Die and then textured it with the Linen & Canvas impression plate for added texture. I then snipped the top edge with scissors to make it fringe. I heat embossed the sentiment onto the grassy circle using white embossing powder and attached it to the card front atop the sponged circle.

Go For The Goal Close Up

Next, I die cut a circle using the Limitless Layers: 1 3/4" Circle Die Collection and stamped it with the soccer ball using True Black ink. It felt a little bare, so I gave it some depth by adding a shadow using a T1 Copic on one edge. To finish up, I simply tucked the ball into the grass and attached it to the card front with foam tape. It's nice and simple and could be used to encourage your favorite soccer star, no matter their gender.

I have one last card to share with you today. I had a lot of fun playing around with the background on this one.

Ultimate Champion Card

I began by repeatedly stamping the soccer field image onto a Rustic White panel using New Leaf ink. I then went back in and added the "x, " "o," and dashed line images with Dark Chocolate ink. Fair warning, I have no idea if any of these plays are even close to legit, but I had fun stamping them and that's really all that matters. The soccer field image has built-in texture, so the background didn't really need anything else to give it interest.

Ultimate Champion Close Up

Next, I stamped the Mia Hamm quote onto a piece of vellum and heat embossed with clear powder. Because the ink doesn't dry quickly on the coated surface of the vellum I didn't even need to stamp a second time with sticky ink and this way the ink was sealed in. Hooray for double duty, am I right?! I wrapped the vellum around the background panel and attached it on the back to hide the adhesive. All I needed to do to wrap this one up was attach the panel to a Classic Kraft card base. Simple.

Ok, friends. That's all for me today. I hope you've enjoyed today's post! I'll be back tomorrow with more of Background Basics: Splats and Go For The Goal. I hope to see you then! In the meantime, Nichole, Betsy, Dawn, Heather, and Erin all have posts to share with you today. See you soon!

Recipes:
Sending Hugs Card
Stamps: Background Basics: Splats, Big Hugs - Papertrey Ink
Cardstock: Terra Cotta Tile, Tropical Teal - Papertrey Ink; white
Ink: Lemon Tart, Harvest Gold, Summer Sunrise, Canyon Clay, Terra Cotta Tile, True Black - Papertrey Ink
Other: Big Hugs Die, Sentiment Splits: Curve Vertical Die, Sketched Shapes Die - Papertrey Ink; Foam Tape - Scotch

Let's Party Card
Stamps: Background Basics: Splats - Papertrey Ink
Cardstock: Tropical Teal - Papertrey Ink; white
Ink: Pure Poppy, Summer Sunrise, Lemon Tart, Simply Chartreuse, Aqua Mist - Papertrey Ink
Other: Text Block: Party Time - Papertrey Ink; Feldspar Glitter - Martha Stewart Crafts; White Crochet Thread; Xyron

Go For The Goal Card
Stamps: Go For The Goal, Background Basics: Woodgrain - Papertrey Ink
Cardstock: Simply Chartreuse - Papertrey Ink; white
Ink: Ripe Avocado, True Black, Spring Rain - Papertrey Ink - Papertrey Ink; VersaMark - Tsukineko
Other: Pinking Shears Border Die, Limitless Layers: 1 3/4" Circle Die Collection, Linen & Canvas Impression Plate - Papertrey Ink; Nesting Circles Die - Quickutz; Foam Tape - Scotch; T1 Marker - Copic; White Detail Embossing Powder - Filigree

Ultimate Champion Card
Stamps: Go For The Goal - Papertrey Ink
Cardstock: Rustic White, Classic Kraft, Stamper's Select Vellum - Papertrey Ink
Ink: New Leaf, Dark Chocolate - Papertrey Ink
Other: Clear Detail Embossing Powder - Filigree; Foam Tape - Scotch