Monday, August 31, 2015

Introducing The Quick Stitch: Beaded Holiday Kit

Good morning, friends! I have the absolute pleasure of getting to introduce you to Erin Lincoln's newest Quick Stitch kit from Papertrey Ink.

The third Quick Stitch Kit will be released on September 1st and it is entitled "Beaded Holiday". This kit reminds us of days gone by. When women spent quiet evenings by the fire, doing handwork. A time when handmade was best. The basic holiday stitching shapes in Beaded Holiday can be used for so many different types of projects, everything from keepsake gift tags, to tree ornaments, to holiday garland. Think gift card holders, holiday party favors and more! Erin even has you covered when it comes to decorating your holiday stitching projects. The clever beaded motif dies pre-cut all of your holes so the beading process is a snap and perfectly precise. Get your kit tomorrow night so you can get a head start on holiday projects!

Let me tell you, this kit is truly a joy to use! With it, I've created home decor, gift packaging, even a little festive style for Yuletide entertaining. And Erin has made it so easy to add sparkle to the seasonal shapes, that these beautiful projects come together in no time at all. I've had so, so much fun with this batch of projects. So without further ado, let's get on to some holiday goodness!

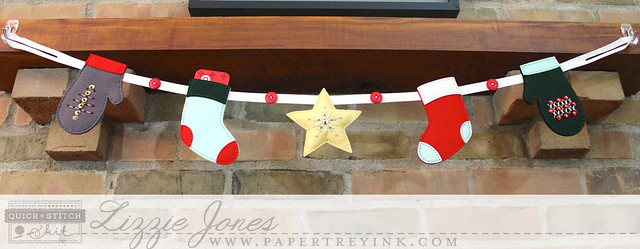
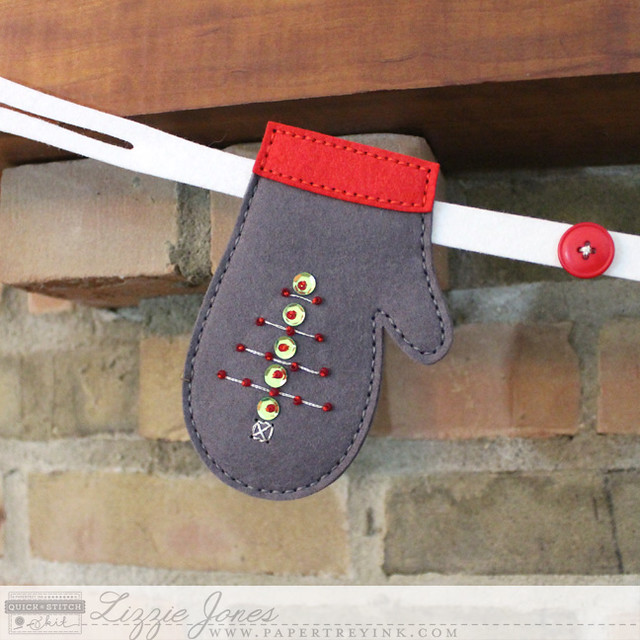
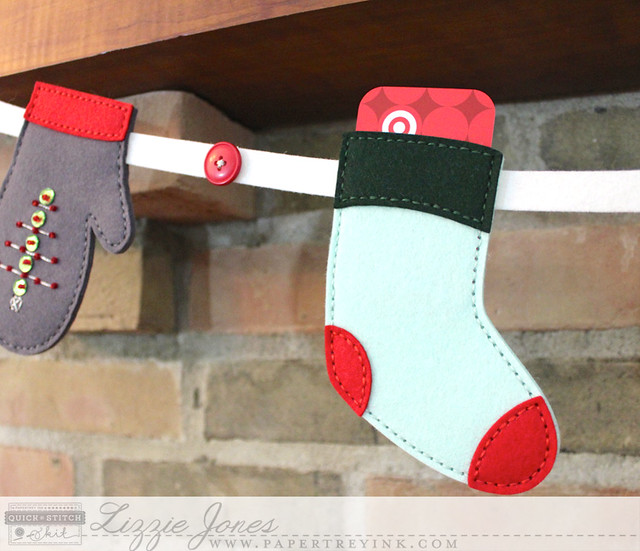
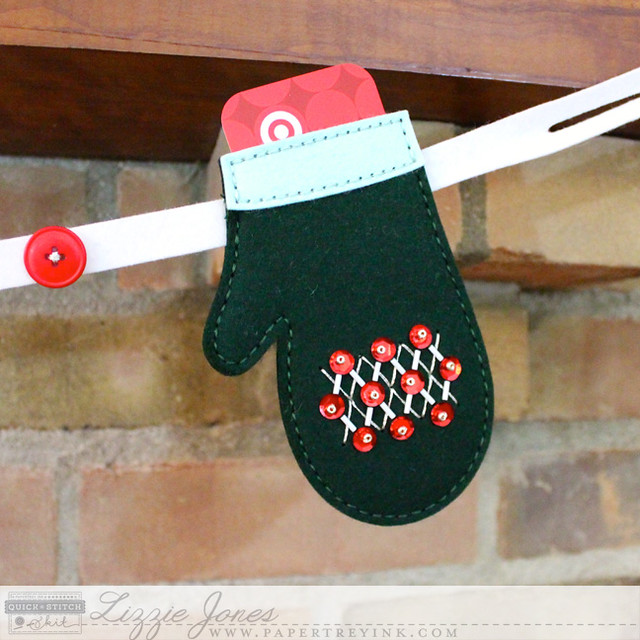
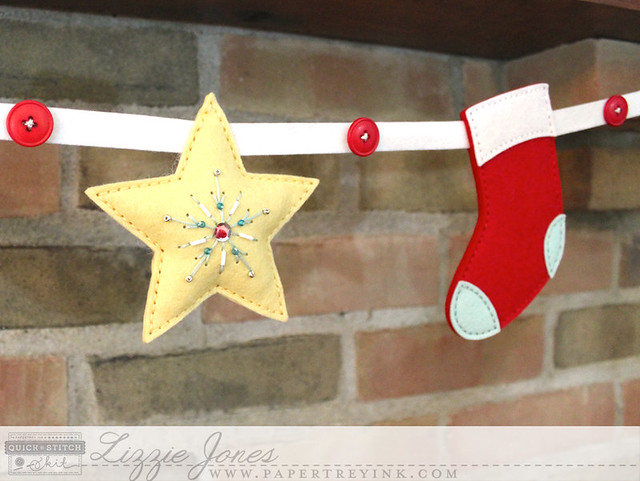
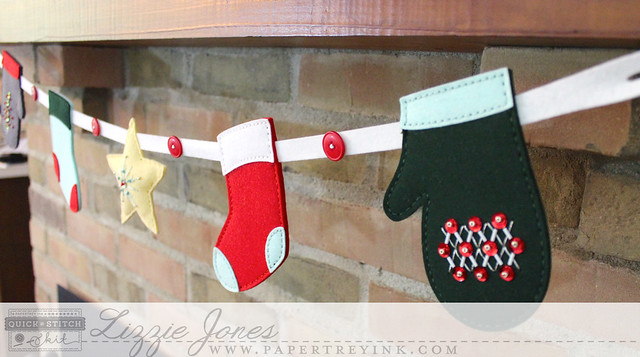
We're going to begin today with a festive holiday garland.

Beaded Garland

I used the dies in the kit to cut mittens, stockings, a star, and garland pieces. I created the tree, argyle, and star beaded designs with ease thanks to the motif dies included in the kit.

Beaded Tree Mitten

I chose to leave the stockings a little simpler by just using the heel and toe patches instead of the beading. I actually like that there's something a little less involved between the beaded objects. It sort of gives the eye a place to rest, know what I mean?

Gift Card Stocking

The mittens and the stockings are all open at the top, so small trinkets, candies, and gift cards can be tucked inside for safe keeping. The star is stuffed with polyfil to give it a bit of extra dimension.

Beaded Argyle Mitten

I stitched two medium garland lengths together between each shaped item. The garland includes three separate lengths as well as an end loop to give you a wide range of options. I stitched Pure Poppy buttons over each connection to both hide the stitching and give an extra pop of color.

Beaded Star and Stocking

This mantle is about four feet wide. I can't wait to start on a garland for the eleven foot mantle!

Beaded Garland Angle

Next up, I have a pair of gift toppers. Let's start with the monogrammed stocking.

Monogrammed Stocking Tag

I began this little patterned stocking by stamping Background Basics: Striped Sweater onto a piece of iron-on transfer paper using Ripe Avocado ink. I ironed that onto Simply Chartreuse felt and die cut as normal. I used Vintage Cream for the cuff, heel, and toe and then used contrasting red embroidery floss to assemble. The letter was cut from Pure Poppy felt using the Sew Stylish Alphabet dies and attached with the same red floss. I kept the top open again and tucked a gift card inside, but a candy cane would be another perfect addition.

Monogrammed Stocking Tag On Tree

And once the gift is opened, this little fella can be used as a Christmas tree ornament. Isn't that handy?

The second gift topper is a wintry beaded star.

Beaded Star Ornament

I die cut the star from Aqua Mist and Vintage Cream felts. I used the beaded star motif die on the white piece and then embellished with sequins and beads included in the kit. I stitched together those layers, adding a Hawaiian Shores hanger and polyfill in there before all was said and done. This one would also look lovely hanging on your tree.

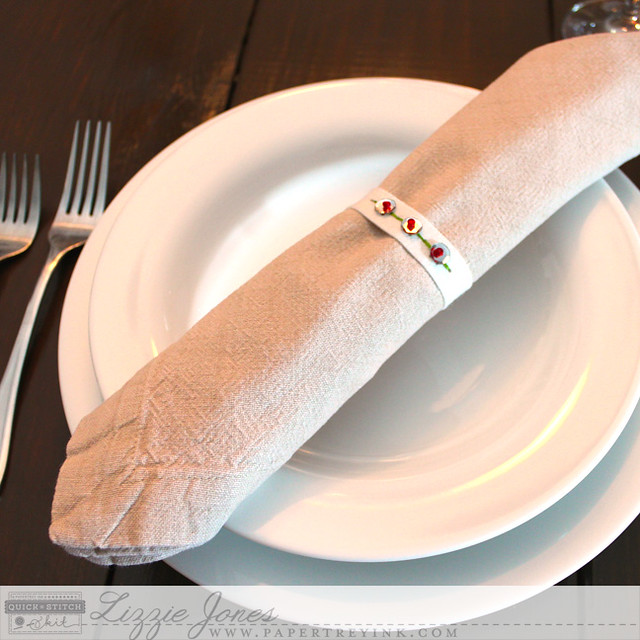
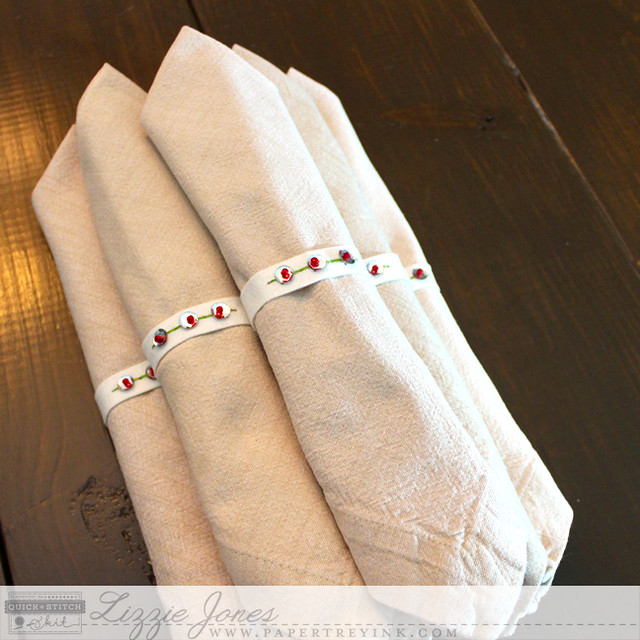
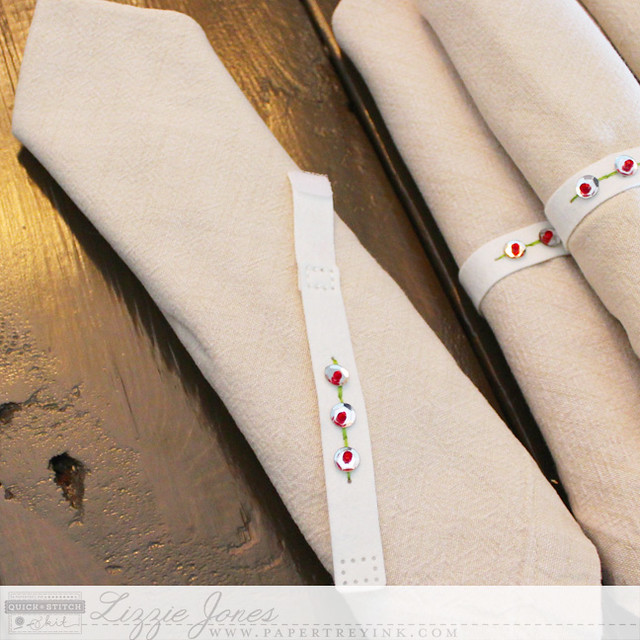
Last, but certainly not least, I have a set of beaded napkin rings to share. We get together (almost) every week with friends for dinner on Thursday nights and I thought it might be fun to use this kit to create a bit of festive table decor for the upcoming holiday season.

Place Setting

I began by cutting the longest and the shortest garland lengths from Vintage Cream felt. Then, I die cut the long strips with part of the argyle pattern. I paired the garland lengths together and stitched one end together.

Place Setting Close Up

I did my decorative stitching and beading before finishing the free ends of the strips with self-adhesive hook & loop tape (aka velcro).

Set Of Napkin Rings

That makes it super easy to get the napkin rings on and off and I don't have to worry about the rings getting crunched or misshapen in the off-season since they'll store flat. I'm really looking forward to using them!

Open Napkin Ring

So there you have it! This kit really is a joy. Erin's Quick Stitch: Beaded Holiday Kit will be available tomorrow, September 1st at 10pm in the Papertrey Ink store, so be sure to pick up your kit then. In the meantime, check in with Erin, Hilary, Rebecca, and Tracy for as much inspiration as you can handle! See you again soon!

More Kit Details:

Beaded Holiday Kit Contents:

Custom tote bag
Beaded Holiday: Mitten die collection
Beaded Holiday: Stocking die collection
Beaded Holiday: Star die
Beaded Holiday: Motifs die collection
Beaded Holiday: Garland die collection
Bead storage box (ten compartments)
6mm Bugle Beads, Silver
6mm Bugle Beads, White
3mm Seed Beads, Red
3mm Seed Beads, Chartreuse
3mm Seed Beads, Teal
3mm Seed Beads, Silver
8mm Cupped Sequins, Red
8mm Cupped Sequins, Chartreuse
8mm Cupped Sequins, Teal
8mm Cupped Sequins, Silver


The total retail cost of the "Beaded Holiday" Kit is $105. There will be a limited number of these exclusive kits available, so be sure to get yours while you can! The Beaded Holiday: Garland dies are the ONLY item from this kit that will be available for purchase separately at a later date. All other items are limited edition to this kit and will never be offered again! "Beaded Holiday" Kit will be available for sale beginning on September 1st at 10pm ET, only at Papertrey Ink. Read all the details on Nichole's blog or contact Customer Service with any questions.

Recipes:
Beaded Garland
Felt: Pure Poppy, Vintage Cream Smokey Shadow, Pinefeather, Aqua Mist, Harvest Gold - Papertrey Ink
Dies: Beaded Holiday: Mitten die collection, Beaded Holiday: Stocking die collection, Beaded Holiday: Star die, Beaded Holiday: Motifs die collection, Beaded Holiday: Garland die collection - Papertrey Ink
Other: Beads and Sequins, Pure Poppy Buttons - Papertrey Ink; Embroidery Floss - DMC; Stuffing - Polyfil

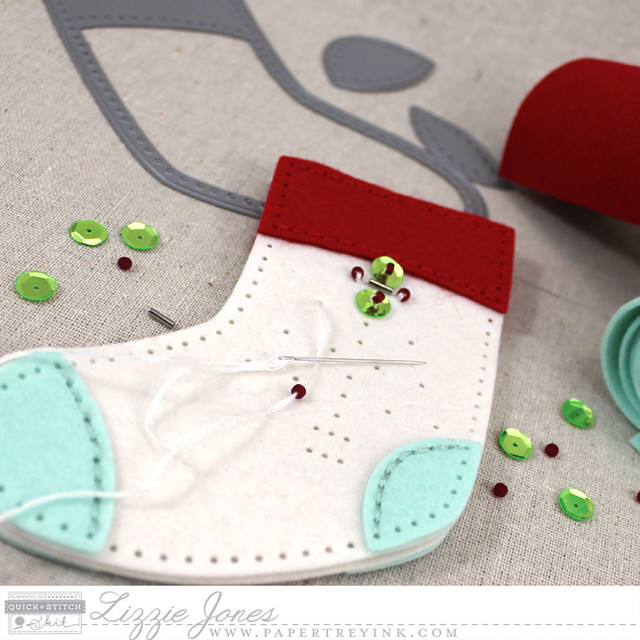
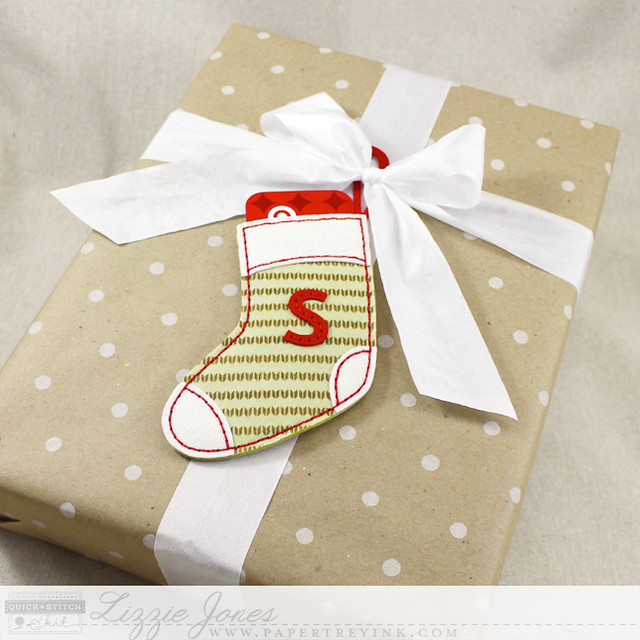
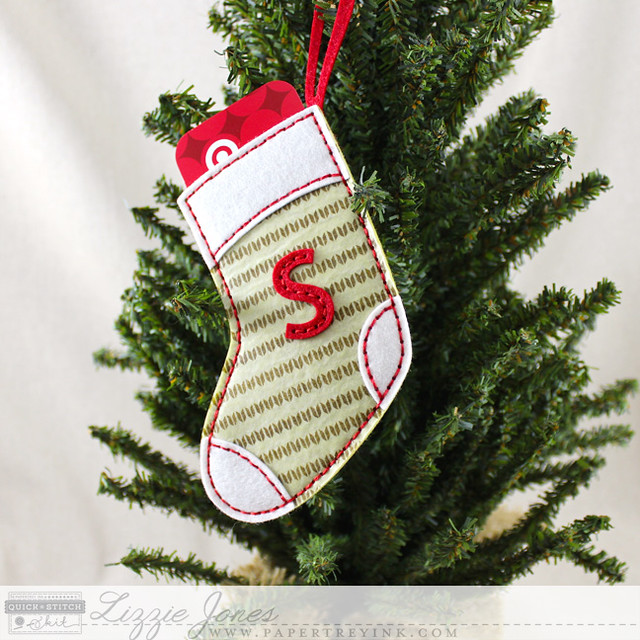
Monogrammed Stocking Ornament
Felt: Simply Chartreuse, Vintage Cream, Pure Poppy - Papertrey Ink
Dies: Beaded Holiday: Stocking die collection
Stamps: Background Basics: Striped Sweater - Papertrey Ink
Ink: Ripe Avocado - Papertrey Ink
Other: Sew Stylish Alphabet Die, Iron-on transfer paper - Papertrey Ink; Embroidery Floss - DMC

Beaded Star Ornament
Felt: Vintage Cream, Aqua Mist, Hawaiian Shores - Papertrey Ink
Dies:Beaded Holiday: Star die - Papertrey Ink
Other: Beads and Sequins - Papertrey Ink; Embroidery Floss - DMC; Stuffing - Polyfil

Beaded Napkin Rings
Felt: Vintage Cream - Papertrey Ink
Dies: Beaded Holiday: Garland die collection - Papertrey Ink
Other: Beads and Sequins - Papertrey Ink; Hook & Loop Tape - Singer; Embroidery Floss - DMC

Moments Inked: Countdown Planning


Good morning, everyone! It's my turn to share what's happening in my Moments Inked planner these days and I thought it might be a fun opportunity to let you in on how I plan for the monthly Papertrey Ink countdowns.

Countdown Inserts

This is a system that I've put into practice recently and I've learned that it really helps me brainstorm and stay off of the computer so much (which can be a major time waster for me).

Countdown Insert Day 1

When we receive the schedule for the countdowns I get to work. I start each month with a set of five full-sheet pages that I cut using the Divided Die. I stamp those pages with the lines in Journal Accessories on both sides so I have a nice, structured space to work with. Then, I label each page with a day of the countdown (Day 1, Day 2, etc).

Countdown Insert Day 1 Back

I use the top label from the Posted stamp set to create title areas and then add "make" and "ideas" (both from the Blog Banners set) below. I use the "make" line to write down specific assignments and the "ideas" section to brainstorm how I might like to use the new sets. Sometimes that means I'm writing down techniques, sometimes that means I'm noting colors I'd like to use, and sometimes that means I'm thinking of previously released products that would pair nicely with the new items. I try not to be too critical of the ideas I include here. It is brainstorming, after all!

Countdown Insert Day 2

I don't stamp the next "title" until I've brainstormed my ideas for the first set to make sure that I don't run out of space in one area and have an abundance of space for another set. Having both sides stamped with lines gives me plenty of space for all of my notes.

Countdown Insert Day 2_3

I also write down pertinent deadlines, so I can be sure to have my bits and pieces where they belong on time. And I make notes of who is participating on which days so I can remember to link to them when I go to write my posts. I used to just check my online notes, but inevitably would end up getting distracted and find myself down an internet rabbit hole more often than not. Time is precious, especially during countdown week, and those are moments I can't afford to lose. These notes help me stay focused. Sean and I joke that I'm a little like a squirrel when it comes to focus. Anything to help me stay on task is a positive as far as I'm concerned.

Countdown Insert Day 4

Often, I start these pages before I even receive the new products for the month, so once my new stamps arrive I take a quick moment to decorate these pages with images from the sets. It's just a quick way to get acquainted with the new goodies and the added bonus is that it makes my planner pretty. Who doesn't love a pretty planner?!

Countdown Insert Day 5

After all the stamping is done I simply tuck the countdown inserts in with the daily pages of my planner.

Countdown Insert Day 5 Back

So there you have it! Do you think brainstorming in your planner will help you hit the ground running when you get your new goodies each month?

Thank you so much for joining me today for this week's Moments Inked newsletter post. I hope you have a wonderful week! See you soon!

Recipe:
Stamps: Journal Accessories, Moments Inked: Posted, Moments Inked: Blog Banners, Fall Florals, Scribbled Sentiments, Quilted: Autumn, Pumpkin Patch, Brushed Off, Twig Wreath, Choose Joy, Halloween Pin Ups Kit, Petite Places Spook Manor - Papertrey Ink
Cardstock: Fresh Snow Linen - Papertrey Ink
Ink: Limeade Ice, Berry Sorbet, Orange Zest, Lemon Tart, Simply Chartreuse, Harvest Gold, Aqua Mist, Terra Cotta Tile, Canyon Clay, Summer Sunrise, Dark Chocolate, Scarlet Jewel, Fine Linen, Royal Velvet - Papertrey Ink
Other: Moments Inked: Divided Die - Papertrey Ink

Saturday, August 29, 2015

Stamp-A-Faire 2015: Runway Inspiration Challenge

Ok, paper party people, I have one more project to share with you today! The Runway Inspired Challenge has arrived and I couldn't pass up the opportunity to jump in and play along. A Pinterest search led me to this inspiration photo:

Source

I just loved the floral paired with the gold embellishment, so I thought it might be fun to incorporate those elements into a card.

SAF2015 Runway Inspiration Challenge - Anniversary Wishes Card

I began by heat embossing the peony from Botanical Blocks II onto watercolor paper using gold powder. I colored it with Zig Clean Color markers and a water brush in tones drawn from the inspiration photo. Next, I heat embossed Background Basics: Tin Types onto white cardstock, also with gold powder. I trimmed that piece into smaller panels and adhered them to a white card base.

SAF2015 Runway Inspiration Challenge - Anniversary Wishes Close Up

Next, I die cut a Half & Half strip from vellum and heat embossed and anniversary sentiment with, you guessed it, gold powder. I trimmed out the floral block and added the sentiment to the bottom edge. I finished up by adhering the floral block to the card front with foam tape.

Alrighty, friends! That's all for me today. Enjoy the rest of the festivities and I'll see you again soon!

Recipe:
Stamps: Botanical Blocks II, Background Basics: Tin Types, Fillable Frames Sentiments - Papertrey Ink
Cardstock: Vellum - Papertrey Ink; white; Watercolor Paper - Strathmore
Ink: Versamark - Tsukineko
Other: Half & Half Die - Papertrey Ink; Watercolor Markers - Zig; Gold Embossing Powder - Filigree; Foam Tape - Scotch

Stamp-A-Faire 2015: Unconventional Materials Challenge

How are you holding up, Papertrey fans? Are you on crafty overload or are you reveling in having a whole day to create? A little of both? Well it's time to rally! We've reached the Unconventional Materials Challenge portion of the day. The challenge this time around is to create a card with hardware store supplies (purchased with a $10 budget). Here's what my hardware store haul looked like:

SAF Unconventional Materials Challenge - Hardware Store Haul

I picked up two different kinds of sandpaper, vinyl bumpers (the thingies you use on drawers), and a screen repair kit. And here's the card I made with those supplies. Can you find everything from my shopping trip?

SAF Unconventional Materials Challenge - Thanks A Bunch Card

I began by creating stencils with the Clouds Dies and post it notes. I sponged on a first layer of ink for my clouds and then used the screen as a secondary stencil to add a little texture. Next, I stamped the sentiment from Petite Pots in Smokey Shadow ink, barely overlapping the clouds. Then, I die cut the pots (also from Petite Pots) from the sandpaper, sponging one of them with Dark Chocolate to alter the color slightly. I also die cut the flowers and stamped them with the coordinating stamps.

SAF2015 Unconventional Materials Challenge - Thanks A Bunch Close Up

I wanted a strip of grass to ground the pots, so I die cut a strip of Simply Chartreuse with the Pinking Shears Border Die and then used the screen patches like an impression plate to add texture (I even used the same sandwich through my die cut machine). I adhered that strip to the card base and mounted the assembled potted plants with flat and foam adhesives. As a final touch, I used the vinyl bumpers to embellish the larger blooms.

What did you pick up at the hardware store? I'm excited to see how you all incorporate your hardware store goodies into your creations!

Recipe:
Stamps: Petite Pots (special edition Anniversary Set) - Papertrey Ink
Cardstock: Simply Chartreuse - Papertrey Ink; white
Ink: Aqua Mist, Smokey Shadow, Berry Sorbet, Ripe Avocado, Lemon Tart, Harvest Gold, Summer Sunrise, Winter Wisteria - Papertrey Ink
Other: Pinking Shears Border Die, Petite Pots Die - Papertrey Ink; Foam Tape - Scotch; Sandpaper; Vinyl Bumpers - Do It Best; Screen Repair Kit - Elgar Prime Line

Stamp-A-Faire 2015: Patterns Challenge


Are you ready for the next challenge, Papertrey fans? This time around we're playing with sketches, or "patterns," created from some of our favorite cards. Here's my pattern:


You can find the original card on THIS POST.

I have a couple of brand new cards to share with you today that use this same pattern. Papertrey has so many fantastic tag dies available that you can totally change the style of your card with a simple swap. I love that versatility!

My first card today is a jaunty thank you card.

SAF2015 Patterns Challenge - Thank You Card


I started by die cutting and stamping the Songbirds bird and die cut the branch from Simply Chartreuse cardstock. Then I die cut the Tag Sale #8 die from white cardstock and stamped it with the Fillable Frames #8 frame using Aqua Mist ink. I added the sentiment from Songbirds in Smokey Shadow ink and embellished the tag with a Simply Chartreuse button tied with white crochet thread.

SAF2015 Patterns Challenge - Thank You Close Up

Then, I textured a white mat layer with the Woodgrain Impression Plate and adhered it to an Aqua Mist card base. I added the tag to the card front with foam tape and then adhered the branch and bird into place. The bird looked a little vacant with that blank eye, so I used a black rhinestone to embellish his little peeper.

My next card is a little just because number that incorporates a flower sprig from Dawn's Fall Florals set. I love these flowers! They remind me of billy ball flowers.

SAF2015 Patterns Challenge - Just A Note Card
I began by die cutting the Tag Sale #11 from Spring Moss and white cardstocks. I stamped the Sentiment Signs sentiment onto the white tag using Dark Chocolate ink and layered it with the Spring Moss piece. I used an aged copper brad and button twine in place of a button when I assembled the tag strap.

SAF2015 Patterns Challenge - Just A Note Close Up
Next, I die cut the Fall Florals pieces from white and Simply Chartreuse cardstocks. I stamped those shapes with their coordinating images in Ripe Avocado, Lemon Tart, and Harvest Gold inks. I textured a white cardstock panel with the Sunrise Impressions 2 Impression Plate and adhered it to a Harvest Gold card base. I attached the tag to the front of the card and then added the floral sprig, both with foam tape.

So there you go! How will you switch up the pattern? I can't wait to see! Make sure to check in with Amy, Ashley, Betsy, Dawn,Heather, Laurie, Lexi, Maile, and Melissa to see how they're revisiting their favorite sketches today, too!

Recipes:
Thank You Card
Stamps: Songbirds, Fillable Frames #8 - Papertrey Ink
Cardstock: Aqua Mist, Simply Chartreuse - Papertrey Ink
Ink: Pure Poppy, Aqua Mist, Harvest Gold, Smokey Shadow, Simply Chartreuse - Papertrey Ink
Other: Tag Sale #8 Die, Songbirds Die, Woodgrain Impression Plate, Simply Chartreuse Button - Papertrey Ink; Foam Tape - Scotch; Mini Self-Adhesive Rhinestone - Mark Richards; White Crochet Thread

Just A Note Card
Stamps: Fall Florals, Sentiment Signs - Papertrey Ink
Cardstock: Spring Moss, Simply Chartreuse, Harvest Gold - Papertrey Ink; white
Ink: Ripe Avocado, Dark Chocolate, Lemon Tart, Harvest Gold - Papertrey Ink
Other: Fall Florals Die, Tag Sale #11 Die, Sunrise Impressions 2 Impression Plate - Papertrey Ink; Lemon Baker's Twine - Divine Twine; Antique Copper Brad - American Crafts; Foam Tape - Scotch

Stamp-A-Faire 2015: Bridal Challenge


Here we go, everybody! It's Stamp-A-Faire time! We're starting this morning with the Bridal Challenge. The object of this challenge is to create an all-white wedding card (save a neutral-colored sentiment). I thought it would be fun to play along, too.

I liked the idea of keeping the card very simple, with a good deal of dimension.

SAF2015 Bridal Challenge - Happy Wedding Day Card

I began by die cutting four vellum butterflies and heat embossing them with the polka dot detail from Beautiful Butterflies Layers. I also die cut the butterfly bodies from white cardstock and embellished them with a clear glitter Wink Of Stella pen.

SAF2015 Bridal Challenge - Happy Wedding Day Close Up


I heat embossed the sentiment onto a white card base using Liquid Platinum powder and then added the assembled butterflies with flat and foam adhesives. I fluffed up the wings to give them plenty of dimension. And there you have it! Make sure to check in at Nichole's blog to see who else is participating in the challenge. I hope you'll play along!

Recipe:
Stamps: Keep It Simple: Wedding, Beautiful Butterflies Layers - Papertrey Ink
Cardstock: Vellum - Papertrey Ink; white
Ink: VersaMark - Tsukineko
Other: Beautiful Butterfies Die - Papertrey Ink; White Embossing Powder - Filigree; Liquid Platinum Embossing Powder - Ranger; Wink Of Stella Pen - Zig; Foam Tape - Scotch

Friday, August 28, 2015

Stamp-A-Faire Free Exclusive Set!


Good morning, everyone! We're kicking off this year's Stamp-A-Faire festivities with a peek at this year's exclusive set, Fashion Sense.


This set will not be made available for sale, however, all customers will have the opportunity to earn it for free with a qualifying $100 purchase made between 7am EST and 11:30pm ET on Stamp-a-faire Day (August 29, 2015).

SAF2015 Exclusive Set - Fashion Sense Cards

I have two cards to share that I created using this set. I went bold and colorful with one and simply sophisticated with the other. Let's start with the more colorful card!

SAF2015 Exclusive Set - Be Different Card

I began by stamping the model and sentiment onto white cardstock using black ink. Then, I stamped a "shadow" using one of the brushstroke images from Watercolor Wonder. I used Spring Rain ink and stamped it off to make sure I got a nice, subtle impression.

SAF2015 Exclusive Set - Be Different Close Up

Then I followed up by randomly stamping small floral images, leaves, and polka dots in an assortment of bright, cheerful colors. I let the images overlap the model's outline a bit for a more freeform look. Isn't she lovely?

My second card with this set has a bit more luxe, refined appeal.

SAF2015 Exclusive Set - Believe In Yourself Card

I began by stamping the dress image onto white cardstock with Fine Linen ink. I stamped over that image with watermark ink and then embellished with Perfect Pearls powder. The finish looks like champagne-colored satin.

SAF2015 Exclusive Set - Believe In Yourself Close Up

Next, I stamped the model and sentiment using Onyx Black Versacolor ink. The thicker, quick-drying pigment ink tended to bleed less than wetter inks when it interacted with the pigment powder. I used a partial die cutting technique with the Sentiment Splits: Curve Vertical die and layered that panel over an Onyx Shimmer card front. The finished card is so simple and elegant.

You're all going to love creating with this set! Make sure to check in with NicholeAmy, Ashley, Betsy, DawnHeather, Laurie, Maile, and Melissa for more Fashion Sense inspiration. I'll see you again soon!

Recipes:
Be Different Card
Stamps: Fashion Sense (Stamp-A-Faire 2015 Exclusive Set) - Papertrey Ink
Cardstock: White
Ink: Spring Rain, Pure Poppy, Hibiscus Burst, Simply Chartreuse, Harvest Gold, Summer Sunrise, Winter Wisteria, Plum Pudding - Papertrey Ink; Onyx Black - VersaColor
Other: a smile

Believe In Yourself Card
Stamps: Fashion Sense (Stamp-A-Faire 2015 Exclusive Set) - Papertrey Ink
Cardstock: Onyx Shimmer - Papertrey Ink; White
Ink: Fine Linen - Papertrey Ink; VersaMark - Tsukineko; Onyx Black - VersaColor
Other: Sentiment Splits: Curve Vertical Die - Papertrey Ink; Perfect Pearls - Ranger; Foam Tape - Scotch

Saturday, August 15, 2015

Release In Review

Good morning, everyone, and welcome back for one last Papertrey Ink August countdown post. I have a few projects left to share featuring this month's new releases. All of the new products I've showcased this past week will be available for purchase on Papertrey's website tonight at 10pm. Let's get on to those projects!

The first card I'm sharing today uses Dawn's Enclosed: Leaf as the star of the show.

Grateful For You Card

I began by randomly stamping images from Brushed Off onto watercolor paper, layering Canyon Clay, Summer Sunrise, Terra Cotta Tile, Ripe Avocado, and Harvest Gold inks. I sprayed that with Pearl Glimmer Mist so that the colors would blend together. Once that was dry, I stamped the sentiment from Enclosed: Leaf in the center with Dark Chocolate ink.

Grateful For You Close Up

I die cut the leaf, veins and all, from that piece of watercolor paper. I then die cut additional veins from Canyon Clay cardstock and used them to add dimension under the watercolored layer. I attached the leaf with foam tape to a piece of Rustic White cardstock that I'd textured with the Cover Plate: Circles die. You should see the shimmer in person. It's glorious!

My next card pairs Quilted: Autumn with Choose Joy.

Thankful Heart Quilt Card

I love the large format of the Quilted series of dies. I began by die cutting seven of them from white cardstock and attaching them to a white card base. I stamped my sentiment next and filled in the quilt blocks using the stamps in the coordinating set.

Thankful Heart Quilt Close Up

I trimmed everything off the edges before adding an acorn and leaf cluster below my sentiment. It's really a very simple card, but the gorgeous details that Betsy built into the stamps and dies makes it look so sophisticated and polished. And who could argue with that sentiment? I'm a big fan of Choose Joy and can imagine using it a whole lot.

My third and final card today pairs Dawn's Fall Florals with my Scribbled Sentiments. I love the unique, modern styling of these flowers. This is definitely another new favorite.

You Make Me Smile Card

I stayed very simple on this card, too. I began by stamping the large leafy images onto a Fresh Snow Linen cardstock using Ripe Avocado ink. Then I added the solid flowers with Sweet Blush ink.

You Make Me Smile Close Up

I wanted to add a darker pink layer, but Berry Sorbet was brighter than I wanted and Autumn Rose was too dark. What's a girl to do?! Generational stamping is the answer. It expands your ink collection without buying a single thing. I went back and stamped the dotted flowers with Autumn Rose that I'd stamped off first. I added my sentiment in the bottom corner and that was all she wrote!

I have one last sneaky peek to share before I go today and I think this one is going to have you very excited. Erin Lincoln has designed a Quick Stitch kit all about holiday crafting! I'll have more on this kit later in the month, but here's a photo to wet your whistle.

Lizzie Jones QS Beaded Christmas Kit

Thank you so much for visiting with me today and through this past week. I've had a lot of fun and I hope you have, too. Make sure to pop in with Nichole for details and full reveals of this month's release. Amy, AshleyBetsy, Dawn, Heather, Laurie, Maile, and Melissa all have wrap-ups to share today and I'd be willing to bet Erin has a peek or two of her new kit up her sleeve. That's all for me. I'll see you soon! Have a wonderful weekend, everybody!

Recipes:
Grateful For You Card
Stamps: Brushed Off, Enclosed: Leaf - Papertrey Ink
Cardstock: Rustic White, Canyon Clay - Papertrey Ink; Watercolor Paper - Strathmore
Ink: Canyon Clay, Summer Sunrise, Terra Cotta Tile, Ripe Avocado, Harvest Gold, Dark Chocolate - Papertrey Ink

Other: Enclosed: Leaf Die, Cover Plate: Circles Die - Papertrey Ink; Glimmer Mist - Tattered Angels; Foam Tape - Scotch

Thankful Heart Quilt Card
Stamps: Quilted: Autumn, Choose Joy - Papertrey Ink
Cardstock: White
Ink: Dark Chocolate, Ocean Tides, Summer Sunrise, Terra Cotta Tile, Canyon Clay, Ripe Avocado, Harvest Gold - Papertrey Ink
Other: Quilted: Autumn Die - Papertrey Ink; Foam Tape - Scotch

You Make Me Smile Card
Stamps: Fall Florals, Scribbled Sentiments
Cardstock: Fresh Snow Linen - Papertrey Ink
Ink: Sweet Blush, Autumn Rose - Papertery Ink; Onyx Black - Versafine