Monday, July 27, 2015

Make It Monday

Good morning, all! I just wanted to pop in and mention that I'm the Make It Monday presenter over on Nichole's blog this week. This time around I'm sharing a technique I'm calling Texture Kissing! It's a really easy way to add a little bit of texture to your solid images.

Birthday Wishes Card

Here's a close-up so you can really see the texture.

Birthday Wishes Close Up


Check out the video below for the how-to and supply list and then head over to Nichole's blog to link up your project.


I hope you'll play along! Have a great week!

Tuesday, July 14, 2015

L'Shanah Tovah - Day 5

Good morning, all, and welcome back for Day 5 of the Papertrey Ink July new release countdown! I have one last project for you showcasing my new L'Shanah Tovah set that I am very excited to share. I've been working on figuring this one out all week (some cards materialize more slowly than others) and I'm really happy with how it all finally came together. Let's get to it!

I was thinking about all of the apple-y bits available through the Papertrey Ink catalog as well as the various ways to add honey imagery and Jewish symbolism to projects using existing sets. I wanted to pull together several sets, some older and some brand new, to create a multipanel card. The wonderful thing about Papertrey sets (well, one of the things!) is that they so often blend seamlessly. I had a wonderful time finding images that would enhance one another on this project.

Rosh Hashanah Panels Card

I began by die cutting the Cover Plate: Comic Strip from white cardstock. Then, I laid out the different images until I found an arrangement I liked. In reality, this took a couple of days, but thanks to the magic of the internet you get to see it all assembled.

Rosh Hashanah Panels Close Up 5

I started with the sentiment panel. The larger Star Of David is from Festival Of Lights and the smaller nested one is from Menorah Medley. Then sentiment, included in L'Shanah Tovah, was added atop those with Dark Chocolate ink.

Rosh Hashanah Panels Close Up

I paired the honey wand from L'Shanah Tovah with the apples from Bowl of Sunshine. I glittered the honey for a bit of sparkle.

Rosh Hashanah Panels Close Up 3

The tree is from Teach & Inspire. I kissed the trunk with one of the strips from Background Basics: Woodgrain before stamping to give it a bit of visual texture. The rock 'n roll on the tree top added to the visual texture, too. I added "apples" using the tiniest dot from Polka Dot Basics and glittered those as well.

Rosh Hashanah Panels Close Up 4

The apple in the bottom left corner is from L'Shanah Tovah. I rock 'n rolled this one with Pure Poppy and Terra Cotta Tile inks so it would have a bit of subtle dimension. I also glittered the stem with a bit of dark brown glitter.

Rosh Hashanah Panels Close Up 2

The bee is from Honey Bees. I stamped the wings and antennae directly on the panel and then added a bee that I'd fussy cut from a scrap of cardstock. I added color to the stripes with dark brown pencil and then embellished with glitter.

All of the panels were adhered to a Spring Rain base using foam tape.

I hope you enjoyed today's project as well as the others I've shared over the past several days. Thank you so much for joining me during this countdown! Have a wonderful day and don't forget to check in with Nichole, Amy, AshleyBetsy, Dawn, Heather, Laura, Laurie, Maile, Melissa, and Erin as they share more inspiration with you using this month's new stamps and dies. See you soon!

Recipe:
Stamps: L'Shanah Tovah (available July 15th), Teach & Inspire, Polka Dot Basics, Bowl Of Sunshine, Background Basics: Woodgrain, Festival Of Lights, Menorah Medley, Honey Bees, Happy Hexagons - Papertrey Ink
Cardstock: Spring Rain - Papertrey Ink; white
Ink: Dark Chocolate, Spring Rain, Lemon Tart, Harvest Gold, Fine Linen, Spring Moss, Pure Poppy, Terra Cotta Tile, Ripe Avocado - Papertrey Ink
Other: Cover Plate: Comic Strip Die - Papertrey Ink; Fine Brownstone, Garnet, Crystal Glitter - Martha Stewart Crafts; Foam Tape - Scotch

Monday, July 13, 2015

L'Shanah Tovah - Day 4

Good morning, friends! Welcome to Day 4 of the June Papertrey Ink new release countdown. I hope you've been having as much fun as I have the last few days. The excitement continues today with another project featuring L'Shanah Tovah. Let's get to it!

I wanted to show how many different looks you can get with the apple images included in the set. Today's pattern is intended to give you a glimpse of the possibilities.

Apple Pattern L'Shanah Tovah Card

I began with a piece of Rustic White cardstock. I stamped the apples randomly using Autumn Rose and Scarlet Jewel inks, rock 'n rolled together. I went back in and added "slices" to some of the outline apples by masking with a post it and stamping with the solid apple for a second time. The stems and seeds were all added in Dark Chocolate and the leaves were either Spring Moss or Ripe Avocado. There's no real rhyme or reason to the placement; just whatever caught my fancy.

Apple Pattern L'Shanah Tovah Close Up

Once that panel was finished, I trimmed off the bottom edge at a slight angle and added a narrow mat of Ripe Avocado cardstock. I thought the apples could use a little more interest, so I added fine, dark brown glitter to all of the seeds. You could always use a gloss medium if you wanted to keep the design more on the gender neutral side, but I'm a fan of the tiny touches of sparkle. I used foam adhesive to adhere the patterned panel to a Classic Kraft card base that I'd stamped with my sentiment using Dark Chocolate ink.

So there you have it! I hope you've enjoyed today's post. I'll be back tomorrow with more from L'Shanah Tovah. In the meantime, Nichole, Amy, Ashley, BetsyDawn, Heather, Laura, Laurie, Maile, Melissa, and Erin have more to share with you today. See you again tomorrow!

Recipe:
Stamps: L'Shanah Tovah (available July 15th) - Papertrey Ink
Cardstock: Rustic White, Ripe Avocado, Classic Kraft - Papertrey Ink
Ink: Scarlet Jewel, Autumn Rose, Ripe Avocado, Dark Chocolate, Spring Moss - Papertrey Ink
Other: Foam Tape - Scotch, Fine Brownstone Glitter - Martha Stewart Crafts

Sunday, July 12, 2015

L'Shanah Tovah - Day 3

Good morning, friends! Welcome back to Day 3 of the July Papertrey Ink new release countdown. I'm sharing another L'Shanah Tovah project with you today, so let's get to it!

I wanted to create a card that included several elements of Rosh Hashanah together in a sort of stylized wreath. Thanks to L'Shanah Tovah, some creative masking, and a bit of good ol' stamper's ingenuity I was able to pull it off.

Rosh Hashanah Elements Card

I began by very lightly drawing an oval shape on a panel of white cardstock. I stamped my sentiment inside the oval in Dark Chocolate ink and then began laying out the bits I wanted to use around it. The apples and honey were no sweat, but the pomegranate...a little more thought went into the pomegranate. To create that I stamped the largest solid button from the Bits & Buttons mini stamp set in Autumn Rose ink. I covered it with a mask and then stamped the one of the floraly end bits from the quilt center of Quilted: Spring at the very top. I went back in and repeatedly stamped the seed image from L'Shanah Tovah with Scarlet Jewel to add detail to the inside. It sounds complicated, but once I figured it out, it was really not difficult at all. So there's my gift to you. Now you know how to create pomegranates, too.

Rosh Hashanah Elements Close Up

The rest of the images are fairly straightforward. The apple slice I also did with masking (so that you'd only see half of the original image. The inside of the slice was done by stamping Lemon Tart off once to soften the color. I wanted you to be able to see the inside without making it look super yellow. I used several sets (all listed below) to create the rest of the vignette. Once my stamping was completed and I'd erased the penciled oval, I mounted my panel to an Ocean Tides card base with foam tape. I didn't add any embellishments though because I wanted the stamping and the symbolism to remain the focus. It's deceptively simple, but I really love how it turned out.

Well, that's all for me today. I'll be back tomorrow with another project featuring L'Shanah Tovah. In the meantime, check in with  Nichole, AmyAshley, Betsy, Dawn, Heather, Laura, Laurie, Maile, Melissa, and Erin for more inspiration featuring this month's release. I'll see you tomorrow!

Recipe:
Stamps: L'Shanah Tovah (available July 15th), Bits & Buttons (pomegranate), Quilted: Spring (pomegranate), Happy Hexagons (honey wand), Turning A New Leaf, Flower Favorites (bee), Little Human (hexagon/bee), Mini Blooms (leaf embellishment) - Papertrey Ink
Cardstock: Ocean Tides - Papertrey Ink; white
Ink: Dark Chocolate, Ocean Tides, Autumn Rose, Scarlet Jewel, Pinefeather, Lemon Tart, Harvest Gold, Classic Kraft - Papertrey Ink
Other: Foam Tape - Scotch

Saturday, July 11, 2015

L'Shanah Tovah - Day 2

Good morning, Folks! Welcome back for Day 2 of this month's Papertrey Ink new release countdown. I'm so glad to hear you're all enjoying the sneak peeks of L'Shanah Tovah so far. It's been a lot of fun to use and we're just getting started! How about we take a look at another project?

Yesterday, I mentioned in passing that there are both solid and outline apples in this set. I wanted to use the outline apple to do something with patterned paper and this little dimensional apple fits the bill nicely.

New Year Card

I began by stamping the outline apple three times onto Pure Poppy Leaves patterned paper using Scarlet Jewel ink. Then I hand cut the apples and scored them down the center. I folded them in half and then adhered the back sides together to create a 3D apple. I inked the edges with Scarlet Jewel ink to hide any visible white paper (and hide any iffy scissor work). One of the best things about this technique is that the apple can fold flat for mailing, so it's not going to need extra postage. Bonus!

New Year Close Up

Next I die cut three (two white, one Kraft) of the Text Block: Christmas Die and trimmed out the bits related to Christmas, leaving the "New Year" intact. I layered those on top of one another and adhered them to a white base that I'd stamped with the plaid pattern from Autumn Pattern Pieces. Then I added the sentiment from L'Shanah Tovah in Dark Chocolate and Pure Poppy inks. The phrases are separate, so it was a breeze to ink them individually. I added the stem and leaves for the apple and then attached the paper apple into place. Then, I die cut the honey wand and stamped it with the coordinating images in Fine Linen and Harvest Gold inks. I added that to the card right above the apple using my trusty foam tape. A simple bow of baker's twine was a perfect finishing touch.

I hope you've enjoyed today's card. Thank you so much for joining me! I'll see you back here tomorrow with more of L'Shanah Tovah. In the meantime, Nichole, Betsy, Dawn, Maile, and Erin all have more to share with you today. I'll see you soon!

Recipe:
Stamps: L'Shanah Tovah (available July 15th), Autumn Pattern Pieces - Papertrey Ink
Cardstock: Pure Poppy Leaves Paper, Classic Kraft - Papertrey Ink
Ink: Scarlet Jewel, Pure Poppy, Dark Chocolate, Ripe Avocado, Spring Moss, Harvest Gold, Fine Linen - Papertrey Ink
Other: L'Shanah Tovah Die (available July 15th), Text Block: Christmas - Papertrey Ink; Foam Tape - Scotch; Cherry Baker's Twine - Divine Twine

Friday, July 10, 2015

Introducing L'Shanah Tovah

Good morning, Friends, and welcome to the first day of the July Papertrey Ink new release countdown! This morning I have the pleasure of introducing you to the brand new 
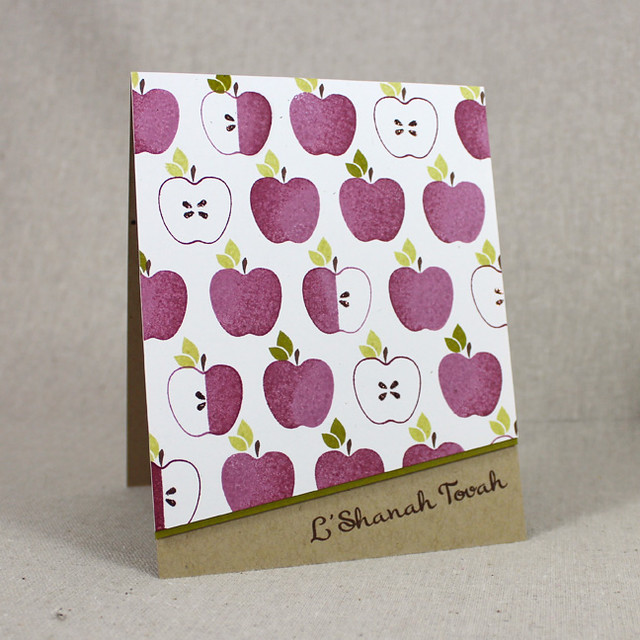
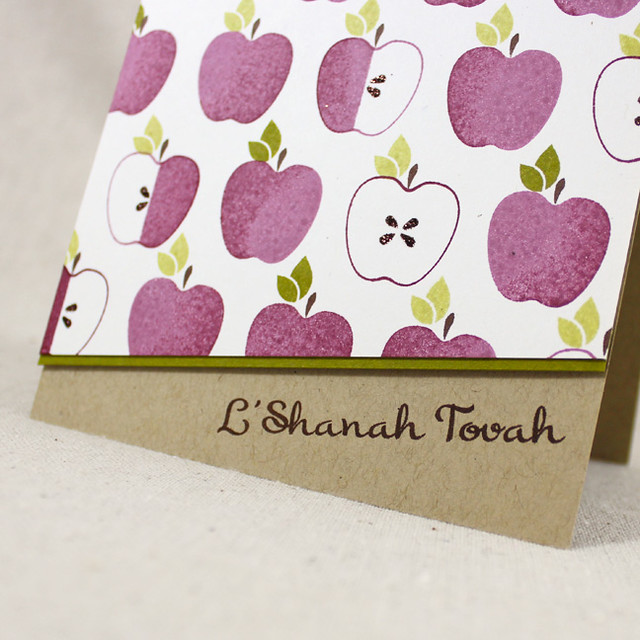
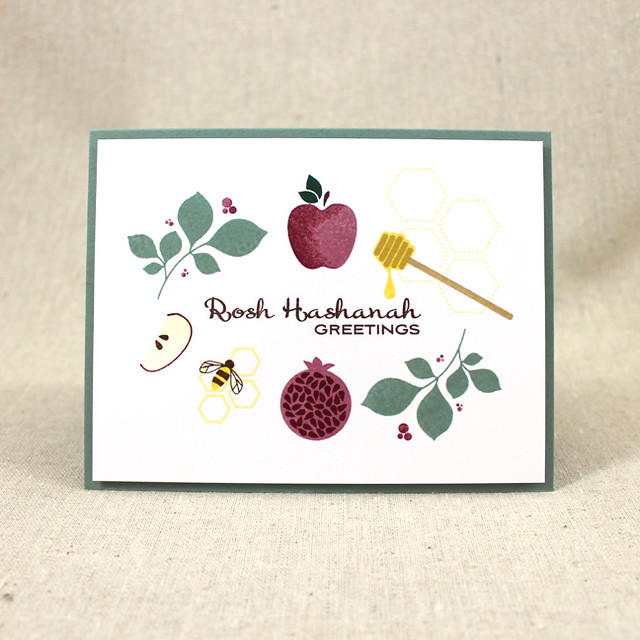
L'Shanah Tovah mini set. This mighty little set includes apple and honey images as well as a selection of sentiments perfect for your Rosh Hashanah creations. Nichole and Heather are also showcasing this set today, so you'll have plenty of inspiration to get your juices flowing this morning. How about we get on to the projects, eh?

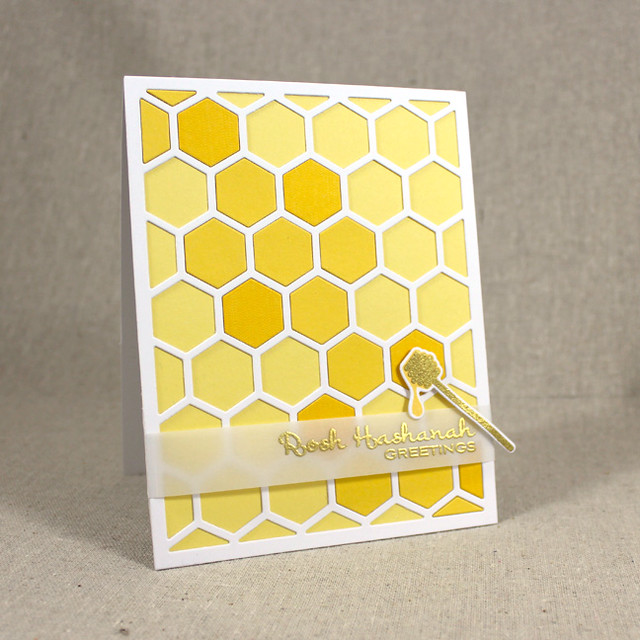
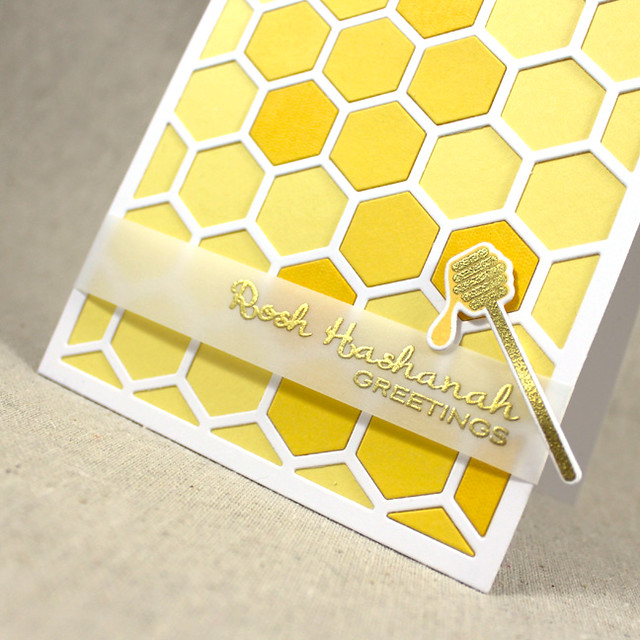
My first card today features the two-step honey wand included in the set.

Honey Rosh Hashanah Card

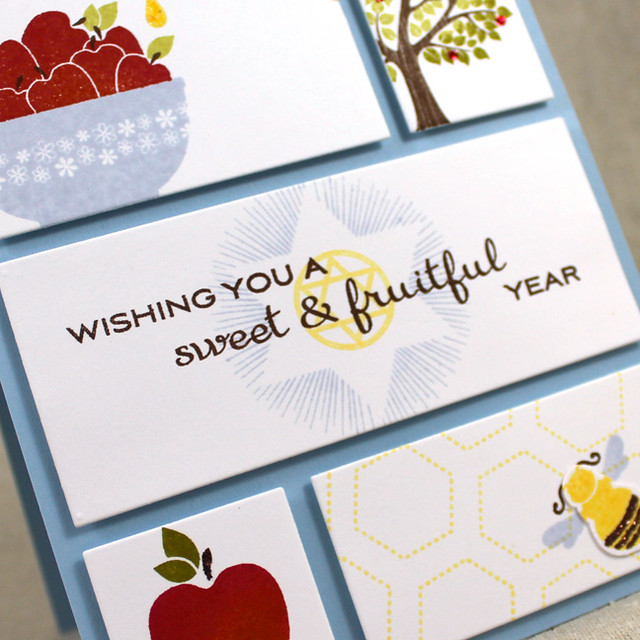
I began by die cutting the Cover Plate: Hexagons from Harvest Gold and white cardstocks. I stamped a few of the Harvest Gold hexagons with one of the strips from Ombre Builders to give them a bit of a darker tone-on-tone appearance. Then, I adhered the white outline panel to a Lemon Tart card front and filled in a cascade of hexagons from one corner to the other, randomly adding in the stamped variety.

Honey Rosh Hashanah Close Up

Next, I heat embossed the sentiment onto a strip of vellum using gold detail powder. I attached the ends of that strip to the back of the Lemon Tart panel before adhering that whole piece to a white card base. I then die cut the honey wand shape and stamped the honey with Harvest Gold ink. I followed up by heat embossing the wand with gold powder. I attached they honey wand to the card front with foam tape to finish the card.

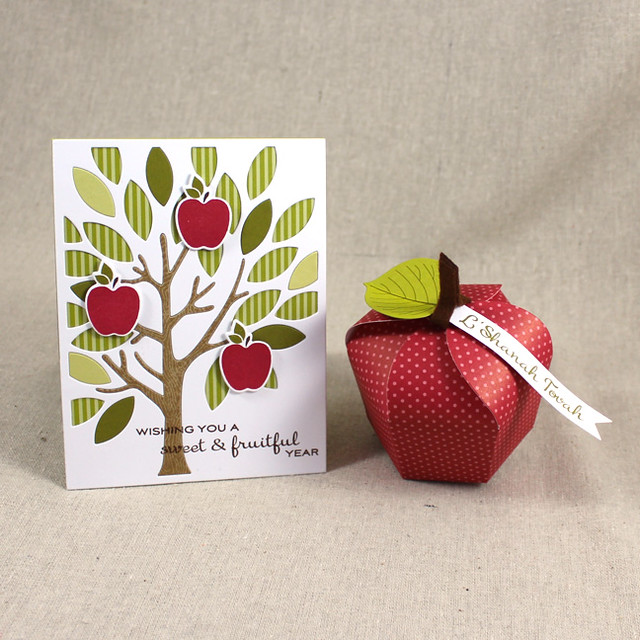
My next project for today is a Rosh Hashanah gift set centered around the apple.

Apple Gift Set

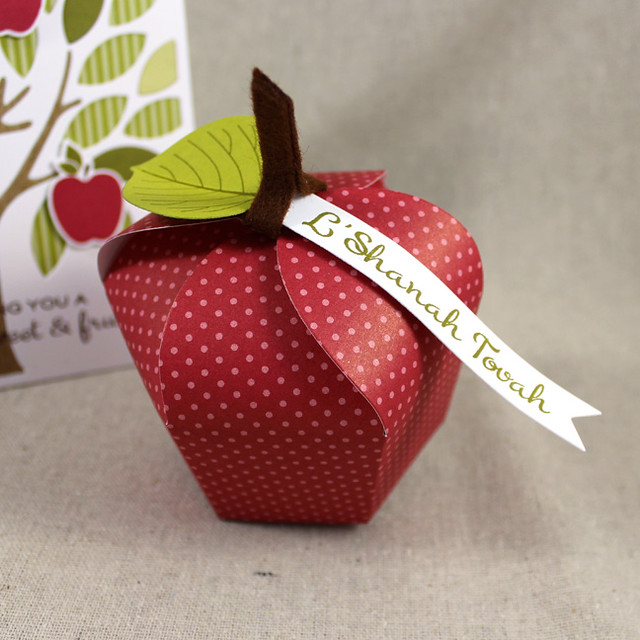
I knew I wanted to create a gift box and was hemming and hawing about which box to use when it hit me...the Favor It: Cupcake Box! Perfect!

Apple Gift Box

I began by die cutting and assembling a Favor It: Cupcake Box shape from Pure Poppy polka dot paper (if you missed the assembly video last month you can find it HERE). I created a stem from Dark Chocolate felt and embellished with a Leave It Be leaf. Then I stamped a Sketched Shapes banner with a sentiment from the set and tucked it under the stem. Wouldn't this be perfect filled with Bit-O-Honey candies?

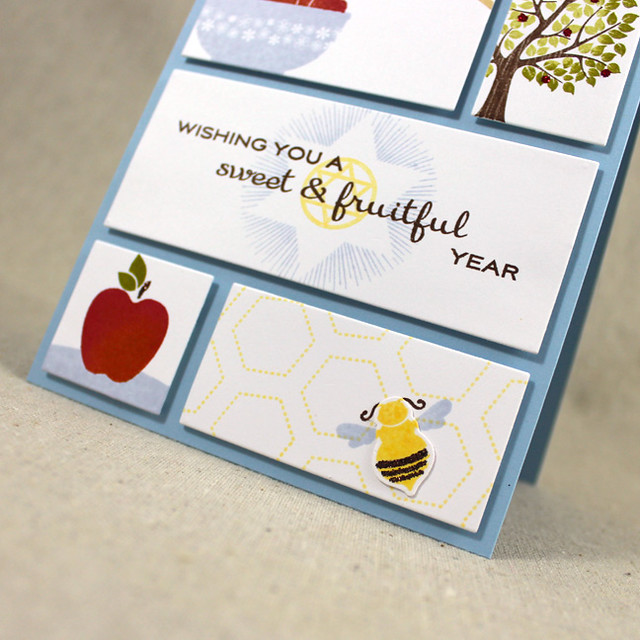
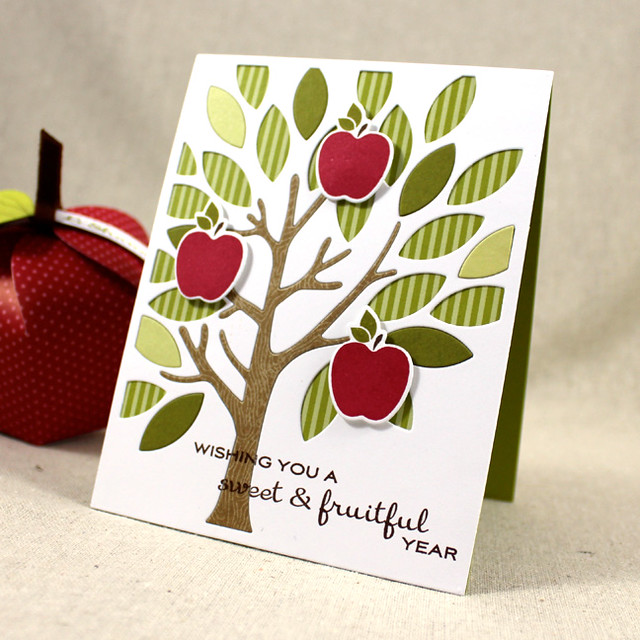
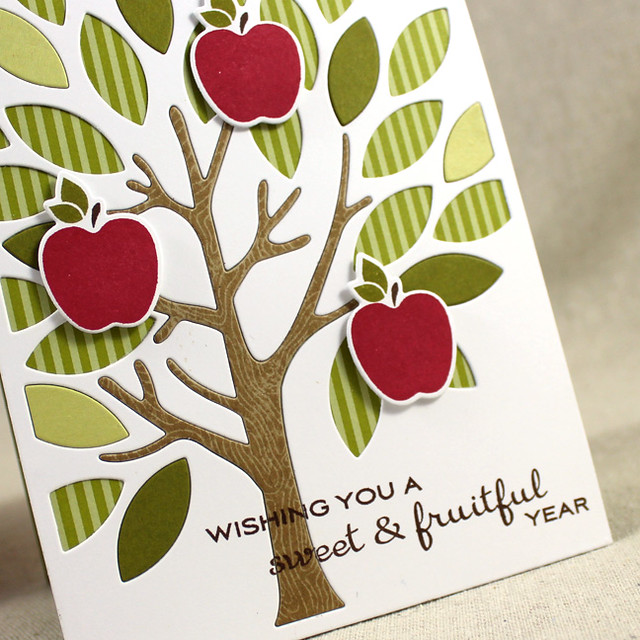
The card came together just as quickly.

Sweet & Fruitful Card

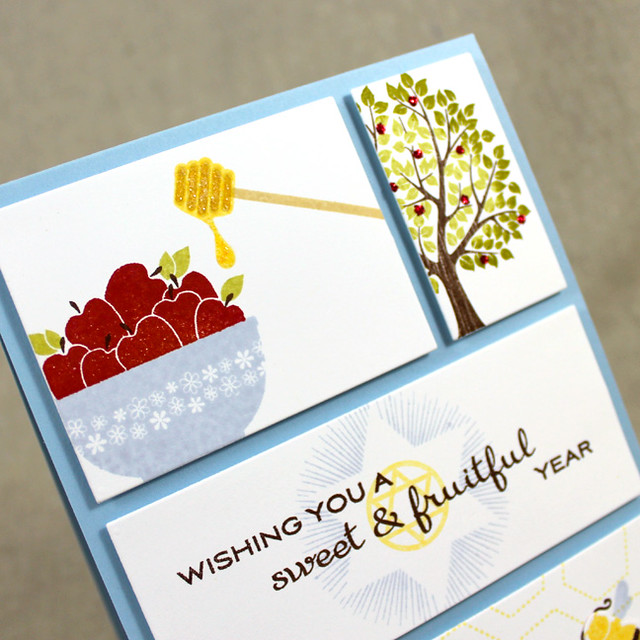
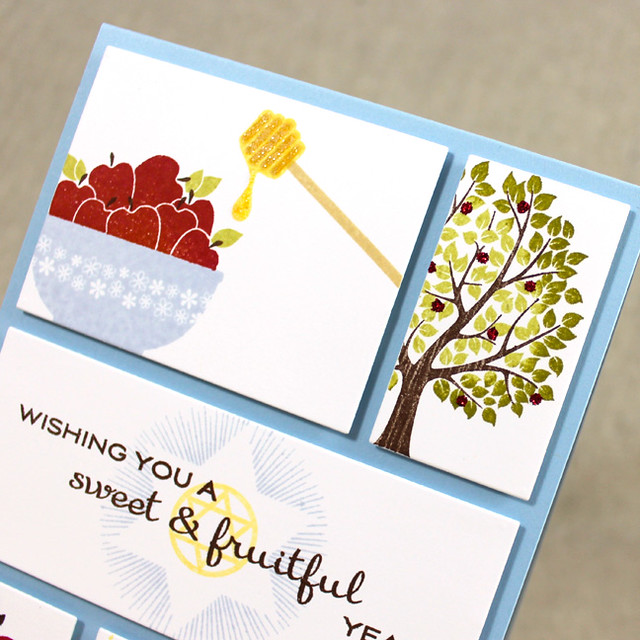
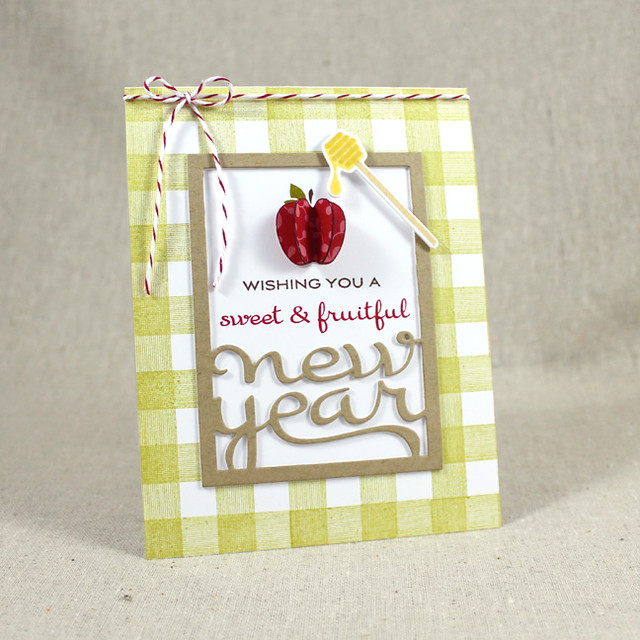
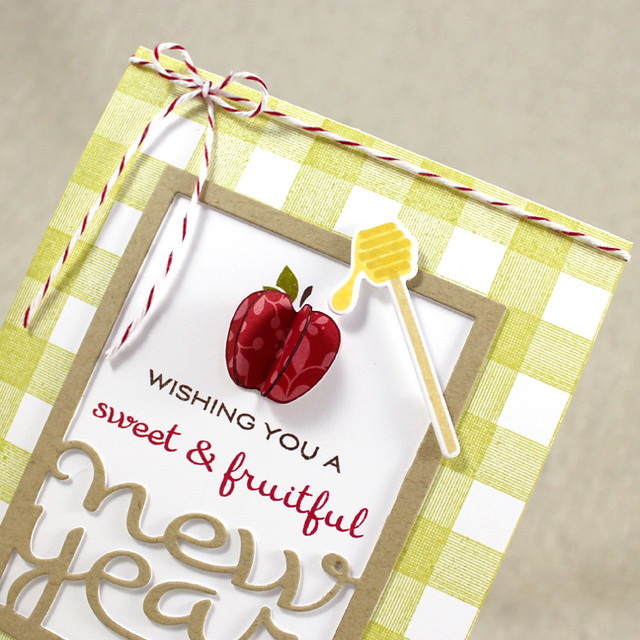
I began by die cutting the Cover Plate: Mighty Oak from white, Spring Moss, Ripe Avocado, and Kraft cardstocks. I layered the white panel over a Simply Chartreuse Striped card front and added in a few random leaves using the Ripe Avocado and Spring Moss cuts.

Sweet & Fruitful Close Up

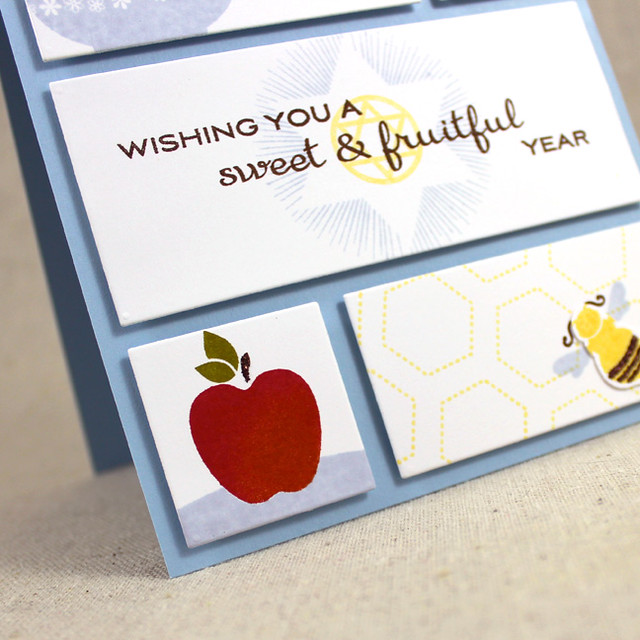
I stamped the tree trunk with the image from the coordinating stamp set using Kraft ink. I inlaid that into the white panel and then stamped the sentiment from L'Shanah Tovah in Dark Chocolate ink. Then, I die cut and stamped three of the solid apples (there's an outline version in the set as well) and adhered those to the card front using foam tape.

That's all I have for you today. Thank you so much for joining me! I'll see you back here tomorrow with more projects featuring L'Shanah Tovah. In the meantime, Nichole, Betsy, Dawn, Heather, Maile, Melissa, and Erin all have more inspiration in store. I'll see you tomorrow!

Recipes:
Rosh Hashanah Honeycomb Card
Stamps: L'Shanah Tovah (available July 15th), Ombre Builders - Papertrey Ink
Cardstock: Harvest Gold, Lemon Tart, Vellum - Papertrey Ink; white
Ink: Harvest Gold - Papertrey Ink; VersaMark - Tsukineko
Other: L'Shanah Tovah Die (available July 15th), Cover Plate: Hexagon - Papertrey Ink; Gold Detail Embossing Powder - Filigree; Foam Tape - Scotch

Apple Gift Box
Stamps: L'Shanah Tovah (available July 15th), Leave It Be - Papertrey Ink
Cardstock: Pure Poppy Polka Dot, Simply Chartreuse - Papertrey Ink; white
Ink: Ripe Avocado - Papertrey Ink
Other: Favor It: Cupcake Box Die, Dark Chocolate Felt, Sketched Shapes Die, Leave It Be Die - Papertrey Ink; Scor Tape

Sweet & Fruitful Card
Stamps: L'Shanah Tovah (available July 15th), Mighty Oak - Papertrey Ink
Cardstock: Classic Kraft, Ripe Avocado, Spring Moss, Simply Chartreuse Stripe - Papertrey Ink; white
Ink: Ripe Avocado, Dark Chocolate, Pure Poppy, Classic Kraft - Papertrey Ink
Other: L'Shanah Tovah Die (available July 15th), Mighty Oak Die Collection - Papertrey Ink; Foam Tape - Scotch

Monday, July 6, 2015

July Sneak Peek

Good morning, Friends. Just a quick little pop-in today. Nichole sneak peeked my newest stamp set over on her blog this morning, so I wanted to include that here just in case you missed it.


I'm really looking forward to sharing this stamp set. I'm not Jewish, myself, but I have friends who are and I know there are plenty of stampers who have been hoping for more products that speak to their specific needs (I'm looking at you, Merry). Hopefully this fills a void for some of you. I'll be back here in just a few days with some Rosh Hashanah inspiration. See you then!

Wednesday, July 1, 2015

July Color Play

Good morning, friends, and welcome to this month's Papertrey Ink Color Play feature! This month we're playing along with this incredibly inspiring starfish photo. I fell in love with the Limeade Ice, Tropical Teal, Aqua Mist, and Pinefeather color scheme right away. Isn't it a stunning palette?


It's so easy to overlook cooler tones in the summer, but these marine colors are just perfect for a fabulous birthday greeting. I also wanted to pair the Color Play colors with this month's hot topic, tribal textiles, so I pulled out the Southwestern Style and Stacked Statements for a bit of tribal flair.

Stacked Happy Birthday Card

I began by stamping a Tropical Teal panel with the Southwestern Style pattern using Pinefeather ink and adhered it to a Limeade Ice card base. Next, I die cut an Aqua Mist circle and trimmed off one edge before attaching a sentiment banner.

Stacked Happy Birthday Close Up

Then, I die cut and stamped the Stacked Statements image. I stamped a handful of leaves on the Aqua Mist circle before mounting the sentiment with foam tape and adhering it to the card front. I finished the card off with a few Tropical Teal flowers, also from Stacked Statements. Nice and simple.

Thank you for joining me today! Now I'm off to spend a nice day celebrating with my mister. I'm hoping there's cake in my future. Have a wonderful day!

Recipe:
Stamps: Stacked Statements, Southwestern Style - Papertrey Ink
Cardstock: Limeade Ice, Tropical Teal, Aqua Mist - Papertrey Ink; white
Ink: Limeade Ice, Tropical Teal, Pinefeather - Papertrey Ink
Other: Stacked Sentiments Die, Sketched Shapes Die - Papertrey Ink; Foam Tape - Scotch; Nesting Circle Dies - Quickutz